Table of Contents
- Why Proper Boot Break-In Makes or Breaks Your Trek
- The Cost of Skipping This Critical Step
- Our Proven Three-Phase Break-In Timeline
- Phase One: Indoor Conditioning Weeks
- Phase Two: Day Hike Testing and Adjustment
- Phase Three: Extended Trek Simulation
- Our Technical Features That Speed Up Break-In
- Essential Gear We Recommend During Break-In
- Common Break-In Mistakes We Help You Avoid
- Customizing Your Protocol for Different Trail Conditions
- How Our XPLR Pass Loyalty Members Get Extra Support
- Frequently Asked Questions (FAQ)
Why Proper Boot Break-In Makes or Breaks Your Trek
Your boots are arguably the most important piece of gear on a multi-day trek. A well-fitted boot that hasn’t been properly conditioned will create friction hot spots, pressure points, and blisters that turn a rewarding expedition into a painful ordeal. We’ve learned this lesson from thousands of trekkers who reached out after their first long-distance adventure, and the pattern is always the same: those who skipped boot preparation paid for it on day two.
Breaking in hiking boots isn’t punishment or unnecessary fuss. It’s the process of molding the leather or synthetic materials to your unique foot shape, allowing the midsole to flex naturally with your stride, and giving the insole padding time to compress and conform to your arch. When you invest time upfront, your boots transform from stiff, unforgiving gear into trusted partners that move with your body instead of against it.
The right boot break-in protocol also helps you identify fit issues before you’re 10 miles from camp. Maybe the heel slips slightly on downhills, or the toe box feels tight around your bunions. Those discoveries matter in controlled conditions, when you can adjust lacing, add insoles, or even swap boots before committing to a remote trail.
What to do next: Set aside 4-6 weeks before your planned trek to begin this three-phase process. Don’t rush it, and don’t use your multi-day trip as your breaking-in ground.
The Cost of Skipping This Critical Step
We’ve seen firsthand what happens when trekkers pull new boots out of a box and hit the trail immediately. The consequences are not minor inconveniences.
Untrained boots cause foot fatigue that accumulates aggressively over multiple days. Your feet work harder to stabilize and adapt to stiff materials, draining energy you need for elevation gain, navigation, and camp setup. By day three, that extra strain compounds, and your legs feel heavier than the terrain warrants.
Blisters are the obvious culprit, but they’re just the symptom. Friction develops where firm leather or synthetic hasn’t softened, where the insole hasn’t settled, where your foot moves slightly inside the shoe with each step. A single blister can force you to modify your gait to avoid pressure, which then strains your ankles, knees, and hips in unnatural patterns. We’ve heard from trekkers who developed plantar fasciitis mid-journey because they were compensating for discomfort in their soles.
Cold weather compounds everything. Ill-fitting boots restrict blood circulation, increasing your risk of cold toes and potentially more serious conditions in alpine terrain. A boot that’s uncomfortable when wet is exponentially worse, and moisture management depends partly on how well the boot’s materials are conditioned to flex and breathe.
Practical reality: A single blister-related injury can cut your trek short. Prevention through proper break-in takes hours of easy effort spread over weeks. The math is straightforward.
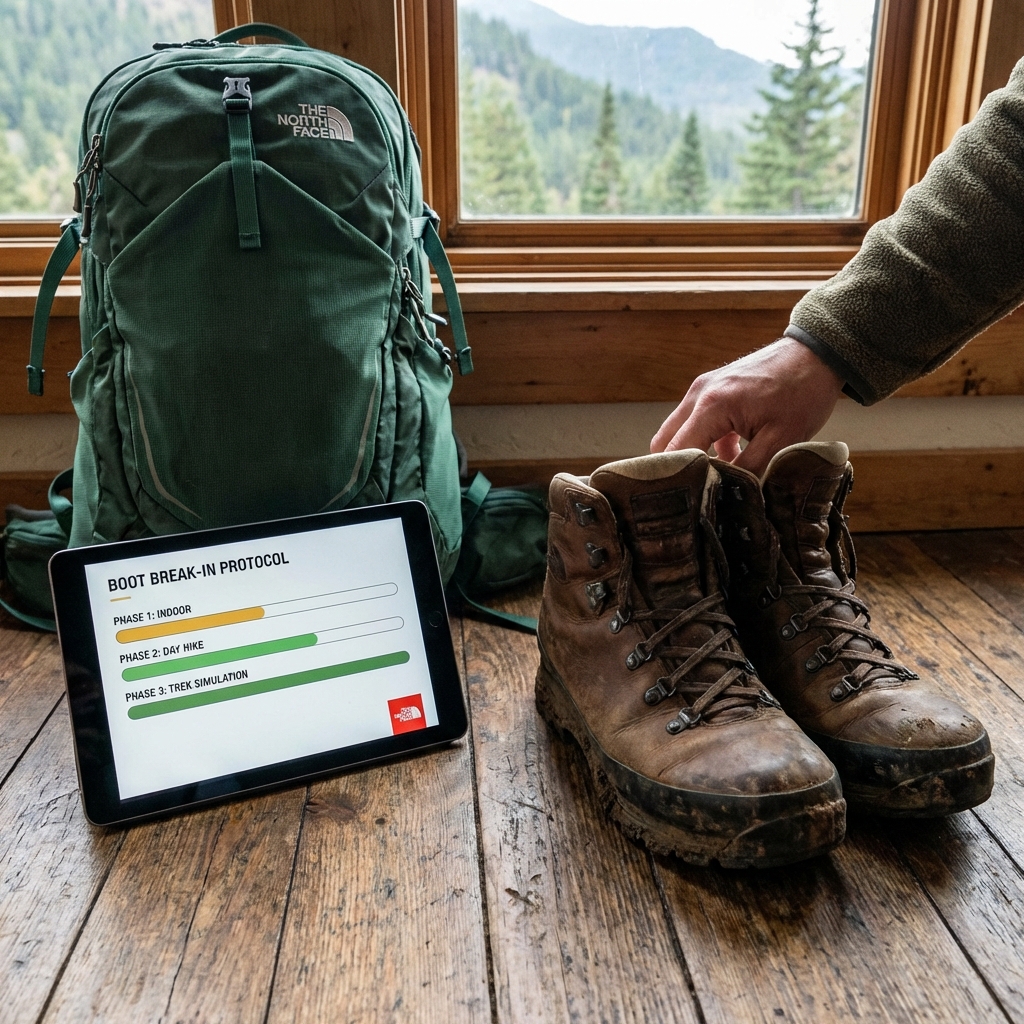
Our Proven Three-Phase Break-In Timeline
We’ve developed this framework by tracking feedback from our community and testing with our athletes across diverse climates and terrains. The three phases span 4-6 weeks and gradually expose your feet to increasing demands, allowing adaptation without injury.
Each phase builds on the previous one. Phase One conditions your boots indoors with minimal risk. Phase Two tests them in real-world conditions over manageable distances. Phase Three simulates the actual demands of your multi-day trek at a smaller scale. This progression prevents the shock of asking your feet to perform tasks they’ve never rehearsed.
Timing matters. Start this protocol 4-6 weeks before your trek departure. If you’re trekking in cold or high-altitude conditions, add an extra 1-2 weeks to account for additional layers and socks that will slightly change the fit. You’re aiming for boots that feel like extensions of your feet, not pieces of gear you’re wearing.
Phase One: Indoor Conditioning Weeks
Weeks 1-2 are all about low-risk adaptation. Wear your boots around the house for 1-2 hours daily, gradually increasing duration as they feel more natural. Start on carpet and wood floors where impact is minimal. Your job is to let the materials loosen without challenging your feet.
This is when you discover fit issues in a safe environment. Pay attention to any pinching, rubbing, or pressure points. The ball of the foot, heel, and instep are common problem areas. Light rubbing that disappears after 15 minutes is normal; persistent pressure that causes redness is a signal to adjust.
During these weeks, experiment with your sock strategy. You’ll likely wear hiking-specific merino wool or synthetic blend socks on your trek, so train in them now. Different sock thicknesses change the boot’s effective fit, so this isn’t a detail to skip. Your boots should feel snug but not constrictive; you should be able to slip a finger between your heel and the boot’s interior.
Lacing also matters significantly. A looser lace pattern across the forefoot with tighter lacing around the ankle gives you better toe box room while maintaining heel security. Conversely, tight across-the-board lacing can create pressure points and restrict blood flow. Experiment, take notes, and remember the lacing tension that feels best.
Actionable step: Keep a simple log of duration, any discomfort spots, and lacing adjustments. This record becomes invaluable if you need to troubleshoot during phase two.
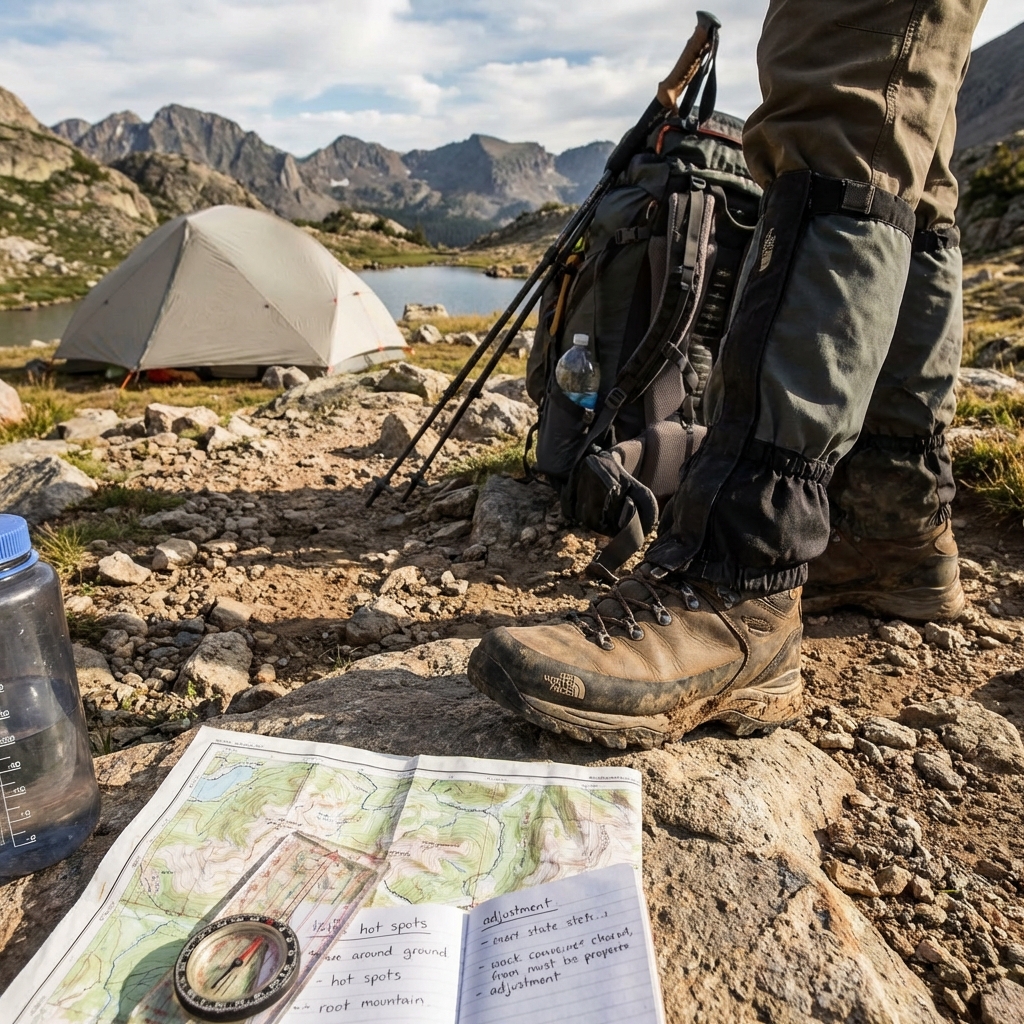
Phase Two: Day Hike Testing and Adjustment
Weeks 2-4 introduce actual terrain and movement. Start with short day hikes of 3-5 miles on well-maintained trails with minimal elevation gain. Your goal is controlled exposure to real hiking conditions while staying close enough to home to adjust or stop if needed.
Pay attention to how your boots respond to downhill sections, rocky terrain, and sustained elevation. These stresses reveal fit issues that simply walking around your home cannot. On a downhill, your foot slides forward slightly, so a heel that fits perfectly on flat ground might slip. Rocky terrain demands precise foot control, making toe box volume suddenly relevant. Elevation gain over extended distance tests your arch support and calf engagement.
After each hike, examine your feet immediately. Look for redness, blisters, or pressure marks. If you find minor rubbing that caused no actual blister, you’ve identified a spot to monitor. Apply a blister prevention patch or adjust your lacing for the next outing. If actual blisters developed, the fit needs modification: consider insoles, heel liners, or potentially different socks.
Gradually extend these hikes to 7-10 miles by week four. Introduce some elevation change and rougher terrain. Your boots should feel increasingly comfortable and supportive, not less so. If discomfort is increasing, something in your setup needs adjustment before moving to phase three.
Next checkpoint: After 4 weeks and cumulative 25-30 miles in real conditions, your boots should feel noticeably more responsive and comfortable than week one. If they don’t, troubleshoot the fit before progressing.
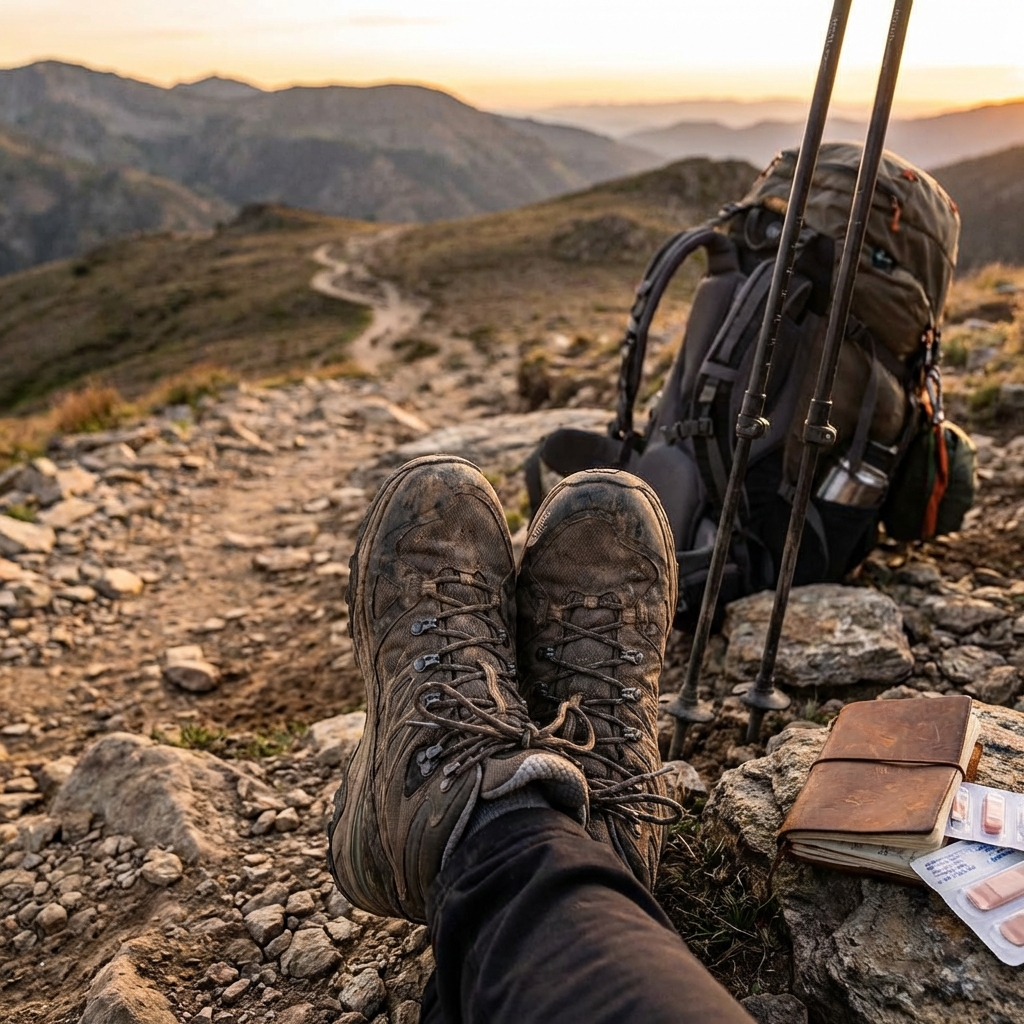
Phase Three: Extended Trek Simulation
Weeks 5-6 are your rehearsal performance. Plan an overnight or weekend backpacking trip that mimics your planned trek’s elevation, terrain, and duration as closely as possible. This is the dress rehearsal where you test everything: boots, socks, insoles, lacing, pack weight, and your body’s response to sustained hiking with a load.
An overnight trip teaches you things that day hikes cannot. You’ll discover how your feet respond to impact recovery; whether your insoles hold up to real-world duress; how your pack’s weight affects your gait and foot stress; and whether your boot choice works for camp setup, cooking, and morning stiffness.
The second day of any backpacking trip is psychologically harder and physically more demanding than the first. You’re more fatigued, and your feet are already partially stressed. This is precisely the condition you’ll face on day three of your multi-day trek. By the time you finish this practice trip blister-free and with energized feet, you know your boots are ready.
Use this trip to refine details. If you’ve been wondering whether to add an insole for arch support, test it here. If you’re uncertain about sock thickness in warmer versus cooler conditions, experience both. Document what works so you can replicate it exactly on your actual trek.
What to verify: Your boots should feel broken in but not broken down. The uppers should be flexible without being floppy. Your feet should feel supported, not tired. You should have zero blisters or concerning pressure points. If any of these aren’t true, you need more time or a different boot model.
Our Technical Features That Speed Up Break-In
We design our hiking boots and footwear with features specifically engineered to accelerate the break-in process and enhance comfort during it.
Our TPR midsoles use dual-density technology that starts firm for support but softens and becomes more responsive with wear. This means the stiff, uncomfortable feel of week one gradually transforms into a broken-in feel without requiring months of suffering. The materials don’t degrade; they simply optimize to your stride.
We incorporate padded collars and heel liners in our hiking boots to cushion the high-impact areas that cause blisters. These materials are selected for their ability to conform to your foot while maintaining structural integrity. Merino wool blend liners naturally reduce moisture and friction, addressing two major blister causes simultaneously.
Our women’s boots use differentiated last designs (the internal shape) that account for narrower heels, different arch profiles, and proportional toe box dimensions. This means women aren’t just wearing scaled-down men’s boots; they’re wearing boots engineered for women’s foot anatomy. That translates to faster, more comfortable break-in and better overall fit.
Gore-Tex membranes in our higher-performance models prevent water penetration while allowing internal moisture to escape. Wet boots feel cold and enable blisters faster than dry ones. During your break-in weeks, keeping your feet dry isn’t just comfortable; it’s a performance advantage that lets you focus on adaptation rather than fighting moisture.
Essential Gear We Recommend During Break-In
Beyond the boots themselves, specific accessories dramatically improve your break-in experience and blister prevention.
Merino wool socks are non-negotiable. Unlike cotton, which absorbs sweat and creates friction, merino wicks moisture away from your skin while naturally regulating temperature. We recommend midweight (not heavyweight) merino for three-season hiking. The cushioning is adequate without adding bulk that changes your fit, and the moisture management is superior.
Blister prevention patches go on hot spots before they become actual blisters. We favor those made with hydrocolloid technology, which maintains a moist environment that allows skin healing while reducing friction. Apply them during your break-in weeks whenever you notice minor rubbing that causes redness but not blistering. They’re your early warning system.
Insoles tailored to your arch profile can transform a marginal fit into an excellent one. Some feet need extra arch support; others need cushioning under the ball of the foot. We recommend visiting a specialty retailer for a gait analysis, which helps identify your specific needs rather than guessing. The right insole can eliminate persistent discomfort without requiring a different boot size.
Gaiters aren’t traditionally “break-in” gear, but if your trek involves rocky terrain, snow, or stream crossings, testing them now ensures they don’t create unexpected pressure points on your lower legs or ankles that throw off your overall comfort.
Investment perspective: Quality socks, insoles, and prevention patches cost $60-100 total and prevent blisters that could end your entire trek. That’s one of outdoor hiking’s clearest ROI equations.
Common Break-In Mistakes We Help You Avoid
We encounter patterns in how people approach boot preparation, and certain mistakes keep recurring.
The biggest is skipping phase one entirely and jumping straight to day hikes. Without indoor conditioning, your feet and the boots are simultaneously learning. That’s a recipe for discomfort and blisters. Worse, you can’t easily adjust or troubleshoot when you’re already 5 miles from the car. Start at home.
Another widespread error is buying boots in the afternoon when your feet are slightly swollen and then finding they’re tight in the morning. Shop for hiking boots in the late afternoon, after you’ve been on your feet for hours. Your feet will be in a more realistic state, and the fit will be accurate.
Many people also assume that pain during break-in is normal and must be endured. Some mild pressure is expected, but actual pain is your body saying the fit isn’t right. If a boot causes sharp pain, localized bruising, or blisters that aren’t minor friction marks, the fit is wrong. Don’t push through hoping it will resolve; adjust the setup or consider a different model.
Using brand new boots on a challenging terrain during phase two is another common misstep. Your first real hikes should be on well-maintained, relatively flat trails. Save the rocky, technical terrain for when your boots are already partially broken in. You’re building confidence and adaptation, not testing limits.
Finally, many trekkers break in boots without their actual backpack or with a lightweight daypack, then show up to their trek with a 40-pound load. Pack weight significantly changes how your feet, ankles, and legs experience hiking. By phase three, your simulated trek should match your planned trek’s load within a few pounds.
Customizing Your Protocol for Different Trail Conditions
The foundational three-phase approach works universally, but your specific trail’s demands warrant some customization.
For alpine or high-altitude treks, add an extra week to the timeline and introduce more elevation gain during phase two. High altitude taxes your body’s oxygen availability, and boots that feel fine at sea level might create uncomfortable pressure at 13,000 feet due to foot swelling. Alpine terrain also tends to be rocky and technical, so phase two hikes should include similar ground.
For winter or snow treks, test your boots with winter-weight socks during phase one and incorporate insulated or thicker liners if you’ll be using them. Cold constricts your feet slightly differently than warmth, and you need to understand how your chosen socks interact with your boots in those conditions. Winter hiking is also typically slower and more technical, so your phase two hikes should mimic that pace and terrain.
For desert or arid terrain, focus on dust and debris management during your testing. Gaiters become more important, and you’ll want to ensure your boots’ closures seal effectively. The hard-packed, gravelly terrain is also unforgiving on feet, so extra arch support via insoles often becomes relevant.
For tropical or wet conditions, emphasize moisture management during phase two. Wear your boots in wet conditions; don’t avoid rain. Test your drainage strategy. If your plan includes stream crossings or mud, expose your boots to similar conditions during break-in so you understand their water handling and how they feel when wet and heavy.
In all cases, the principle remains: break in your boots in conditions that approximate your planned trek.
How Our XPLR Pass Loyalty Members Get Extra Support
Our XPLR Pass community provides exclusive tools and guidance tailored to your adventures, including personalized boot break-in support.
Members gain access to our online gait analysis resources, which help you understand your foot strike pattern and identify whether you overpronate, underpronate, or have a neutral gait. That insight directly informs your insole selection and boot adjustments. We also offer virtual fittings with our specialists, who can recommend specific models and features based on your unique fit needs and planned trek terrain.
XPLR Pass members earn points on every gear purchase, including boots, socks, insoles, and prevention patches. Those points translate to future discounts, making your break-in investment more affordable. Members also get early access to new boot models and exclusive colorways, so you’re not limited to what’s currently in stock if you find your perfect fit.
Beyond gear, our community forum connects you with other XPLR Pass members who’ve completed similar treks. Their real-world break-in experiences, specific boot recommendations, and trail insights become invaluable as you prepare. We also host seasonal webinars on boot selection and foot care, exclusive to members.
If you encounter a break-in challenge like a persistent hot spot or blister pattern, our member support team can provide personalized troubleshooting, including recommendations for insoles, modifications, or alternative models. That level of individualized guidance accelerates your path to comfortable, confident trekking.
Join XPLR Pass or explore our full footwear collection to get started on your break-in journey with boots engineered for multi-day success.
Ready for your next adventure? Gear up with apparel and equipment built for the wild. Explore the collection now.
Frequently Asked Questions (FAQ)
How long should I break in my new hiking boots before a multi-day trek?
We recommend following our three-phase protocol that spans 4-6 weeks total. Phase one takes 2-3 weeks of indoor wear to let your feet adjust to the boot’s structure, phase two involves 3-4 day hikes to test real-world performance, and phase three simulates your actual trek conditions. Starting this process sooner rather than later gives us the best chance to identify any problem areas and make adjustments before you hit the trail for real.
What’s the most common break-in mistake we see trekkers make?
We consistently find that people skip phase two entirely and jump straight from wearing boots around the house to a multi-day expedition. This skips the critical feedback loop where your feet tell us what needs adjusting—whether that’s additional insole support, heel adjustments, or blister-prone spots. We always encourage at least a few day hikes first so we can dial in the fit before you commit to several days on the trail.
Can we speed up our boot break-in timeline?
We’ve designed our technical features like our cushioning systems and flexible midsoles to reduce break-in time compared to traditional boots, but we still can’t skip the phases entirely. What we can do is use quality merino wool socks and our moisture-management gear during break-in to keep your feet comfortable faster, and we recommend starting with shorter indoor sessions and gradually increasing wear time rather than wearing your new boots for 8 hours on day one.
Leave a Reply