Table of Contents
- Why Avalanche Preparedness Saves Lives in the Backcountry
- The Three Core Components of Our Essential Avalanche Kit
- Selecting the Right Avalanche Beacon for Your Adventures
- Probe and Shovel Selection for Rapid Rescue Response
- Our Technical Backpacks Built for Alpine Emergencies
- Layering and Protection Gear for Avalanche-Prone Terrain
- Mastering Companion Rescue Protocol and Search Techniques
- Training, Practice, and Real-World Preparedness Skills
- How Our Gear Integrates Into Your Complete Safety System
- Packing Your Kit for Accessibility and Efficiency in Crisis
- Maintenance and Inspection Before Every Alpine Expedition
- Join Our Community of Prepared Mountain Explorers
- Frequently Asked Questions (FAQ)
Why Avalanche Preparedness Saves Lives in the Backcountry
Every season, we hear stories from mountain communities where seconds mattered. A skier caught in sliding snow had 15 minutes of air before burial became fatal. The difference between a good outcome and tragedy often comes down to one thing: whether the buried person’s partner carried the right gear and knew how to use it.
We’ve spent decades working with mountain athletes, ski patrollers, and backcountry guides. They’ve taught us that avalanche preparedness isn’t about fear. It’s about respect and readiness. When you’re moving through avalanche terrain, you’re accepting a calculated risk. An avalanche emergency kit levels that risk by giving you and your companions the tools for rapid self-rescue.
The statistics are sobering but motivating. Buried avalanche victims have a survival rate above 90% if dug out within 15 minutes, but that drops sharply after 35 minutes. That narrow window means you can’t rely on helicopter rescue or professional teams. You and your partner are the rescue team. Your kit, your training, and your composure are what matter in those critical minutes.
Carrying an avalanche emergency kit signals intention. It says you’re serious about moving safely in avalanche terrain, that you’ve done the homework, and that you respect the mountains enough to prepare for worst-case scenarios.
The Three Core Components of Our Essential Avalanche Kit
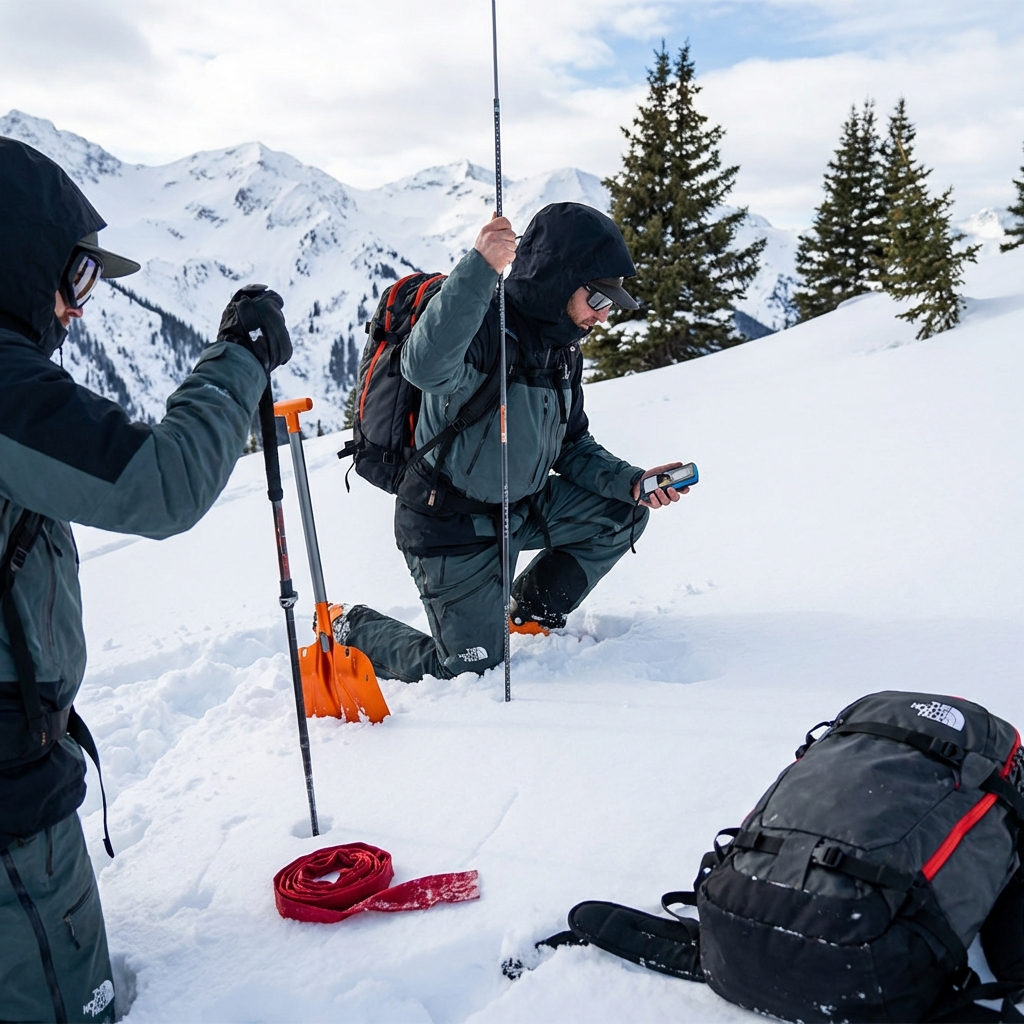
An avalanche emergency kit has three non-negotiable pieces: a beacon, a probe, and a shovel. Each serves a specific function in the rescue sequence, and each demands your attention and training.
The beacon is your search tool. It transmits your location if you’re buried and switches to receive mode so your partner can locate you. A modern avalanche beacon can narrow a burial location from hundreds of square meters down to precise coordinates in minutes. Without it, rescue becomes guesswork in moving snow.
The probe is your pinpointing tool. Once your beacon has guided your partner to the general burial area, a probe lets them confirm the victim’s exact depth and location. You can be inches away from a buried person and never find them without a probe. It’s essentially a long, rigid needle that lets you check beneath the surface systematically.
The shovel is your extrication tool. Avalanche shovels are engineered differently from snow tools you might carry for camp work. They’re lighter, have a larger blade area, and attach quickly to minimize exertion. The person digging needs to move snow efficiently because fatigue happens fast when you’re working in panic mode and heavy snow.
All three work as a system. Beacon locates. Probe confirms. Shovel extracts. Missing any one of them means the rescue stalls or fails entirely.
Selecting the Right Avalanche Beacon for Your Adventures
Choosing a beacon means understanding the technology and matching it to your needs. We recommend digital three-antenna beacons for most backcountry users because they offer intuitive search patterns and faster pinpointing than older analog models.
Look for beacons with a range of at least 50 meters in transmit mode and similar range in receive mode. Test the range in your local conditions before heading into serious terrain. Snow density, mineral content, and temperature all affect signal propagation, so what works at sea level might behave differently at 10,000 feet.
Consider weight and size. A beacon you’ll actually wear is better than the lightest model you leave at home. You’ll spend 99.9% of your trips not needing it, so comfort matters for compliance. Many modern beacons weigh less than 200 grams and fit easily under a jacket with an antenna fully extended.
Battery life is critical. Check your beacon’s battery status before every expedition. Alkaline batteries lose charge faster in cold, so if you’re planning a multi-day expedition in winter, consider lithium alternatives. Some modern beacons now feature rechargeable options, though traditional batteries remain the standard for reliability in the backcountry.
Practice mode is your friend. Most beacons have a burial practice function that lets you train without switching between transmit and receive manually. Spend 30 minutes monthly running drills so that operating your beacon becomes muscle memory, not conscious effort.
Probe and Shovel Selection for Rapid Rescue Response

A quality probe collapses to pocket size but extends to 240-320 centimeters. We favor probes with rigid segments because they resist bending under pressure, which speeds up the depth check. Some newer designs have markings at 25-centimeter intervals, letting rescuers call out burial depth while others are probing nearby.
Shovel blade area matters more than many people realize. A 25-centimeter-wide blade removes snow roughly 40% faster than a 20-centimeter blade, and that efficiency compounds over minutes. Weight is secondary to speed. You want a shovel around 500-600 grams that can move volume, not a featherweight model that requires extra strokes.
Handle design affects fatigue. Shovels with ergonomic handles that curve slightly and provide good grip reduce hand and wrist strain. If you’re digging, you’re working hard and moving fast. A handle that feels right in your gloved hand is worth the slight weight trade-off.
Many of us pair a shovel with a lightweight aluminum frame or folding stool design. Some shovels convert from digging mode to a scoop-and-throw stance that engages different muscle groups and reduces shoulder fatigue on longer extractions. Test your shovel in summer corn snow before relying on it in February powder.
Probe and shovel should nest or attach to your backpack exterior or pack into a dedicated pocket for instant access. If they’re buried in your main compartment, you’ve lost precious minutes.
Our Technical Backpacks Built for Alpine Emergencies
Your backpack is the platform for carrying your entire avalanche kit, which means it needs to balance capacity, access, and durability. We design our alpine packs around the principle of accessible emergency gear. That means exterior pockets sized for shovel and probe attachment, internal organization that keeps your beacon close to your chest, and a hip belt that distributes weight when you’re moving uphill in deep snow.
The Summit AMK 55L Backpack is purpose-built for this work. It features a dedicated shovel pocket, beacon loop, and probe attachment points. The pack’s 55-liter capacity holds your safety kit, emergency supplies, and route-finding tools without forcing you to leave the house unprepared.
Look for packs with snow flaps that cover zippers and prevent powder from jamming them. Reinforced base panels protect against sharp terrain and rocks hidden under snow. Internal compression straps keep your load stable on steep slopes, which matters when you’re climbing in avalanche terrain and need to move with control and balance.
Fit is personal. A pack that sits well on your frame distributes weight to your hips and legs, where your strong muscles carry the load. Ill-fitting packs pull on your shoulders and exhaust you faster. Visit a retailer who specializes in outdoor gear and get properly fitted if you’re spending serious time in the alpine.
Layering and Protection Gear for Avalanche-Prone Terrain
Avalanche terrain often means cold, windy, high-altitude exposure. Your layering system needs to keep you warm and dry through activity, which means managing sweat while staying protected against wind and wet.
Start with a technical base layer that moves moisture away from your skin. We recommend synthetic or merino wool, not cotton. Cotton absorbs sweat and stays wet against your body. If you get buried and then extricated, wet clothing against your skin accelerates hypothermia. A quality base layer wicks moisture and dries fast.
Your mid-layer adds insulation. We favor lighter insulation like fleece for sustained aerobic activity in avalanche terrain because you’re working hard climbing up and searching for victims. Down or synthetic puffy jackets add more insulation but can trap moisture if you’re exerting heavily. Keep your puffy accessible in your pack and layer it on during rest or descent.
Your shell is your defense against wind and snow. Look for a technical shell that blocks wind completely but breathes enough to let moisture escape. Many of our shells use Gore-Tex or similar membranes that let water vapor pass while blocking liquid water. Sealed seams mean water can’t sneak through stitching. Your shell should have a helmet-compatible hood and pockets large enough for a gloved hand.
Hands and feet deserve attention. Insulated gloves that let you manipulate your beacon and probe are non-negotiable. We offer trigger-finger designs and convertible mittens that expose fingertips when you need dexterity. Gaiters seal the gap between your boots and pants, preventing snow from loading into your boots and melting against your feet.
Mastering Companion Rescue Protocol and Search Techniques
When your partner stops moving and doesn’t respond, your first action is to mark their last seen point with a ski pole, piece of clothing, or even your own pack. That marker becomes your reference point for search pattern. Then you transition your beacon to receive mode.
The search pattern most rescuers use is called a “hasty search.” You move downslope along the fracture line in a grid pattern, scanning with your beacon. When your beacon’s range indicator shows you’re getting closer, you narrow your search by moving in tighter passes. Modern digital beacons display distance and direction, which beats older analog models that required more experience to interpret.
Once your beacon range drops to a few meters, switch to probe work. Start probing in a tight pattern. Many rescuers use a spiral or grid system radiating from the point where their beacon signal is strongest. Mark each probe location with a stick or gloved hand so you don’t probe the same spot twice. This is methodical work, not panic. Speed comes from not wasting effort.
When your probe finds a body, radio for help if you have communication. Then position yourself at the head if possible so you can watch for the buried person’s face and mouth as you excavate. Extricate from the head down, which gives you the best view of the burial and lets you clear the airway first.
Two rescuers are far more effective than one. Your partner shouldn’t dig alone while you probe. Most organized companion rescue involves one person coordinating and probing while the other digs aggressively. After 15-20 minutes of hard digging, you may switch roles because fatigue degrades both speed and safety.
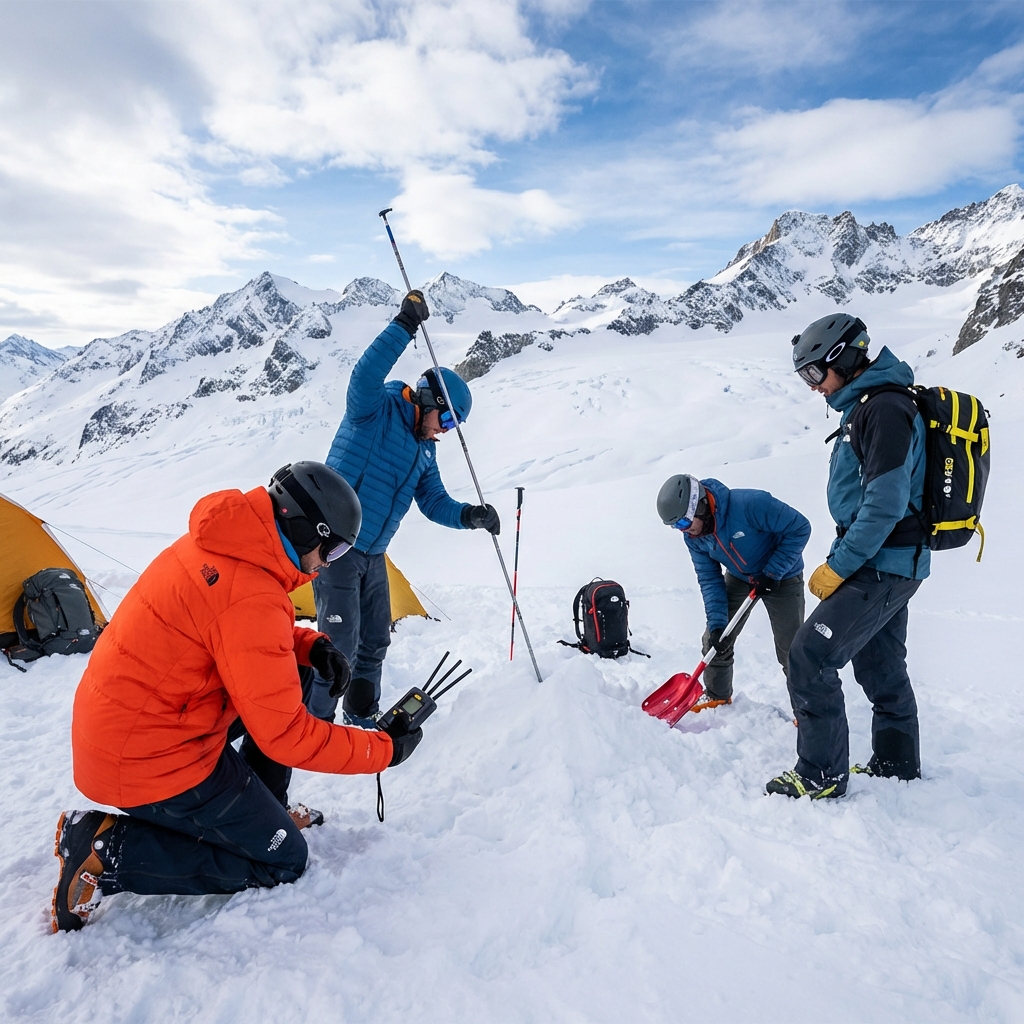
Training, Practice, and Real-World Preparedness Skills
Reading this article prepares your mind, but your hands and nervous system need experience. We strongly recommend formal avalanche rescue training from an established school or guide service. The American Avalanche Association certifies instructors, and most offer weekend level-one courses that teach beacon operation, probe work, shovel technique, and rescue scenarios.
Practice at least once a season, ideally twice. Set up a burial practice course where a friend hides a beacon at a known depth under four feet of snow. Then run a rescue scenario as if it were real. Time yourself. See how fast you can locate, probe, and start excavating.
Scenario drills build competence and confidence. If you practice only with perfect conditions and your beacon on full power, you’ll panic the first time you search in a storm with weak signal. Train in wind. Train with cold, numb fingers. Train when you’re already tired from climbing.
Video record yourself running drills. Watch how your technique changes when fatigue sets in. Many rescuers develop bad habits like inefficient probe patterns or shovel techniques that waste energy. Seeing yourself work is humbling and instructive.
Take care in steep gullies and narrow couloirs. These terrain features funnel snow and create compression zones where burial is deeper and extrication harder. Know the avalanche terrain in your region and understand which slopes and times of year carry highest risk. Local guides and ski patrollers are invaluable sources of terrain knowledge.
How Our Gear Integrates Into Your Complete Safety System
Your avalanche kit is one layer of your complete safety approach. It works best alongside other tools and practices: a lightweight communication device, a navigation system, a first aid kit, and insulation for emergencies.
We design our technical gear to integrate seamlessly. Your beacon sits close to your chest in an accessible pocket so it stays warm and responsive. Your shell has beacon loop attachments that keep your antenna oriented correctly during travel. Your backpack’s exterior organization means your shovel and probe don’t interfere with your climbing or skiing motion.
Consider adding a personal locator beacon (PLB) or satellite communicator if you’re traveling in remote terrain. These devices can summon professional rescue if your companion rescue fails or if you’re injured and immobilized. A PLB doesn’t replace your avalanche kit; it backs it up.
Carry a small first aid kit that includes CPR barriers, tourniquets, and bandages. Avalanche rescue often ends with an injured person who may need immediate first aid before you can move them to professional care. Hypothermia is your primary concern, so insulating materials and a space blanket weigh little and matter tremendously.
Navigation redundancy is essential. Carry a map and compass alongside your GPS device. In white-out conditions, technology fails. A compass and map never need batteries.
Packing Your Kit for Accessibility and Efficiency in Crisis
Organization during normal conditions saves critical seconds during emergencies. We recommend a standard packing approach that every partner knows. When you’re searching under stress, muscle memory beats conscious thought.
Your beacon lives in a dedicated beacon harness or chest pocket where it stays warm and accessible. It should never go into your pack where it would take five seconds to extract. Many avalanche educators practice removing and turning on a beacon in under three seconds. That speed only comes from consistent positioning and practice.
Your probe and shovel attach or nest on your pack exterior. They should be removable without removing your entire pack or opening zippers. Some rescuers velcro their probe and shovel attachments so they can pull them free one-handed while keeping their other hand free for balance or communication.
Your second shovel (if you’re traveling as a pair) rides with your partner in their pack. You each carry your own beacon, and together you carry enough shovels for quick, coordinated digging. Never rely on a single shovel for two-person rescue.
Spare batteries, a small repair kit for your beacon, and a whistle fit into a small waterproof pouch that lives in your pack’s lid pocket. These backup items weigh little and have saved lives when radios fail or visibility prevents visual location.
Your route plan and emergency contacts should be written down, not just remembered. Leave this information with someone who will follow protocol if you don’t check in. A detailed plan including your intended route, turnaround time, and emergency contact numbers takes five minutes to write and could be the difference between a 20-minute rescue and a full search-and-rescue response.
Maintenance and Inspection Before Every Alpine Expedition
Your beacon batteries deserve particular attention. Check voltage before every trip. Cold drains batteries faster, so what reads fine at home might fail at 11,000 feet in February. Carry spares.
Probe and shovel function checks are quick. Extend your probe fully and look for cracks or bending in any segment. Collapse and re-extend it to confirm smooth operation. Your shovel blade should have no rust, and the attachment point should be secure. A loose shovel head is useless when you’re digging under pressure.
Antenna checks matter more than many people realize. Your beacon’s antenna should extend fully without sticking. A kinked or damaged antenna dramatically reduces range. Keep your antenna in a protective sheath until you’re in the field.
Seam inspection on your shell and base layers takes 30 seconds. Look for separation or leaking at high-stress points like shoulder seams and armpit gussets. Wet gear during a rescue attempt is a safety hazard.
Glove and gaiter inspection ensures no tears or loose stitching. A small tear in a glove that you ignore now becomes a frostbite risk when you’re digging in minus-10 conditions.
Create a pre-trip checklist and follow it consistently. We recommend photographing your completed kit so you have a visual reference. When you’re packing in low light or bad weather, a photo of your organized kit prevents leaving critical items behind.
Join Our Community of Prepared Mountain Explorers
We build our products for people like you, people who respect mountains enough to prepare thoroughly and train honestly. When you invest in a quality avalanche emergency kit and the training to use it, you’re joining thousands of backcountry travelers who move through avalanche terrain responsibly.
Our XPLR Pass loyalty program rewards you for building your complete alpine system. Each purchase toward your avalanche kit, layering system, and technical backpack earns you points toward future gear. Over time, you build a truly integrated system that performs together.
Most importantly, find partners who share your commitment to preparedness. Avalanche rescue is a partner activity. The person most likely to save your life is the person skiing or climbing next to you. Train together. Practice together. Share the same standard of readiness.
The mountains don’t care about your intentions. They respond to preparation, practice, and respect. An avalanche emergency kit is your commitment to all three. Carry it with confidence, maintain it with discipline, and never stop learning.
Your next step is simple: audit your current kit against the three core components we’ve outlined. If something is missing or outdated, replace it this season. Schedule a companion rescue training course. Then get out there and move confidently through terrain you’ve trained for, with partners you trust and gear that’s earned its place in your pack.
Ready for your next adventure? Gear up with apparel and equipment built for the wild. Explore the collection now.
Frequently Asked Questions (FAQ)
What’s included in our avalanche emergency kit?
Our essential avalanche kit contains three core components: an avalanche beacon for locating buried companions, a probe for pinpointing victims under snow, and a shovel for rapid excavation. We also recommend pairing these tools with our technical backpacks designed for alpine terrain, along with layering and protection gear suited for avalanche-prone conditions. The specific items you choose depend on your experience level and the terrain you’re exploring.
How do we recommend organizing our kit for quick access during an emergency?
We design our alpine backpacks with accessibility in mind, positioning your beacon, probe, and shovel where you can reach them within seconds without removing other gear. We suggest keeping your beacon on the outside of your pack or worn on your chest harness, your probe in an easily accessible side pocket, and your shovel secured where it won’t shift during movement. During emergencies, every second counts, so we emphasize practicing your packing system before heading into the backcountry.
Do we offer training resources to help us use this equipment effectively?
While our guide covers companion rescue protocol and search techniques, we strongly encourage you to take in-person avalanche safety courses from certified instructors in your region. We believe hands-on training combined with regular practice is essential before you rely on any emergency kit in real conditions. Our gear supports your safety efforts, but proper training and preparedness skills are what ultimately save lives in the mountains.
Leave a Reply