Table of Contents
- Why Your Waterproof Shell Isn't Keeping You Dry
- Understanding How Our Shells Actually Work
- The Most Common Places Shells Fail
- Step-by-Step Leak Detection Techniques
- How We Design Our Shells to Prevent Failures
- Seam-Sealed Construction: Our Standard Advantage
- The Role of Membrane Technology in Our Designs
- Quick Field Fixes When You're Out There
- Professional Repair Options We Recommend
- Maintaining Your Shell for Long-Term Performance
- When It's Time to Upgrade to Newer Technology
- Frequently Asked Questions (FAQ)
Why Your Waterproof Shell Isn’t Keeping You Dry
You’re mid-ridge on a storm descent, and suddenly there’s water trickling down your ribs. Your shell promised waterproof protection, so what gives? The answer usually isn’t that the material itself failed—it’s that one of several vulnerable points in the jacket’s construction or maintenance broke down under real-world stress.
We’ve studied failure patterns across thousands of shells returned for repair and learned that most leaks stem from preventable issues rather than material defects. A compromised seam, worn coating, or overlooked maintenance gap can transform reliable gear into a liability. The good news: understanding what fails and why lets you catch problems early and extend your shell’s life significantly.
Most leakers we see fall into three camps: construction issues from day one, deterioration from use and weather exposure, and damage from improper care. Identifying which category your shell belongs to determines whether you’re looking at a field fix, professional repair, or a upgrade path.
Understanding How Our Shells Actually Work
Our shells use a three-layer defense system to keep you dry while letting moisture escape. The outer fabric (usually nylon or polyester) sheds water. The middle membrane—typically Gore-Tex or similar technology—blocks liquid water but allows water vapor through. The inner lining protects that critical membrane from sweat, body oils, and abrasion.
This layering only works when all three components stay bonded and intact. Think of it like a roof: a missing shingle matters less than a failed seal at the corner where water funnels inward. In our shells, seams are those vulnerable corners. Every stitch creates a potential entry point if not properly sealed.
Breathability depends on this membrane staying unobstructed and active. When you clog the membrane with sweat buildup or damage the outer layer, it can no longer release moisture effectively. You end up soaked from the inside—a problem that feels identical to a leak from the outside, but requires a completely different fix.
The Most Common Places Shells Fail
Seams are the obvious culprit, but they’re just the beginning. We’ve identified predictable weak points across our product line and others we’ve tested:
- Pit zips and underarm vents: High-friction zones that flex constantly, breaking seals and creating gaps where water pools
- Shoulder seams: Backpack straps apply directional force that stresses tape and stitching
- Zipper runs: Zippers channel water if the waterproof flap deteriorates or if stitching pulls the tape away
- Pocket corners: Stress points where seams terminate; they’re easy to overlook during maintenance
- Membrane pinholes: Tiny punctures from sharp brush, rock, or ice that look invisible but leak steadily
We’ve also observed that shells fail faster in high-movement activity zones. A climbing shell takes different stress than a winter insulated parka, which is why we engineer our shells with activity-specific reinforcement. Your hiking shell might handle ten seasons of trail use; a climbing shell used for scrambling and exposed movement might show seam degradation in three to four seasons of regular use.
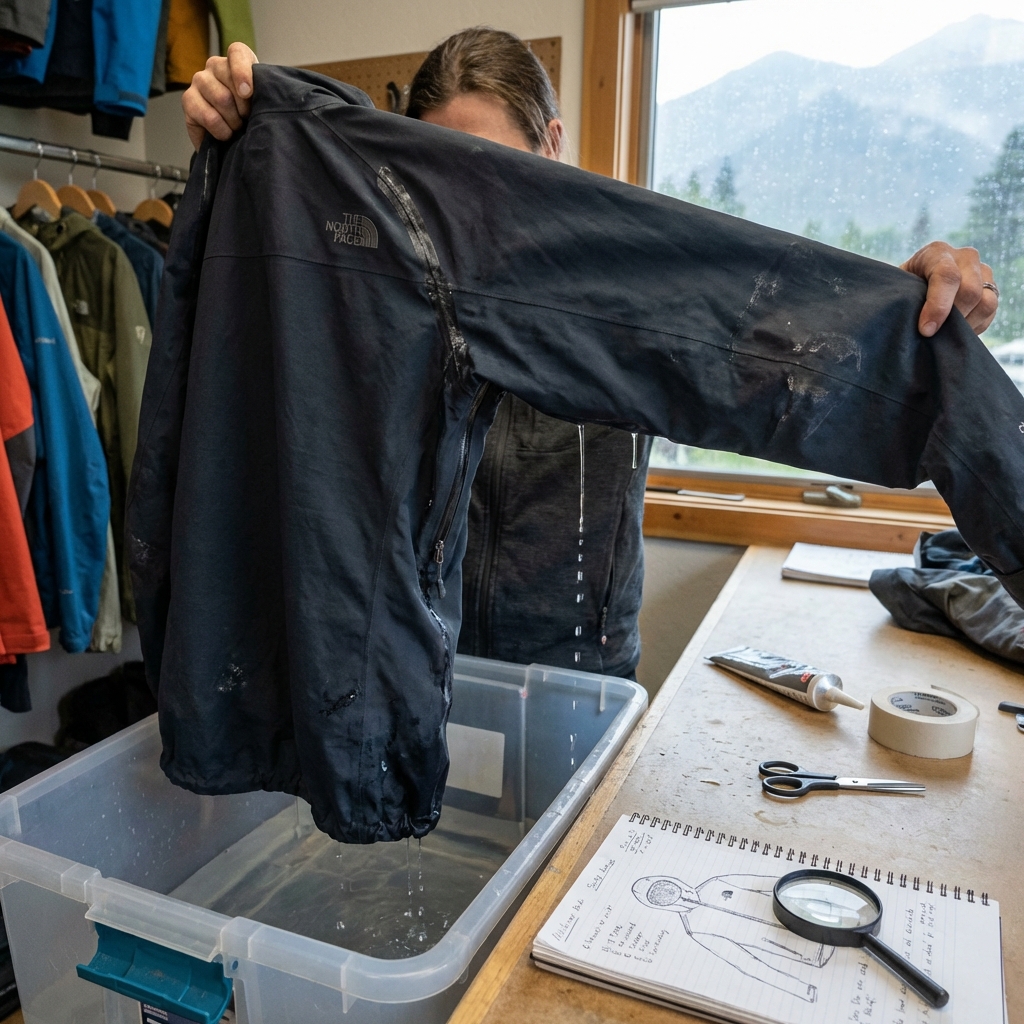
Step-by-Step Leak Detection Techniques
Diagnosing where water enters is half the battle. Start indoors with simple water tests:
The bathtub method: Fill your shell with water inside the tub and watch for drips on the outside. This works for pinhole leaks and major seam failures but won’t catch slow, intermittent leaks. Move the fabric around, flex seams, and check pit zips open and closed.

The spray test: Use a hose or spray bottle with a friend helping. Have them spray one section while you’re inside with your hands tracing seams. This reveals exactly where water traces a path inward. It’s slower but more precise than the tub method.
The light test: Hang your shell in a dark room and shine a flashlight from the inside, looking for light leaking through (indicating pinholes). This only catches holes that go all the way through, but it’s fast and free.
Once you narrow down a suspect zone, examine it closely under good light. Look for stitching separating from the seam tape, visible cracks in the membrane beneath, or zipper tape peeling. Feel the seams for hard spots (where tape is intact) and soft, flexible spots (where it’s failing).
Check your pit zip and zipper flaps next, since these move constantly. Flex them while observing for gaps. Then dry the shell completely and look at the lining for stains or discoloration around suspected areas—these mark where water has been traveling.
How We Design Our Shells to Prevent Failures
Our engineering team starts with a simple principle: every seam gets sealed, and every zip gets a waterproof flap. We don’t treat these as nice-to-haves; they’re non-negotiable.
On our higher-end shells, we use wider, more robust seam tape and stitch through all three layers simultaneously, creating a mechanical lock that prevents tape from ever separating. Our standard shells use sealed seams as the baseline, then add reinforced stress points at pit zips, shoulders, and the back where packs sit.
We also test shells in conditions you’ll actually encounter: rain while moving, rain while wet and compressed in a pack, and rain followed by intense sun exposure. We’ve learned that UV damage degrades seam tape over time, which is why we use UV-resistant formulations in our tape. Similarly, flex testing ensures that movement and pressure don’t break seals—a concern most brands underestimate.
One thing we’ve changed over time: we’re more conservative with pocket placement. Some of our earlier designs had pockets that looked good but created complex seam geometries that were hard to seal properly. Our recent releases consolidate pockets and minimize seam count without sacrificing function. Fewer seams mean fewer potential leak points.
Seam-Sealed Construction: Our Standard Advantage
Every shell we make leaves our factories with taped seams. This isn’t a premium feature; it’s foundational. We apply tape to seams before the lining goes in, then again after assembly. This double-seal approach means even if outer tape degrades, the inner seal can still protect you for a time.
The quality of that tape matters enormously. We use polyurethane tape that flexes with the fabric rather than cracking as temperatures change. Cheaper alternatives use rigid adhesive that becomes brittle in cold and separates when you flex the seam. When you’re comparing shells, run your fingers along seams and feel for flexibility and adhesion. Tape should be smooth and firmly bonded, with no curling edges or hard creases.
We also extend tape beyond where the actual stitching ends. This creates a water-shedding zone that catches moisture trying to migrate along the thread itself. It’s a small detail, but it’s the difference between a seam that lasts five years and one that starts leaking in two.
If your shell’s seam tape is peeling or curling at edges, that’s your first repair target. In the field, we use adhesive-backed waterproof tape (we carry this in our repair kits). At home, professional resealing involves removing the failed tape and applying fresh, professional-grade seam sealer. Most of our retail locations offer this service, and we can also handle it through our warranty program if your shell qualifies.
The Role of Membrane Technology in Our Designs
The membrane is your shell’s MVP. Ours are mostly Gore-Tex products, which use expanded polytetrafluoroethylene (ePTFE)—a material with billions of tiny pores. Those pores are small enough to block water droplets but large enough for water vapor molecules to pass through. It’s the engineering that makes breathable waterproofing possible.
What damages a membrane? Physical punctures, obviously. But also chemical degradation from salt sweat, sunscreen, or insect repellent; and clogging from body oils and dirt buildup. The membrane itself might be fine, but if the outer layer is compromised—scratched, abraded, or waterproof coating worn away—water saturates the outer fabric and backs up against the membrane, overwhelming it.
This is why we insist on gentle washing and regular maintenance. Harsh detergents and high heat can degrade the membrane’s finish and reduce breathability. We recommend lukewarm water, mild soap, and air drying. It takes longer, but it preserves the membrane’s function for years longer.

One advantage we’ve built into our recent designs: we use membranes with enhanced durability coatings. These resist scuffing and salt degradation better than standard Gore-Tex. If you’re buying a new shell today, this is worth asking about. The investment in a more durable membrane pays off over the shell’s lifetime.
Quick Field Fixes When You’re Out There
You’re soaked, you’re cold, and you need to stop the leak now. Here’s what actually works in the field:
Waterproof tape: Carry a small roll of Seam Seal tape or equivalent. Dry the area as best you can, then apply tape over the leak. It won’t last forever, but it’ll get you through the day and the next morning. Press hard and work out air bubbles.
Zipper slider lubricant: If your zipper leak comes from the slider itself, apply dry lubricant (silicon-based, not water-based). Work the slider up and down to distribute it. This reduces the gap where water enters.
Pit zip adjustment: If your pit zip is leaking where the fabric meets the slider, sometimes tightening the stitching by flexing the zip repeatedly can reseat the tape temporarily. This is a Hail Mary, but we’ve seen it work.
Sweatband adjustment: If breathability is the problem (you’re soaked from inside), repositioning your backpack straps or adjusting your layers can improve airflow and reduce condensation. It’s not a fix, but it buys time.
The reality: field fixes are temporary. Plan to get professional repairs done at your earliest opportunity. Carrying seam seal tape and knowing these tricks keeps you from being stranded, but they don’t solve the underlying issue.
Professional Repair Options We Recommend
We handle shell repairs at our service centers through our Gear Repair program. This includes full seam resealing, zipper replacement, and membrane patching for holes. We assess your shell’s condition and give you honest feedback about whether repair or replacement makes sense.
For seam leaks, our techs remove the failed tape and apply professional-grade sealer designed for the specific membrane in your shell. This typically takes two to three weeks and costs between $40 and $100 depending on the extent of work.
Zipper replacement is more involved—we source matched hardware and rebuild the zipper run entirely. This runs $75 to $150 but essentially gives you a new closure system.
Membrane patches for small punctures cost $20 to $40. We use adhesive patches from inside, which means the repair is invisible and doesn’t interrupt the outer surface where it might snag on branches.
Beyond our in-house service, most outdoor retailers and local repair shops can handle seam resealing using standard polyurethane tape. If you’re in a remote area, this is your option. Just make sure they’re using waterproof seam sealer, not general adhesive.
We also recommend exploring our Resale Program if your shell has reached the end of its useful life. We refurbish returned gear and sell it at a discount, which gives you an exit path while helping another explorer get reliable equipment at lower cost.
Maintaining Your Shell for Long-Term Performance
Treat your shell like the technical tool it is. After every wet trip, air-dry it completely before storing. Moisture trapped inside promotes mildew and degrades the membrane. Hang it in a shaded area with good airflow; direct sun can degrade seam tape over time.
Wash your shell every six months or after extensive use in salty, sweaty conditions. Use cool water, mild soap (we recommend products designed for technical gear), and gentle agitation. Avoid fabric softeners and harsh detergents, which clog the membrane. Rinse thoroughly and air-dry completely.
Inspect seams and zippers seasonally. Look for curling tape edges, discolored spots, or separated stitching. Catching these early means a small repair rather than a shell-wide resealing later.
Store your shell loosely in a cool, dry place. Don’t hang it on a coat hook for months—it stretches the shoulders and stresses seams. Fold it or lay it flat. Keep it away from direct sunlight and heat sources.
Avoid prolonged contact with high-intensity heat (car seats in summer, heaters during storage prep). Heat degrades seam tape adhesive and can damage the membrane coating.
When It’s Time to Upgrade to Newer Technology
Shells don’t fail suddenly in most cases—they degrade gradually. If your five-year-old shell needs frequent resealing, is noticeably less breathable, or requires field repairs to stay functional, an upgrade might be smarter than continued patching.
Our current membrane technology is more durable, more breathable, and more resistant to damage than shells from just three years ago. Our newer puffer shells also use hybrid constructions that combine insulation with waterproof panels, eliminating the need for a separate insulated layer. These represent genuine performance leaps, not just marketing.
Cost-wise, if repair expenses approach 60% of a new shell’s price, replacement becomes the better choice. A $300 shell that needs $180 in repairs might not be worth fixing. A $120 shell that needs $40 in seam resealing absolutely is.
We’re also moving toward more sustainable materials. Our recent shells use recycled nylon and environmentally responsible membrane technology. If durability and lower environmental impact matter to you, this is a good time to check out what we’ve released this season.
When you’re ready to replace an old shell, we offer trade-in credit toward new purchases through our XPLR Pass loyalty program. This gives your old gear a second life while helping you upgrade to current technology at a discount.
What to do next: Inspect your shell this weekend. Run the light test, check seams under magnification, and assess whether you’re looking at a maintenance issue or a structural failure. Carry our seam seal tape kit on your next trip as insurance. Schedule a professional inspection at a service center if you’re unsure, or reach out to us directly—we’re happy to help you make the right call about repair versus replacement.
Ready for your next adventure? Gear up with apparel and equipment built for the wild. Explore the collection now.
Frequently Asked Questions (FAQ)
How can I tell if my North Face shell jacket actually has a leak or if it’s just condensation?
We find that most folks confuse condensation with actual leaks, especially when they’re moving hard on the trail. The easiest way to test this at home is to take your jacket to a sink and run water from the inside out onto a seam or suspect area while wearing it inside-out, then check the outside for dampness. If water passes through, you’ve got a real leak; if it beads up and stays dry, you’re dealing with condensation buildup from your body heat, which is totally normal and manageable with better ventilation.
Where do waterproof shells most commonly fail, and can I repair these spots myself?
We see most failures happen at seams, zippers, and pit zips because these areas get the most stress and flexing during use. You can absolutely handle minor issues yourself using our seam sealer for small gaps or waterproof tape as a temporary field fix, but if the actual fabric membrane is punctured or if your seams are compromised, we recommend sending it to our professional repair team to ensure it gets properly sealed and won’t fail you on your next big trip.
How often should I be maintaining my shell jacket to keep it waterproofing?
We suggest a gentle refresh every season or two depending on how hard you use it: rinse it in cool water without detergent, let it air dry completely, and then run it through a warm tumble dryer on low heat, which helps reactivate the DWR coating we apply. This simple routine keeps the fabric breathable and water-shedding without damaging the membrane underneath, and it’s honestly the best investment you can make to extend your jacket’s life.
Leave a Reply