Table of Contents
- When Your Shell Fails You in the Field
- Why Traditional Repairs Fall Short on the Trail
- The North Face Emergency Patching Philosophy
- Essential Tools We Recommend Keeping in Your Pack
- Step-by-Step Field Patching for Seam Leaks
- Identifying Where Your Shell is Failing
- Temporary Fixes That Actually Hold Under Pressure
- How Our Shells Are Built for Field Repair
- Extending the Life of Your Gear Between Base Camp Visits
- When to Replace Versus Repair: Our Honest Assessment
- Caring for Your Shell After Emergency Fixes
- Frequently Asked Questions (FAQ)
When Your Shell Fails You in the Field
Rain doesn’t announce itself at 11,000 feet. One moment you’re scanning the ridge ahead, and the next, water’s trickling down your spine through a seam you didn’t know existed. We’ve been there, and we’ve learned that a small leak in your shell can turn a solid day into a miserable one fast. The difference between a ruined trip and a managed problem often comes down to knowing how to patch in the moment.
This isn’t about replacing your jacket at base camp. It’s about buying yourself hours of dryness and confidence when you’re hours away from shelter. A field patch won’t restore your shell to factory condition, but it will keep you functional until you can get home for a proper repair.
Why Traditional Repairs Fall Short on the Trail
Home sewing kits and fabric glues are engineered for still air and dry conditions. Once you’re dealing with wind, moisture, and movement, traditional stitching loses its grip. A standard needle and thread can’t seal the seam itself, and water finds every gap between fibers.
We design our shells with seam-taping specifically because regular fabric-to-fabric seams leak under real conditions. The tape creates a waterproof bond that thread alone never will. When you’re patching in the field, you need something that works the same way: an adhesive or tape that bonds across the seam structure itself, not just on top of it.
Pressure from your pack straps, arm movement, and the constant expansion and contraction of wet fabric all work against a hastily stitched fix. A patch that holds in your living room will fail within an hour on the trail.
The North Face Emergency Patching Philosophy
We build our gear expecting it to take a hit. That mindset extends to repair philosophy. A quality shell should be repairable on location without a machine, special knowledge, or hours of waiting. You need speed, simplicity, and something that survives immediate use.
Our approach centers on pressure-activated tape and flexible sealants that bond directly to the fabric structure. These work in damp conditions and set fast enough that you can keep moving. We also design our shells with repair-friendly fabric weights and seam architectures, meaning the materials actually hold patches well when they need them.
This is why we emphasize patching over stitching for field repairs. Tape and sealant don’t require tension or perfect alignment. They conform to moisture and movement naturally.
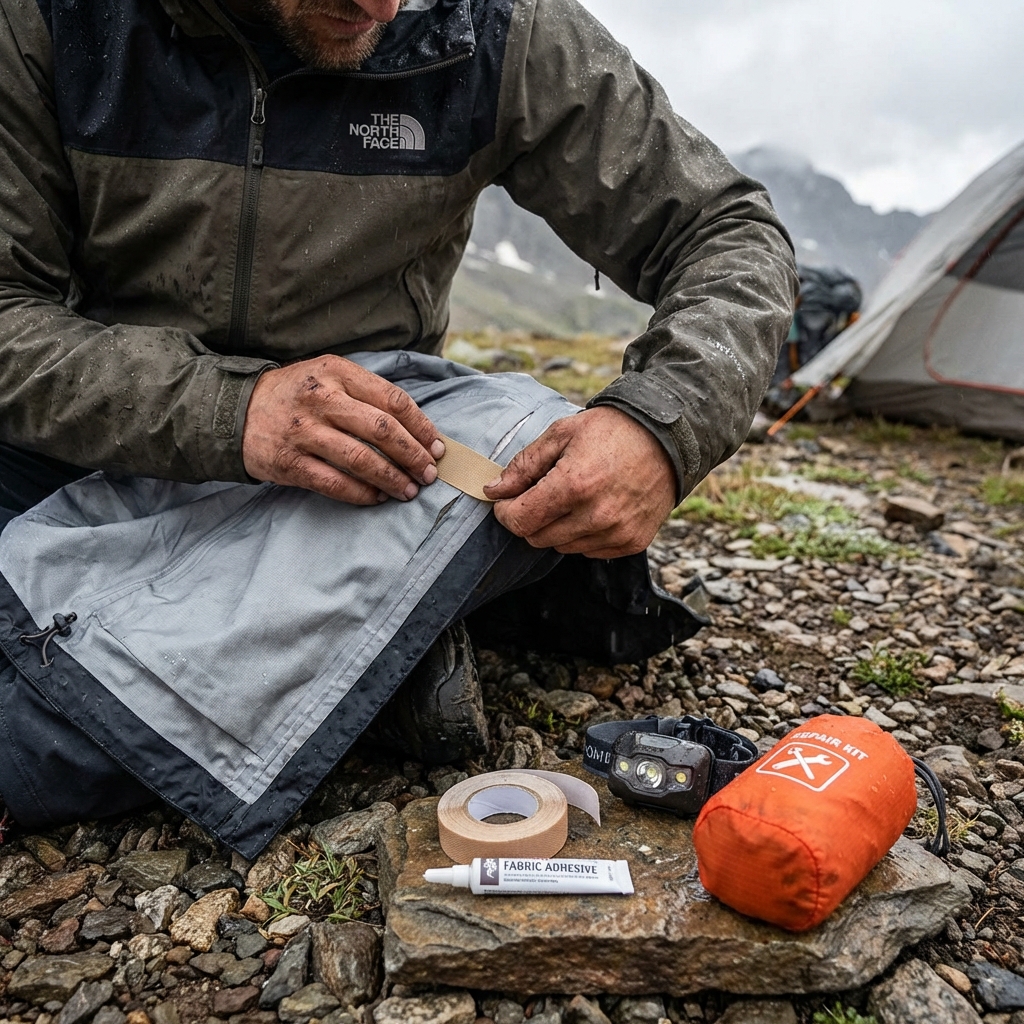
Essential Tools We Recommend Keeping in Your Pack
You don’t need a repair kit the size of a camp stove. We suggest keeping these specific items in a small stuff sack:
- Adhesive-backed seam tape (not regular duct tape) designed for fabric and waterproof use
- A tube of flexible waterproof sealant or fabric cement
- Fine-grit sandpaper or a small sanding block to rough the surface before patching
- A lightweight fabric patch or ripstop repair tape
- A small applicator or old credit card to press seams down firmly
Total weight: under 3 ounces. The adhesive-backed seam tape does most of the work. Choose products rated for outdoor use and tested in wet conditions. Many general-purpose fabric tapes fail in rain. Ours are field-proven in high-alpine settings.
Keep your kit in a ziplock bag at the top of your pack where you can reach it quickly. Moisture ruins adhesive, so replace items every season or if they’ve been exposed to extended dampness.
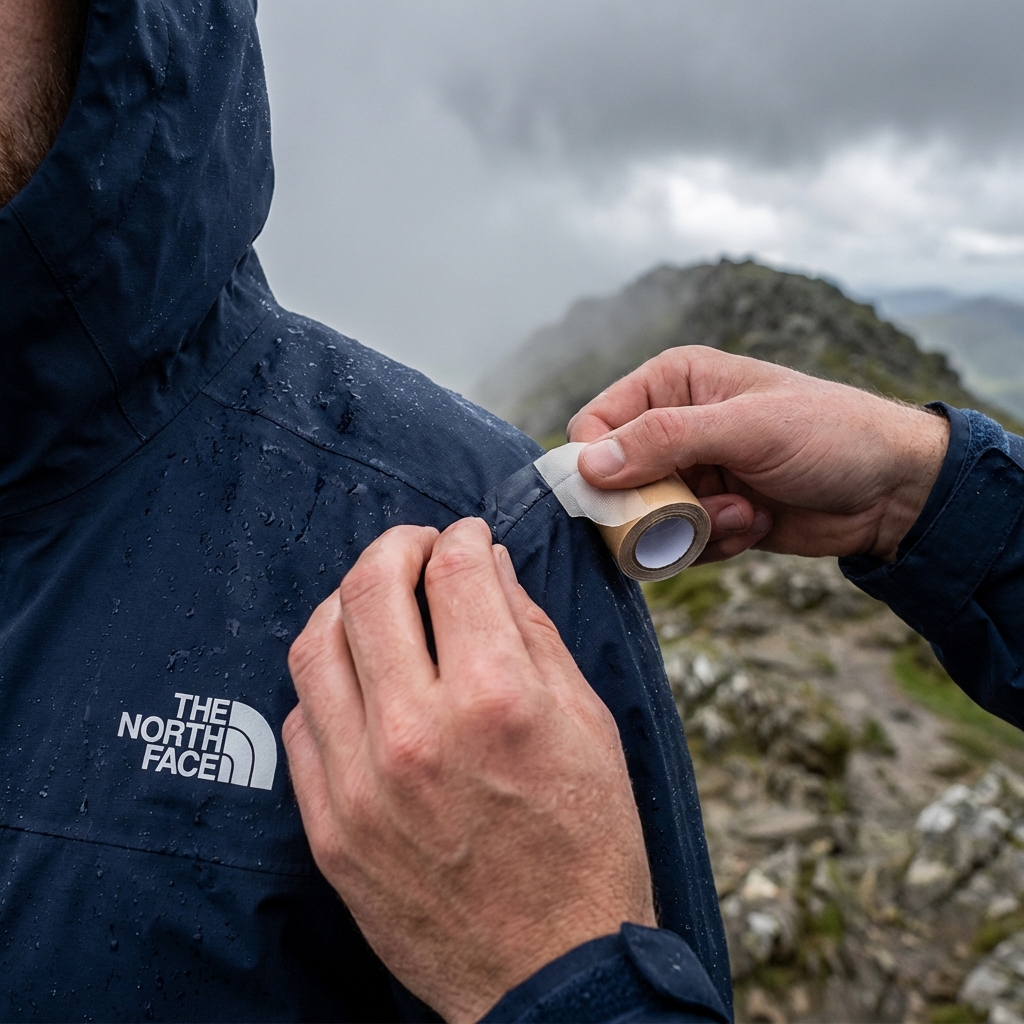
Step-by-Step Field Patching for Seam Leaks
Start by identifying exactly where water is entering. Have your partner or yourself wear the shell and spray it lightly with water while standing in wind. You’ll see the leak point within seconds. Mark it with a small pencil mark or mental note of the location relative to seams or features.
Once you’ve found the leak, dry the area as much as possible. Use your pack towel or a dry sock. This is critical. Adhesive won’t set on wet fabric. Wait a few minutes in wind or sun if you can spare the time.
If the leak is at a seam, rough the fabric lightly with sandpaper on both sides of the seam. This gives the adhesive something to grab. You’re not trying to damage the fabric, just dull any water-resistant finish. Sand for 10-15 seconds on each side.
Apply the adhesive-backed seam tape directly over the seam on the inside (the DWR-coated side) if possible. If the seam is on a curved area, work in small sections. Press hard and hold for 20-30 seconds. Run your fingernail or the credit card edge along the entire seam to ensure full contact.
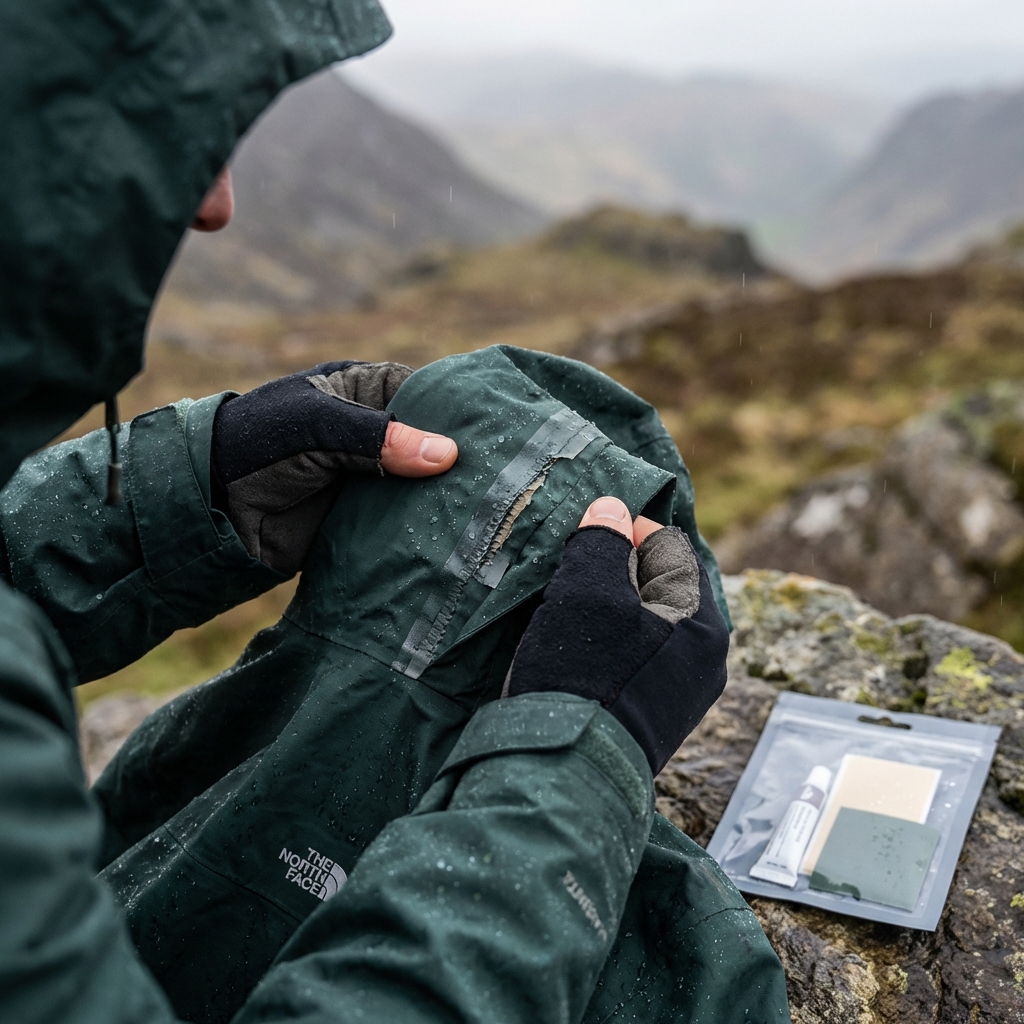
If water is leaking through fabric (not the seam), apply a patch of ripstop tape over the hole on the inside, following the same pressure and hold time. For best results, cover an area at least 2-3 inches in all directions from the hole.
Let the patch cure for at least 5 minutes before moving or adding pressure. Ideally, wait 15 minutes if conditions allow. After that, you can resume hiking. The patch should hold through day-end activity.
Identifying Where Your Shell is Failing
Water finds every weak point. Most leaks happen at seams because that’s where two pieces of fabric meet with tiny gaps between stitches. Second most common: stress points where your pack straps dig in, around zipper pulls, or at the underarms where movement concentrates.
To diagnose a leak systematically, spray your shell lightly in low wind and watch where water beads or runs. Beading means the DWR finish is intact. Darkening fabric or water pooling means water is soaking in. Pay special attention to areas where your pack sits, under the arms, and along the back seam.
Some leaks only happen under pressure. Wear your pack, have water sprayed on you, and move your arms. This simulates real conditions far better than a static test. You might discover that the leak appears only under load.
Check taped seams for delamination. If the tape is peeling, water gets under it immediately. These are the first repairs we recommend once you’re home.
Temporary Fixes That Actually Hold Under Pressure
The word “temporary” matters here. These patches are rated for 6-24 hours of use, depending on conditions. Expect them to hold in moderate rain and wind. Heavy downpour, steep scrambling, or extreme wind may overwhelm the seal.
Adhesive-backed seam tape is your best temporary solution because it’s specifically engineered for this task. It stretches slightly with fabric movement, so it doesn’t peel when your shoulder rotates. Unlike standard duct tape, it’s designed to stay flexible in cold conditions and won’t crack when the fabric bends.
Apply patches in a diamond or X pattern if you’re covering a larger area. This distributes pressure and keeps edges from lifting. Overlap multiple patches if the damage is extensive.
Sealant works well for small holes or delaminating seams. It cures flexible and waterproof. The downside is it takes 30-60 minutes to fully set, so plan ahead if conditions allow a break.
Test your patch before committing. Spray water over it while moving your arm or bending that area of the shell. If water pools instead of running off, you need more coverage or better pressure on the edges.
How Our Shells Are Built for Field Repair
We use specific fabrics and seam construction because we know field repairs happen. Our shells use woven nylon base fabrics (not knits) that accept patches and tape far better than stretchy materials. Tape adheres to a stable surface, not one that shifts under your fingers.
We seam-tape during manufacturing, and that tape is the same type and quality we recommend for field repairs. If you understand how we taped a seam in production, you understand how to patch it in the field. The technology is consistent.
Our fabric weights typically range from 50D to 100D nylon with multiple layers. This density means patches stay put. Lighter fabrics accept patches, but they’re more fragile overall. Heavier shells provide more anchoring surface for tape.
We also consider repair accessibility in design. Critical seams are positioned where you can reach them easily, even while wearing a pack. Underarm seams, back seams, and shoulder seams are all designed to be patchable without undressing completely.
Extending the Life of Your Gear Between Base Camp Visits
A field patch buys time, but it also signals that your shell needs attention. Once you’re home, treat that patch as a priority repair, not something to ignore.
Inspect the entire shell for similar issues. If one seam failed, others under similar stress might follow soon. We recommend a full inspection every 50 hours of use or at the start of each season. Look for tape delamination, cracking in the DWR finish, or seams that are starting to separate.
Store your shell clean and dry. Moisture accelerates tape failure and weakens adhesive bonds. Hang it in a closet, not a compression stuff sack, between trips. The DWR finish lasts longer when the shell isn’t creased.
Refresh the DWR finish annually. Over time, dirt and oils dull the water-beading properties, and water starts soaking into the outer fabric instead of beading off. A wash with specialized detergent and a DWR treatment spray will restore the finish in an afternoon. This reduces stress on seams because water isn’t sitting on the fabric looking for entry points.
Small issues become big ones fast in the mountains. A loose seam that holds for today might fail completely tomorrow. Addressing problems early, even with field patches, prevents catastrophic failures mid-expedition.
When to Replace Versus Repair: Our Honest Assessment
If a seam is leaking, it’s repairable. Field patch it now, then have it retaped at home. If multiple seams are leaking or if the damage is widespread, the shell is reaching end of life.
Consider replacement if: the shell has more than three leaking seams, the DWR finish is completely shot and not restoring with treatment, the fabric is torn (not just leaking at seams), or the shell is older than 8-10 years of regular use. At that point, a new shell will outperform multiple repairs.
Consider repair if: the damage is isolated to one or two seams, the DWR is still mostly functional, and the shell has been a reliable partner. One good retaping can add 2-3 more seasons of use.
We track shell longevity across our athlete community. A well-maintained shell typically sees 200-400 hours of use before significant repair work becomes necessary. With proper maintenance and field patches where needed, shells can stretch toward 500+ hours.
Be honest about the economics. A field patch costs you a few dollars in tape and sealant. A professional retaping runs $40-80. A new shell is $200-400. If you patch it today and retape it at home, you’re reinvesting $50-90 into something you already know performs well.
Caring for Your Shell After Emergency Fixes
After a field patch, resist the urge to immediately rewash the shell. Let the patch cure fully, preferably for 24-48 hours in dry conditions. Water and detergent can soften the adhesive before it’s fully set.
When you do wash, use cool water and a gentle cycle. Avoid heavy scrubbing around the patched area. Hand wash if you can, focusing on the outside. The patch is strongest when not agitated.
After washing, hang dry rather than machine drying. Heat can affect the adhesive. Allow at least 24 hours of air drying before storing.
Inspect the patch periodically. Adhesive-backed tape sometimes peels at the edges after several washes. If you notice lifting, dry the area completely and re-press the edge firmly. You can apply a thin line of flexible sealant under the peeling edge if needed.
Before your next big trip, spray test the patched area under pressure. Make sure the seal is still holding. If the patch has lifted or if water is getting through again, plan a professional retaping before you head out.
Keep your field kit stocked for the next emergency. Patches get used, tape loses its stickiness over time, and sealant tubes expire. Replacing these items yearly is cheap insurance against being caught without repair supplies.
—
We’ve learned that a waterproof shell isn’t a sealed unit: it’s something you maintain, patch, and care for as part of the adventure. Field patching isn’t a failure of the gear or your skills. It’s part of owning outdoor equipment that actually gets used. The next time rain finds a seam, you’ll have the tools and knowledge to keep moving.
For further reading: Base Camp Shop.
Ready for your next adventure? Gear up with apparel and equipment built for the wild. Explore the collection now.
Frequently Asked Questions (FAQ)
What emergency patching supplies should we carry for field repairs?
We recommend keeping a compact repair kit that includes seam sealer, adhesive-backed patches, a small tube of waterproof epoxy, and fine-grit sandpaper in your pack. These items are lightweight enough to barely notice but powerful enough to handle most seam failures you’ll encounter on the trail. For a shell jacket, a piece of duct tape wrapped around a pencil also saves space while giving you options for quick temporary fixes.
How long will a field patch actually last on our waterproof shells?
Our field patches are engineered to hold under real conditions, typically lasting the remainder of your trip and often much longer depending on use and weather. A seam seal patch can last an entire season if applied correctly, though we always recommend getting a proper factory repair done once you’re back home to ensure complete restoration. The temporary fixes are exactly that, but we’ve designed our shells with repair-friendly construction so field solutions buy you the durability you need when you need it most.
When should we replace a shell instead of trying to repair it?
If your shell has multiple seam failures in the same area, extensive puncture damage across the fabric, or delamination of the waterproof membrane, replacement makes more sense than repair. We also suggest replacing rather than repairing if your jacket has already been through several rounds of repairs, as the fabric integrity may be compromised. When in doubt, reach out to our customer service team with photos, and we’ll give you our honest assessment about whether your gear deserves another season or a worthy replacement.
Leave a Reply