Table of Contents
- Why Your Favorite Gear Deserves a Second Life
- The Real Cost of Replacing Damaged Outdoor Equipment
- Tools and Materials Every Explorer Should Keep on Hand
- Mastering Zipper Repairs: From Stuck to Smooth
- Fixing Torn Seams Without Losing Performance
- Patching Fabric Punctures That Don't Compromise Durability
- Restoring Down Baffle Integrity in Winter Gear
- Our Commitment to Sustainable Outdoor Exploration
- When Professional Repair Makes Sense
- Protecting Your Gear Between Adventures
- Frequently Asked Questions (FAQ)
Why Your Favorite Gear Deserves a Second Life
That jacket has earned every scuff mark. The backpack’s patched pocket holds memories of ridge lines and river crossings. We get it. Your gear isn’t just equipment—it’s a trusted partner that’s proven itself in the field. When damage happens, the instinct to retire a beloved piece and buy new is tempting. We’re here to help you fight that urge, because the best gear is the gear you already know.
Gear breaks down with use. A zipper catches. A seam splits from the stress of a full pack. A sharp rock punctures fabric during a scramble. These aren’t failures—they’re marks of a tool that’s been put to work. We design our outerwear and packs to handle punishment, but we also design them to be repairable.
There’s real value in keeping a jacket or pack in rotation longer. You’ve already shaped it to your body and hiking style. You know how it breathes, how it sheds water, how the straps sit on your shoulders. A piece of gear that fits your movements and your needs is worth 10 hours of break-in time with something new.
Beyond the personal connection, repairing gear you already own keeps you exploring sooner. You don’t wait for shipping or spend time researching replacements. You grab your repair kit, fix the problem, and hit the trail again the next weekend.
What to do next: Before retirement, assess whether the damage is cosmetic or structural. Cosmetic wear—fading, scuffs, fraying—doesn’t affect performance. Structural damage like broken zippers, separated seams, or punctures in critical areas is what we’ll address in this guide.
The Real Cost of Replacing Damaged Outdoor Equipment
A quality puffer jacket or technical rain shell costs real money. Our insulated outerwear and four-season gear represent genuine investments. Replacing a damaged pack or winter coat isn’t just a purchase transaction; it’s lost budget for future adventures.
Consider the full math. A new technical shell runs $200 to $400. A premium backpack costs $300 to $500. Down booties, climbing harnesses, and specialized gloves add up quickly. If you rotate between two or three jackets and packs per year—as serious explorers do—annual equipment spending without repairs can exceed $1,500 easily.
A basic repair kit costs under $50. Seam sealer tubes run $5 to $12. Replacement zippers, patches, and adhesives total maybe $30. One successful repair pays for your entire kit multiple times over. More importantly, it buys you another season or two with gear that’s already dialed in.
There’s also the sustainability angle. Manufacturing new gear requires raw materials, energy, and shipping. A jacket repaired at home stays out of the landfill and keeps its carbon footprint from doubling. We created our XPLR Pass loyalty program and our resale marketplace partly to extend the life of gear already in the world, and DIY repairs are an extension of that same philosophy.
What to do next: Calculate what you’d spend replacing one jacket or pack. That’s your baseline ROI for learning basic repairs. Keep that number in mind as you build your repair skills.
Tools and Materials Every Explorer Should Keep on Hand
You don’t need a workshop to maintain gear. A small kit that lives in a dry bag or closet is all it takes. We recommend building around these essentials.
Start with the core:
- Heavy-duty needle and thread (upholstery grade or waxed cord for seams)
- Patch tape or adhesive-backed fabric patches
- Seam sealer (we recommend products that cure waterproof and flexible)
- Small scissors or cutting tool
- Zipper lubricant or graphite pencil
- Replacement zippers in black and silver (common sizes for jackets and packs)
- Tweezers for handling small repairs
Add these as you gain confidence:
- Sewing awl for thick materials
- Fabric glue designed for outdoor gear
- Down patch kit (if you own winter insulated pieces)
- Vinyl patches for punctures in waterproof fabrics
- Fine-grit sandpaper for prepping patch surfaces
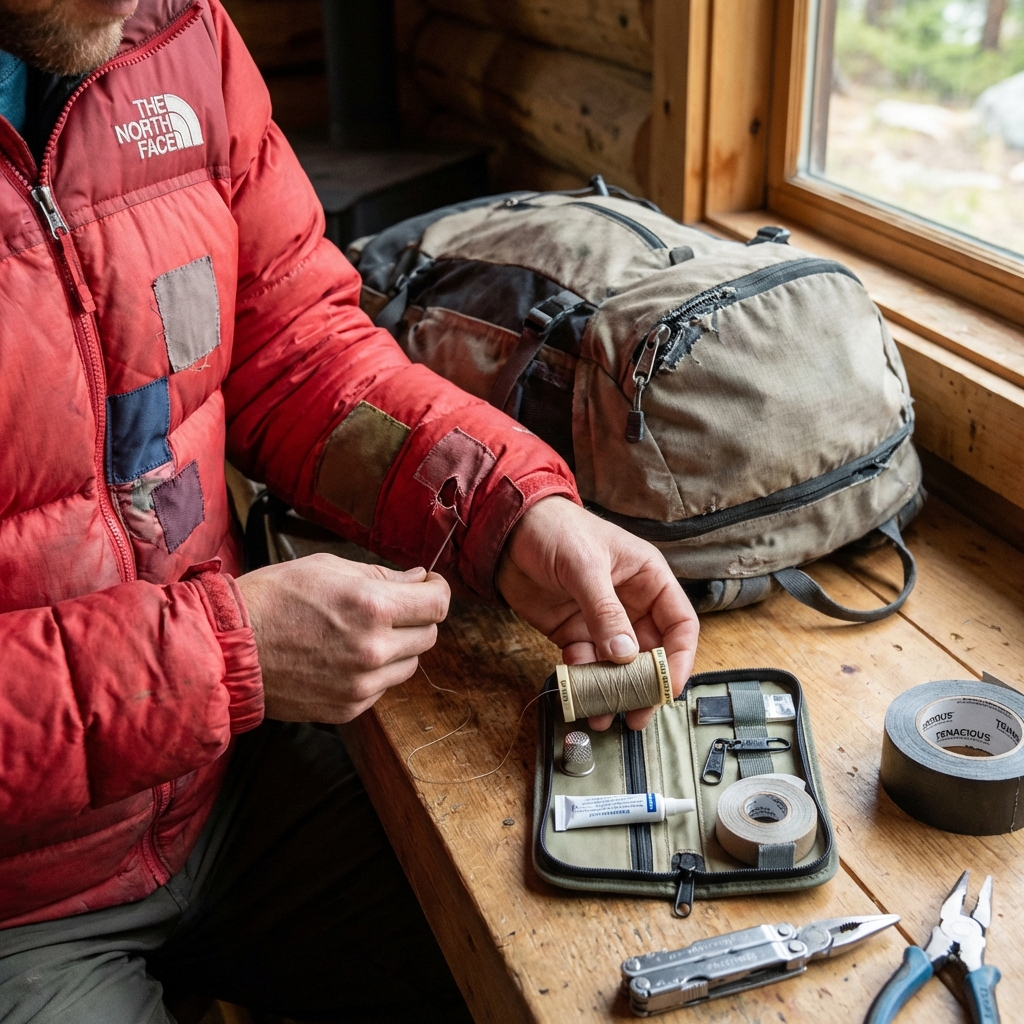
Store everything in a small waterproof container or zippered pouch. Include a printed instruction sheet for your most common repairs. We’ve all stared at a broken zipper at 11 p.m. and wished we had a quick reference guide handy.
What to do next: Source a basic kit this week. You can assemble it yourself or buy pre-made repair kits designed for outdoor gear. The investment is under $50 and will last years.
Mastering Zipper Repairs: From Stuck to Smooth
Zippers fail more than any other gear component. They stick, slip, or refuse to budge. The good news: most zipper problems are solvable without replacement.
A stuck zipper usually means dirt or corrosion in the teeth. Try this first: spray a tiny bit of silicone lubricant on the teeth, work the slider gently back and forth, then wipe away excess. If you don’t have silicone, a graphite pencil works almost as well—just rub the pencil tip along the zipper track. Avoid WD-40 or oil-based products; they attract dirt over time.
A slipping slider—one that slides open without you moving it—needs a different approach. The slider has worn inside and no longer grips the teeth tightly. Pinch the slider slightly with pliers, just enough to squeeze the metal or plastic housing tighter against the teeth. Test frequently so you don’t over-tighten and snap the slider. This is a five-minute fix that restores 90% of slipping zippers.
Complete zipper failure—teeth missing, slider broken beyond tightening—calls for replacement. This sounds intimidating but becomes routine with practice. Remove the old zipper by carefully cutting stitches along the seam. Source a replacement zipper of the same length and slider type. Stitch the new zipper in place using a needle and strong thread, following the old stitch holes as a guide. The first replacement takes an hour. By your third, you’re down to 20 minutes.
What to do next: Test your jacket zippers this weekend. Pick one that’s slightly sluggish and practice the graphite-pencil trick. You’ll build confidence before tackling a major replacement.
Fixing Torn Seams Without Losing Performance
A split seam is a serious repair because seams bear massive stress. A fully loaded backpack pushing against your shoulders, a winter jacket stretching across your chest, a climbing harness taking body weight—all of these concentrate force along seam lines.
Inspect the damage first. If only the thread is broken but both fabric pieces are intact, you can re-stitch without losing performance. If the fabric itself has torn, the repair becomes more complex. Start by cleaning the area. Remove any old thread fragments and wipe away dirt. This takes two minutes and makes a huge difference in stitch quality.
For a split seam, use a needle with heavy-duty thread—upholstery thread or waxed dental floss work well. Knot the end and push the needle through the fabric starting just past the end of the tear. Use a tight running stitch or a backstitch (the strongest option). Aim to stitch through both fabric layers and follow the original stitch line. Space stitches every quarter-inch. Once you reach the other end of the tear, backstitch three or four times to lock the thread.
If the fabric itself has torn along the seam, reinforce the repair with a patch on the inside. Cut a patch of matching or complementary fabric (we often use nylon repair tape or ripstop fabric) and glue or stitch it over the torn area from the inside. This distributes stress and prevents the tear from spreading again.
What to do next: Inspect the seams on your pack’s shoulder straps and your jacket’s underarm gussets. These high-stress areas show wear first. Practice restitching on a piece you don’t rely on before tackling critical seams.
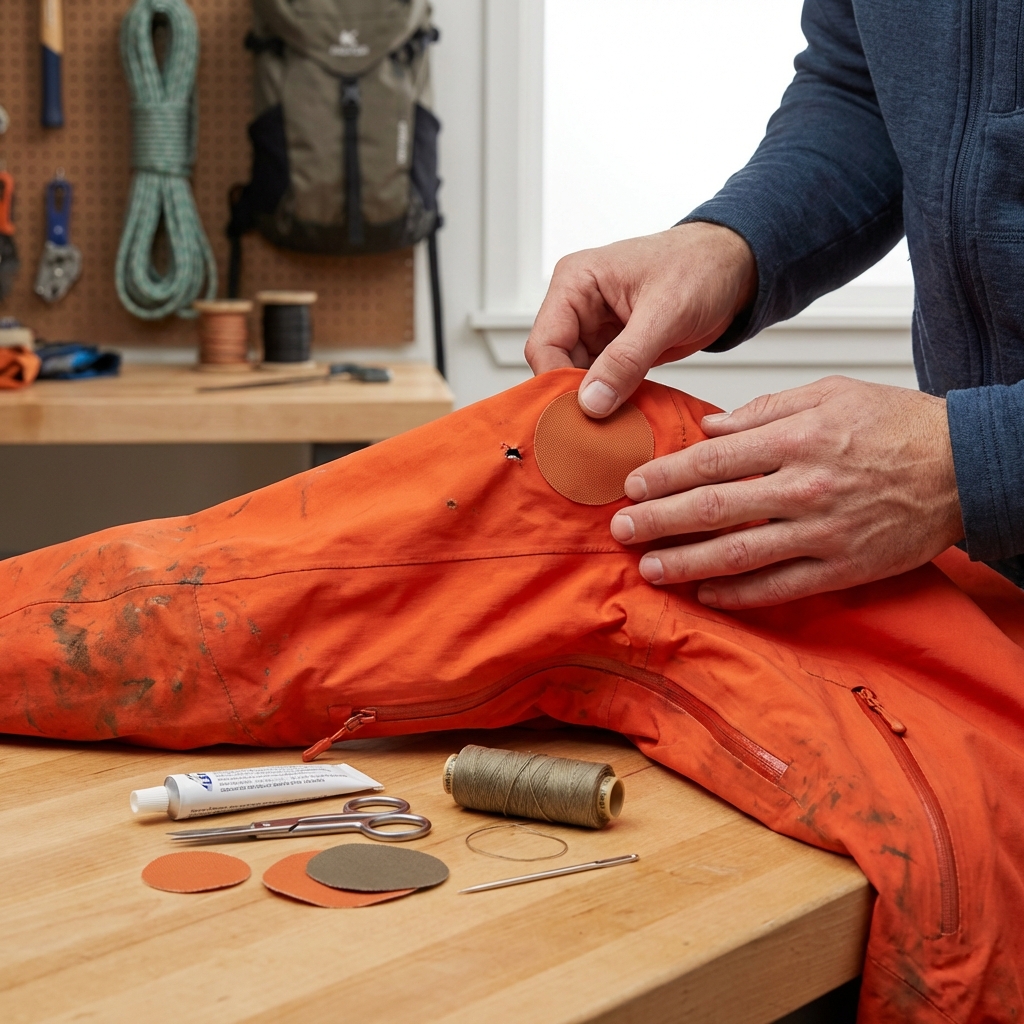
Patching Fabric Punctures That Don’t Compromise Durability
A hole in your jacket or pack shell is fixable but requires the right technique to maintain waterproofing and durability. Size matters. Small punctures (under a half-inch) respond well to adhesive patches. Larger tears need stitching plus patches.
For punctures in waterproof fabrics like nylon, vinyl patches work best. Clean the area thoroughly with a dry cloth—any dirt reduces adhesion. Roughen the fabric slightly with fine-grit sandpaper to help the patch stick. Cut your patch at least an inch larger than the hole on all sides. Apply fabric adhesive according to the product instructions, press the patch firmly, and let it cure fully (often 24 hours) before use.
For non-waterproof areas or when you want extra strength, combine stitching and patches. Stitch a tight running stitch around the perimeter of the tear, drawing the torn edges together. Then apply a patch over the repair on the inside. This creates a three-layer defense against further damage and distributes stress.
If the puncture is near a seam or a high-stress area, make your patch larger—two inches beyond the tear at minimum. The extra coverage prevents stress from concentrating at the patch edge, which is where patched repairs typically fail.
What to do next: Check your outerwear for small punctures during the off-season. These are easiest to fix and lowest-stakes for practicing your patching technique.
Restoring Down Baffle Integrity in Winter Gear
Down insulation moves when baffles—the fabric walls inside your jacket that compartmentalize the down—develop holes or weak spots. When down shifts out of its chamber, insulation becomes uneven and loses effectiveness.
Repairing a down jacket requires care because the insulation is delicate and can escape easily. Small holes in the outer shell are your main concern; down won’t leak unless the inner baffle is also damaged.
For a hole in the outer shell only, repair it with a vinyl or nylon patch using the method described above. No need to worry about down escaping if the inner baffle is intact.
If you suspect baffle damage (down clumping in one area, bunching toward the patch), you’ll need to reach the inner layer. This is more involved: carefully open the outer shell near the damaged baffle, seal the baffle hole with a small patch from the inside, then reseal the outer shell. It’s a two-layer repair. Given the precision required, this is one repair where professional service often makes sense unless you’re experienced with sewing.
What to do next: After heavy use or seasonal storage, squeeze your down jacket in different areas. Feel for uneven insulation that suggests down migration. Catch these problems early before they spread.
Our Commitment to Sustainable Outdoor Exploration
Repairs aren’t just practical—they’re part of our larger mission to keep explorers in gear longer and keep gear out of landfills. We’ve built sustainability into our design philosophy. Our packs and jackets use materials rated for years of use and abuse, making them worth repairing.
We also created our resale marketplace and XPLR Pass rewards program to extend gear lifecycles. When you repair a jacket instead of replacing it, you’re living that same principle. You’re choosing durability over convenience, and that choice compounds over time.
Our newest outerwear lines use recycled insulation and recycled fabric shells. These materials repair just as well as virgin materials, and the environmental case for repair only strengthens when your gear already contains recycled content.
We’re continuously researching better adhesives and patch materials that hold longer and work in extreme conditions. If you run into a repair challenge we haven’t solved yet, we want to hear about it. Feedback from explorers in the field shapes what we research next.
What to do next: When you repair a piece of our gear, share the story with us. Tag us in a photo of your repaired jacket or pack. We use these stories to improve our designs and repair resources.
When Professional Repair Makes Sense
Not every damage scenario calls for a DIY fix. Complex repairs often justify professional attention. We offer repair services through our retail locations and authorized repair partners. Here’s how to decide.
Choose professional repair when:
- The damage involves multiple systems (seams, shells, insulation)
- You’re repairing gear worth $400 or more
- The damage is near critical stress points (harness attachment points on packs, shoulder seams on jackets)
- You’ve already tried a repair and it didn’t hold
- The damage includes down leakage or baffles you can’t safely access
Professional repair typically costs $40 to $150 depending on severity. It’s money well spent on high-value pieces because a mistake on a $500 jacket is expensive. We guarantee our professional repairs and will refinish a failed repair at no charge.
For routine maintenance repairs—patching, zipper replacement, seam restitching on non-critical seams—DIY is almost always the right call. You’ll save money, and you’ll understand your gear better.
What to do next: Keep the contact information for your nearest authorized repair center. Many of us have it bookmarked but never use it because we’re focused on DIY. Having it ready removes friction when a repair does exceed your skill level.
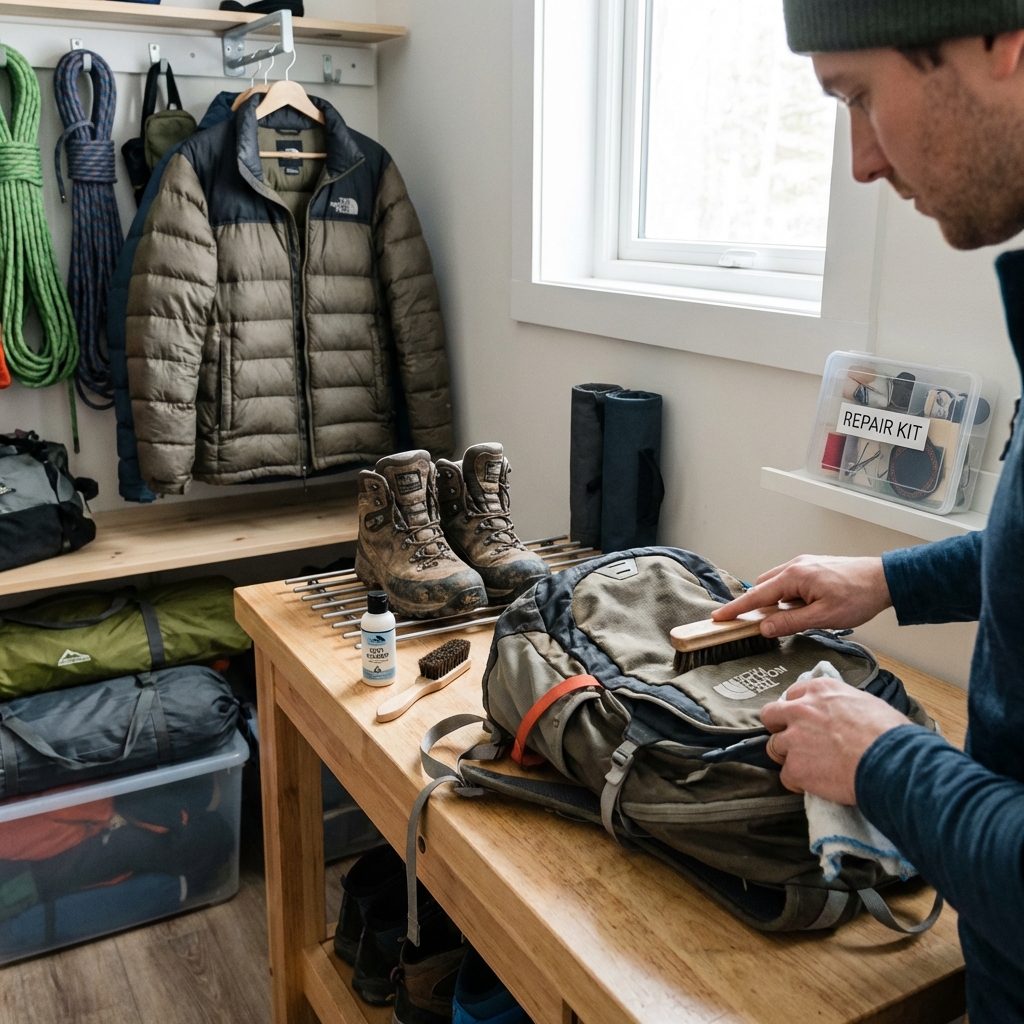
Protecting Your Gear Between Adventures
The best repair is the one you never need. Thoughtful storage and maintenance extend gear life dramatically. We’ve tested our products in extreme conditions, but proper care between expeditions makes a real difference.
Store jackets and packs in cool, dry spaces away from direct sunlight. UV light degrades fabrics over time. Remove any wet gear from packs immediately after use and let it dry fully before storing—moisture invites mold and corrosion. If your pack or jacket gets wet in the field, hang it to dry when you get home, even if it’s late.
Zipper maintenance is preventative. Wipe zippers dry and run a graphite pencil along the teeth quarterly, even on gear in storage. This keeps slides smooth and prevents stuck zippers from becoming your first problem when you need the gear.
Inspect seams and fabric before each season. Small tears are easier to fix than large ones. A 10-minute walkthrough of your gear prevents emergency repairs mid-trip.
For down-insulated pieces, store them lofted in a large mesh bag, not compressed in a stuff sack. Down regains full loft when it can breathe during the off-season. Compressed storage permanently reduces insulation value.
What to do next: Schedule a 30-minute gear inspection this month. Sort pieces into three piles: ready to go, needs minor repair, needs professional service. Address the minor repairs immediately. You’ll start the season fully equipped and confident.
We designed our gear to last, and we built it to be repairable. A torn seam or stuck zipper isn’t the end of the road. It’s an opportunity to understand your equipment better and extend the partnership another season. Grab your repair kit, find quiet time on a weekend evening, and bring your trusted piece back to full performance. The trail will thank you.
Ready for your next adventure? Gear up with apparel and equipment built for the wild. Explore the collection now.
Frequently Asked Questions (FAQ)
What tools and materials do we recommend keeping on hand for basic gear repairs?
We suggest starting with a quality repair kit that includes a small sewing needle set, thread in neutral colors, fabric patches (both adhesive and sewn varieties), a seam sealer, and a zipper repair tool. For down jackets specifically, we recommend adding a down-safe patch kit and beeswax thread to your collection. These basics will handle most common issues you’ll encounter on the trail or back home.
How do we know when it’s time to seek professional repair instead of DIY fixes?
If your gear has extensive seam separation, structural damage to the frame (like a broken backpack stay), or if the damage affects waterproofing across large areas, we’d encourage you to bring it to us for professional assessment. We’ve trained our repair specialists to handle complex restoration work that can extend your gear’s life by years, especially for pieces you’ve invested heavily in or rely on for serious expeditions.
Why does our company encourage gear repair and longevity over constant replacement?
We believe your favorite pieces deserve multiple seasons of adventure, and extending their life reduces waste in our environment. Every repair you make saves resources and keeps trusted gear performing where it matters most rather than in a landfill.
Leave a Reply