Table of Contents
- When Your Shell Fails in the Field: Why Quick Repairs Matter
- Understanding Your Waterproof Shell Damage
- Essential Repair Tools We Recommend Carrying
- Applying Field Tape for Immediate Leak Sealing
- Using Seam Sealant for Lasting Temporary Patches
- Multi-Layer Repair Strategies That Work
- How We Design Our Shells for Repairability
- Testing Your Repair Before Heading Back Out
- When to Replace vs. Repair Your Shell
- Maintaining Your Shell to Prevent Future Damage
- Building Your Emergency Repair Kit
- Frequently Asked Questions (FAQ)
When Your Shell Fails in the Field: Why Quick Repairs Matter
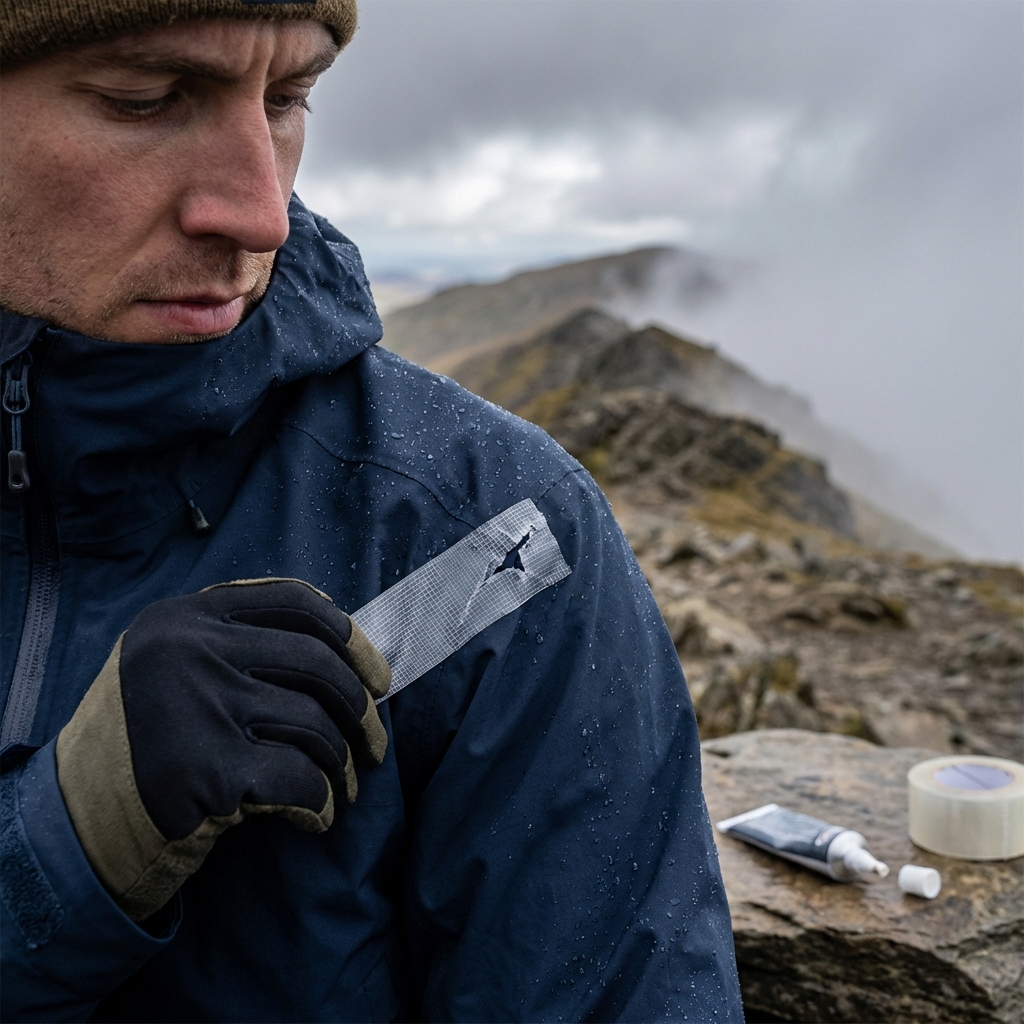
You’re three hours into a ridge traverse when you spot the small tear on your shoulder. It’s not catastrophic, but the sky is darkening and mist is rolling in. In that moment, the difference between a ruined trip and a salvaged one often comes down to how quickly you can seal that breach.
We’ve been building waterproof shells for decades, and we’ve learned that field repairs aren’t a failure of design—they’re a practical necessity in serious outdoor conditions. Rocks snag fabric. Branches catch sleeves. Zippers take abuse. What matters is your ability to respond fast and effectively before a small problem becomes hypothermia risk.
A quick repair in the field serves multiple purposes. It stops water intrusion immediately, preserving your core body temperature and morale. It buys you time to reach shelter or descend to safer conditions. It also extends the life of your shell by preventing water from seeping into insulation layers where it causes real damage. We design our shells expecting they’ll get fixed in the field—and we’ll show you exactly how.
What to do next: Assess the size and location of damage before deciding on a repair strategy. Small pinhole leaks or seam separations under 2 inches benefit most from immediate field tape application.
Understanding Your Waterproof Shell Damage
Not all waterproof shell damage is created equal, and the repair approach depends entirely on what you’re actually dealing with.
Punctures and small tears are straightforward: a rock, a sharp tree branch, or equipment snag creates a localized hole. These are excellent candidates for field tape because they’re isolated and easy to target. Seam failures are trickier. When the thread holding two panels together lets go, water finds a highway. These often need seam sealant to work properly because tape alone won’t seal a gap that flexes with your movement.
Abrasion damage—where the outer layer has been scuffed or worn thin from repeated contact—requires a different mindset. You’re not dealing with a hole yet, but compromised protective coating. If you can feel the underlying fabric texture, moisture can follow eventually. Zipper damage and slider failures are their own category: water runs along the zipper track itself, and no patch fixes that permanently in the field.
Delamination is the sneakiest culprit. When the waterproof membrane separates from the fabric layer, you get pockets where water gets trapped. This often happens at stress points like shoulders or elbows. It’s harder to spot in the field and harder to repair, which is why prevention matters so much.
What to do next: Run your hand over suspected damage areas. Can you feel texture or separation? Does water bead and roll off, or does it wet the fabric? This tells you whether you’re dealing with surface damage or structural failure.
Essential Repair Tools We Recommend Carrying
The weight cost of carrying repair supplies is negligible compared to the misery of a wet core temperature. We recommend keeping these items accessible in your pack, not buried at the bottom.
Field repair tape is non-negotiable. Specialized waterproof repair tape (not standard duct tape) sticks reliably even when damp and doesn’t leave residue. Carry at least two patches roughly 3×3 inches—one for immediate use, one for backup. Roll it around a card or stick to save weight and space.
Seam sealant comes in small tubes designed for backcountry use. It’s different from construction sealants because it cures quickly, remains flexible when dry, and bonds to synthetic fabrics. A tube the size of a lip balm tube weighs almost nothing and covers multiple seam repairs.
A patch kit specific to your shell fabric type gives you options. If your shell is Gore-Tex or a similar laminate, you need patches designed for those materials. Standard fabric patches won’t bond reliably to waterproof membranes.
Needle and thread sound old-school, but they’re essential for seam tears. Heavy-duty thread and a needle with a large eye let you close gaps and reduce water entry. Even rough stitching helps seam sealant work more effectively.
Consider adding a small tube of flexible fabric adhesive and a lightweight piece of sandpaper (helps roughen surfaces for better adhesion). A small alcohol wipe cleans the repair area before applying tape or sealant, improving contact and bond strength.
What to do next: Assemble your kit before your next trip. Test each item at home so you know exactly how it works under pressure rather than discovering surprises in bad weather.
Applying Field Tape for Immediate Leak Sealing
Field tape is your emergency stop-gap, and speed matters more than perfection here.
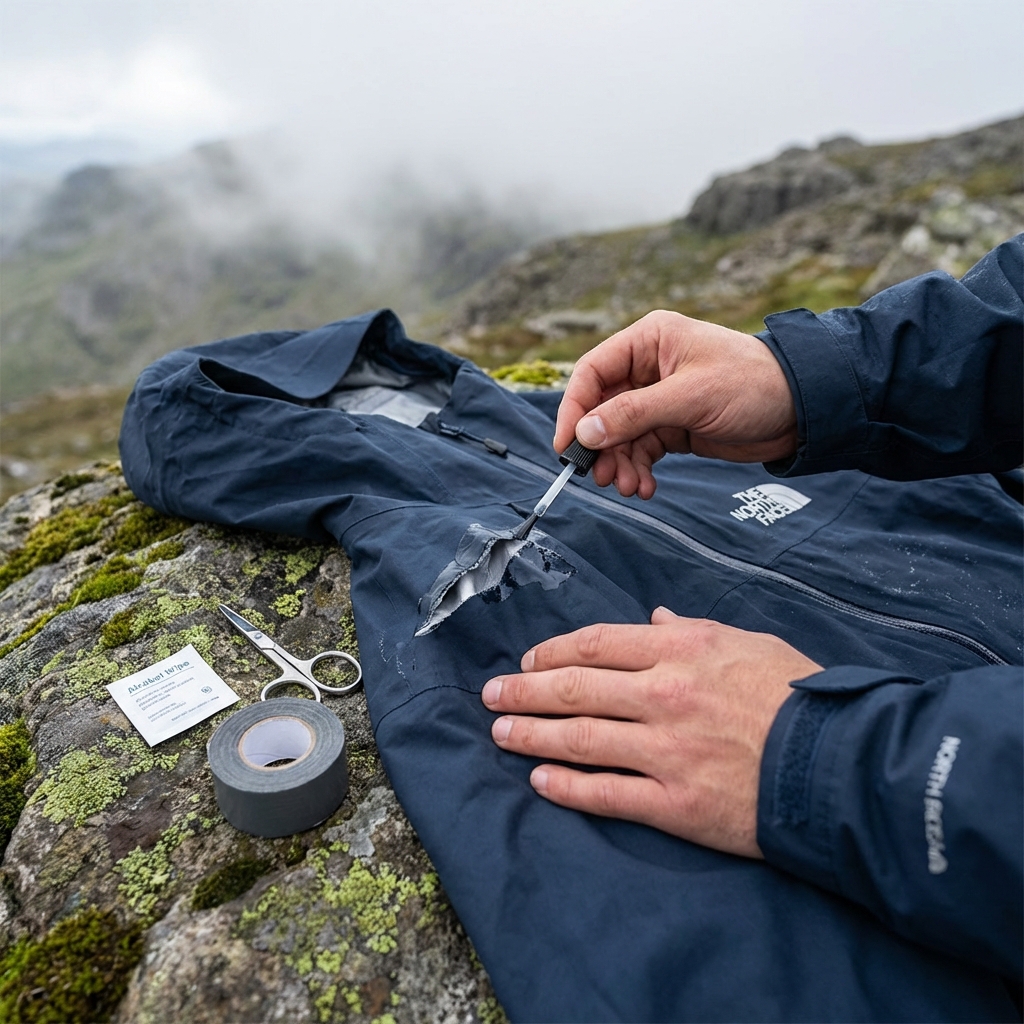
First, dry the area as much as possible. Use a shirt sleeve, a lightweight towel, or even your body heat. Waterproof tape bonds poorly to wet surfaces, and moisture underneath reduces adhesion dramatically. If you’re in heavy rain, find any shelter—even a tree overhang—and wait 30 seconds for the surface to dry.
Clean the area around the damage. Dust, salt residue, and body oils all weaken tape adhesion. A quick wipe with your sleeve or an alcohol pad makes a real difference. If you have sand or grit in the tear, brush it out gently.
Cut your tape into a shape that extends at least 1 inch beyond the damage in all directions. Rectangles are easier to apply than complex shapes—aim for roughly 3×4 inches for small tears. Round the corners slightly so they won’t catch and peel.
Apply the tape starting from one edge and press it down smoothly, working air bubbles out toward the edges. Firm, deliberate pressure—not frantic—ensures good contact. Hold it down for 10-15 seconds. The tape bonds through pressure and time, not through force.
For seams or edges, you may need to apply tape on both sides. Inner seam leaks especially benefit from an interior patch in addition to exterior tape. Let the tape cure for a few minutes before resuming movement if possible.
What to do next: Test your repair immediately in light rain or by splashing water on it before committing to hours of hiking. If it’s holding, move on. If water still seeps through, the damage was larger than the tape covered—apply a second patch overlapping the first.
Using Seam Sealant for Lasting Temporary Patches
Seam sealant bridges the gap between emergency field tape and permanent shop repairs. It’s particularly effective for thread failures or separated seams because it creates a flexible, waterproof bond that moves with the fabric.
Clean the seam thoroughly. Any dirt or old sealant prevents new sealant from bonding. Use your knife or fingernail to scrape away loose material. Wipe it clean with an alcohol pad if you have one. Dry the area completely—this is absolutely essential.
Apply a thin bead of sealant directly into the seam gap. Don’t glob it on; a line about 1/8 inch wide and 1/4 inch tall is sufficient. The sealant spreads slightly as it cures and creates a waterproof layer. Work it into the gap gently with your finger or a stick. Smooth it out so it sits flush with the fabric.
Let it cure according to the product instructions. Most field sealants cure in 10-20 minutes, though full hardness takes several hours. Don’t apply pressure to the seam during this time—let gravity and air do the work.
Seam sealant is particularly useful for weeping seams where water runs along the thread rather than through a hole. It’s also excellent for delamination at the edges of damage. The flexibility of the product means it moves with your shoulder or elbow without cracking like tape might.
What to do next: If you’re using sealant on a high-stress seam, reinforce it with field tape over top once the sealant has cured. This layered approach handles both flexibility and structural support.
Multi-Layer Repair Strategies That Work
The best field repairs often combine multiple techniques because different damage types benefit from different approaches.
For a small tear in a seam, apply seam sealant first. Once it’s cured, cover it with field tape. The sealant handles the micro-failures in the thread, and the tape provides structural reinforcement. This stops leaks at the source and prevents water from finding alternate routes along the seam.
For larger punctures with separated fabric, start with field tape on the outside. Once that’s secure and cured, apply a second tape patch on the inside if accessible. This sandwiches the damage and prevents water from wicking under the tape edges. For critical areas, some athletes add a small sewn patch using the needle and thread method, then seal around the edges with tape.
Abrasion areas require a different approach. If the outer coating is compromised but the fabric is intact, apply a flexible waterproof tape that bridges the worn zone. Don’t wait for actual holes to form—seal it when you first notice the texture change. This prevents small problems from becoming big ones.
Zipper failures are tricky in the field. If the slider is stuck or damaged, attempt to free it gently with a small amount of graphite lubricant or silicone spray if you’re carrying one. If that fails, tape the zipper closed to prevent water from running along the track. This isn’t elegant, but it works in emergency situations.
What to do next: Practice layering repairs on old shells at home. Get comfortable with the feel of tape, sealant, and stitching before you need these skills under stress.
How We Design Our Shells for Repairability
We intentionally design our shells with field repair in mind because we know the trail is unpredictable.
Our technical shells use bonded laminate construction—that is, a waterproof membrane fused to a protective outer layer. This design handles tape and sealant repair extremely well. The membrane is tough enough to hold patches firmly, and the outer layer provides good surface area for adhesion. Contrast this with some simpler coated shells where the coating is thin and peels easily once damaged.
We also pay attention to seam construction. Our seams are taped from the inside during manufacturing, but they’re designed so you can apply additional sealant from either side in the field. The thread we use is durable and won’t fray excessively if a seam partially fails. Small repairs are straightforward.
Critical stress areas like shoulders, elbows, and armpits receive extra attention. We use reinforced panels in these zones, which means small damage is less likely and larger repairs have more fabric to work with. This is especially important on shells like our FutureLIGHT AMK Jacket designed for extended expeditions where durability and repairability are core requirements.
We avoid thin, delicate fabrics on high-wear areas and use materials that accept patches without compromising durability. This isn’t just good for field repairs—it means your shell lasts longer overall.
What to do next: When buying a new shell, check the seam quality and outer layer thickness. Shells designed for technical use are inherently more repairable than ultralight options, a trade-off worth understanding before purchase.
Testing Your Repair Before Heading Back Out
Never assume a repair works until you’ve tested it under conditions similar to what you’ll face.
In light conditions, splash water directly on the repair site. Watch how it behaves. Does water bead and roll away? Does it soak in slowly? Small amounts of water penetration are normal while tape or sealant fully cures, but water shouldn’t stream through the repair.
If you’re in heavy rain, move under shelter and use your water bottle or a stream to deliberately wet the repair area from the outside. Observe the inside. Wait 30 seconds. Dry the inside surface with your hand or sleeve and look for new dampness. Repeat twice. Persistent moisture means the repair failed.
For seam repairs, flex the area gently. Does the sealant stay intact or does it crack? If it’s cured properly, it should flex slightly without breaking. If it’s cracking, you applied too much, used incompatible materials, or didn’t let it cure long enough.
For taped areas, check the edges. Are they lifting? Pressing down on corners and edges—especially if there’s any air gap—ensures adhesion. Smooth any loose spots.
The test phase typically takes 5-10 minutes and could prevent a worse failure hours down the trail. Time is cheap when weighed against exposure risk.
What to do next: If the repair fails, don’t be discouraged. Layer another patch over the first or try a different technique. Field repair often takes iteration, and backup patches exist for exactly this reason.
When to Replace vs. Repair Your Shell
Not every damaged shell deserves a field repair, and knowing when to replace versus patch saves you money and frustration long-term.
Small, isolated damage under 2 inches deserves repair. Punctures, small tears, and minor seam failures are repairable if they’re not in locations that receive constant stress. A pinhole on the back of the shoulder? Easy repair. A tear that runs along a high-stress seam under your pack strap? That’s harder and might recur.
Multiple damage points suggest deeper wear patterns. If you’re finding new damage every trip, the shell has likely reached end-of-life. Repairs on top of repairs eventually fail. The time and expense of repeated patching exceeds the cost of a new shell.
Widespread delamination—where the membrane has separated from the outer layer across large areas—is difficult to repair in the field and points toward retirement. This happens as shells age or from excessive heat exposure during storage or washing.
Zipper failures on critical zippers (main front zip, pit zips) are a good replacement trigger. You can repair it temporarily, but zippers see so much use that field repairs are usually temporary. A new shell with functioning zippers is more reliable.
UV damage and color fading alone don’t indicate the need for replacement. The shell is still waterproof. Repairs work fine on faded shells.
Consider your shell’s age and usage history. A five-year-old shell with minimal damage is worth repairing. A ten-year-old shell that’s been on dozens of expeditions might be approaching the end anyway. Repairs can extend life by a season or two, but they’re not permanent solutions.
What to do next: When you do invest in a new shell, register it with us and keep your receipt. We offer repair services for shells within the first few years of ownership—sometimes professionally sealing or patching is more effective than field repairs.
Maintaining Your Shell to Prevent Future Damage
The best field repair is the one you never need to make, and preventive care dramatically extends shell life.
Store your shell away from direct sunlight. UV exposure degrades the waterproof membrane over time, causing brittleness that cracks easily. Keep it in a cool, dark place—your closet is ideal, your car dashboard is not.
Wash your shell carefully using cool water and a specialized technical fabric wash. Regular detergent leaves residue that reduces breathability and waterproofing. Never use fabric softener. Dry it gently. If you must use a dryer, use low heat. High heat damages membranes.
Avoid sharp contact. Store shells away from velcro, rough zippers, and abrasive materials that snag fabric. Use your pack’s interior pockets strategically so the shell doesn’t rub against sharp gear.
Inspect your shell before every trip. Look for small damage, wear patterns, and seam separation. Address minor issues immediately with sealant rather than waiting. A spot of sealant now prevents larger damage later.
Use your shell appropriately. It’s designed for wet, cold conditions, not for everyday casual wear. Minimize time in direct sun and avoid activities where it will snag repeatedly. This isn’t about bubble-wrapping your gear—it’s about reserving this technical tool for the conditions it’s built for.
Pay attention to high-wear areas during trips. Your pack straps, zipper pulls, and shoulder seams all take repeated stress. Small damage in these areas accelerates quickly. Check them mid-trip if you’re on longer expeditions.
What to do next: Create a simple maintenance routine. Wash and inspect your shell seasonally. Apply preventive sealant to any questionable seams before your trips rather than waiting for leaks to appear.
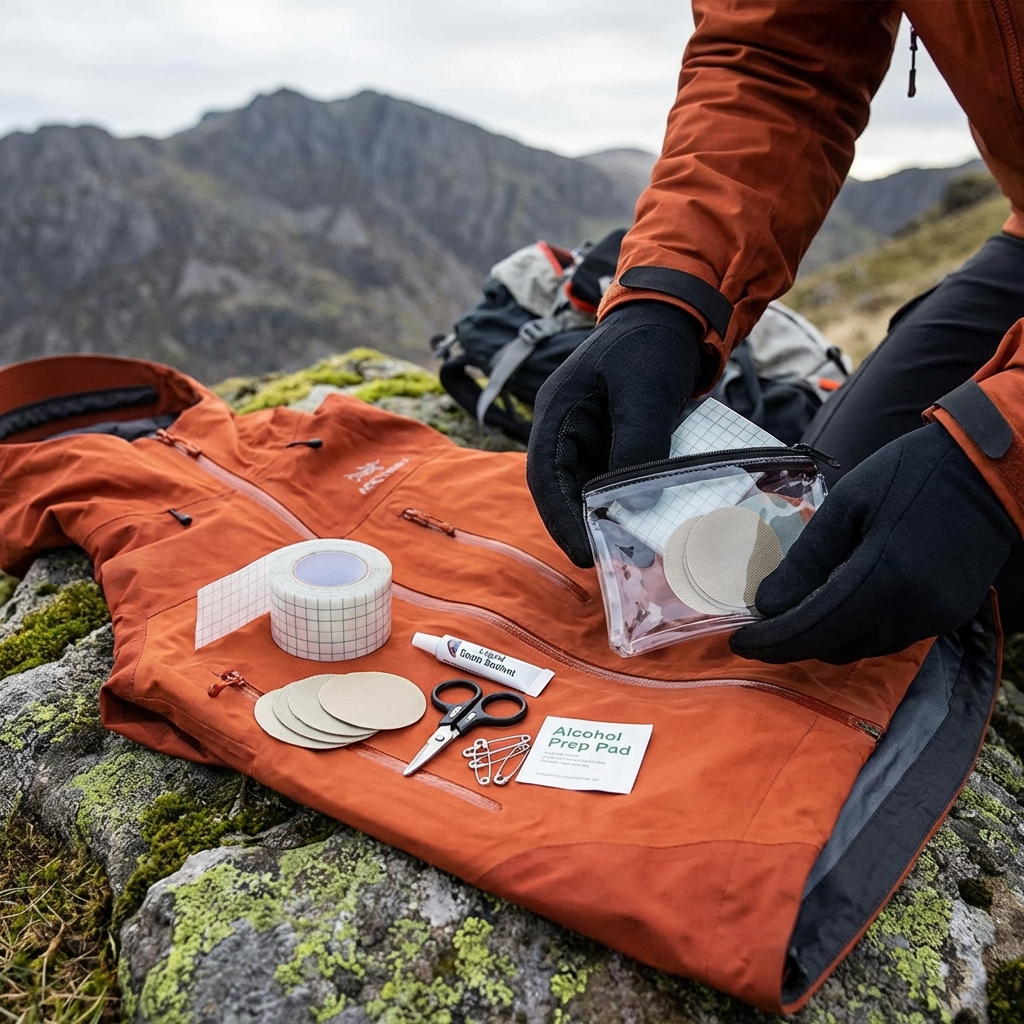
Building Your Emergency Repair Kit
A thoughtful repair kit balances completeness with weight. You don’t need a full workshop, but you do need enough tools to handle common problems.
Start with the essentials: field repair tape (two 3×3 inch patches minimum), a small tube of seam sealant, needle and thread, and a lightweight patch kit. These four items handle 90 percent of field repairs. Total weight is roughly 2-3 ounces. Add a small alcohol wipe for cleaning, and you’re at less than half an ounce more.
Pack these items in a small zipper pouch in the top of your pack or in a hip belt pocket where you can access them quickly. Don’t bury them in a bottom compartment. The moment you need them is when minutes matter.
Consider the length of your trip. Day hikes and short overnights benefit from minimal repair supplies. Extended expeditions—especially those involving scrambling or alpine terrain where damage is more likely—warrant more comprehensive kits. For multi-week trips, consider a larger patch kit and extra sealant.
Organize your kit so you can locate items in low-light conditions. Label small containers. Wrap tape around a card for easy deployment. Familiar tools work faster when you’re stressed.
Build your kit specifically for your shell type. Gore-Tex laminate shells need patches designed for Gore-Tex. Soft-shell materials need more flexible patches. Check your shell’s technical specifications and match your repair supplies accordingly.
Test your kit before serious trips. Practice applying tape and sealant on old shells in your garage. Understand what each tool does and how it feels before you’re 5,000 feet up in weather. Confidence matters.
What to do next: Assemble your kit this week. If you’re planning a trip where weather exposure is a real possibility, invest 15 minutes in a dry run with your repair supplies. You’ll gain confidence and likely discover what you wish you had along.
—
Field repairs aren’t a sign your shell failed—they’re proof that quality gear deserves skilled maintenance. We design our shells expecting they’ll take damage and bounce back stronger. Your job is understanding when and how to help them along. Keep your repair kit light, test it before you need it, and don’t hesitate to layer multiple techniques on serious damage. The trail rewards preparation, and nothing prepares you better than understanding exactly how to keep dry when conditions get rough.
Ready for your next adventure? Gear up with apparel and equipment built for the wild. Explore the collection now.
Frequently Asked Questions (FAQ)
What emergency repair tools should we carry for waterproof shell damage?
We recommend keeping field repair tape and seam sealant patches in your pack because they’re lightweight and handle most common tears and seam failures on the trail. You’ll also want a small piece of sandpaper to roughen the surface before applying tape, which helps it stick better in damp conditions. These items take up minimal space but can keep you dry when a shell fails hours away from camp.
How do we test a field repair before heading back out?
After you’ve applied tape or sealant, we suggest pouring water directly onto the repair from your water bottle to confirm it’s holding. Let it sit for a few minutes to make sure the seal is working and water isn’t seeping through. This quick test gives you confidence that your temporary fix will last until you can get home for a proper repair.
When should we replace our shell instead of repairing it?
If you’re noticing multiple leaks, damage to the main seams along the back or shoulders, or holes larger than a few inches, it’s time to replace it rather than patch it. We design our shells for repairability, but constant failures mean the fabric has reached the end of its performance life. A new shell will protect you better than a patchwork of repairs ever could.
Leave a Reply