Table of Contents
- Why Your Favorite Gear Deserves a Second Life
- The Real Cost of Replacing vs. Repairing Outdoor Equipment
- Essential Tools We Recommend for Your Repair Kit
- Fixing Broken Zippers: Our Step-by-Step Method
- Restoring Seams and Sealing Leaks in Technical Fabrics
- Reviving DWR Coating on Your Outerwear
- Patching Tears and Holes in Backpacks and Apparel
- Using Our Sustainable Resale Program for Beyond-Repair Gear
- Advanced Repairs: When to Seek Professional Help
- Preventive Care Tips to Maximize Gear Durability
- Our Commitment to Repairable, Built-to-Last Products
- Frequently Asked Questions (FAQ)
Why Your Favorite Gear Deserves a Second Life
That jacket has summited peaks with you. Your backpack has carried your dreams through three continents. Your boots broke in during a season of weather you’ll never forget. When something we’ve engineered and you’ve trusted finally shows wear, the instinct is often to replace it. We want you to think differently.
We built our gear to last. That durability is purposeful, designed into every stitch and reinforced seam. A small hole in your shell jacket doesn’t mean it’s finished. A stuck zipper on your pack doesn’t signal the end of the road. Most damage to our technical apparel and equipment is repairable, and learning to fix it yourself extends both the life of your gear and your connection to it.
Repairing gear teaches you how it’s constructed. You understand the layers, the fabrics, the engineering that keeps you dry and warm. That knowledge makes you a better caretaker of equipment in the field. It also means fewer trips to the landfill and less strain on the planet’s resources. When you repair instead of replace, you’re honoring the work we put into making your gear durable in the first place.
The Real Cost of Replacing vs. Repairing Outdoor Equipment
A new technical shell jacket runs between $200 and $400. A replacement zipper slider costs $8. That math is straightforward. But the real calculus goes deeper.
Consider time and availability. A small repair takes 30 minutes to an hour. Researching and purchasing a replacement takes weeks. You’re also dealing with the environmental cost of manufacturing, packaging, and shipping new gear. Our supply chain is efficient, but even the most responsible production uses water, energy, and raw materials.
Then there’s the intangible value. Gear that’s been with you through storms and summits carries a kind of trust that’s hard to replicate in something new. Your jacket knows your body. Your boots are molded to your feet. Starting over with unfamiliar equipment on the trail introduces variables you don’t need.
Most small to moderate damage is 80% cheaper to repair than to replace. A seam reseal might cost $15 in supplies and an afternoon. A new jacket costs what you originally paid. If you have the tools and a little guidance, you can handle the repair yourself and keep that cost even lower. Your investment in a basic repair kit, which runs under $50, pays for itself the first time you fix a zipper or patch a tear.
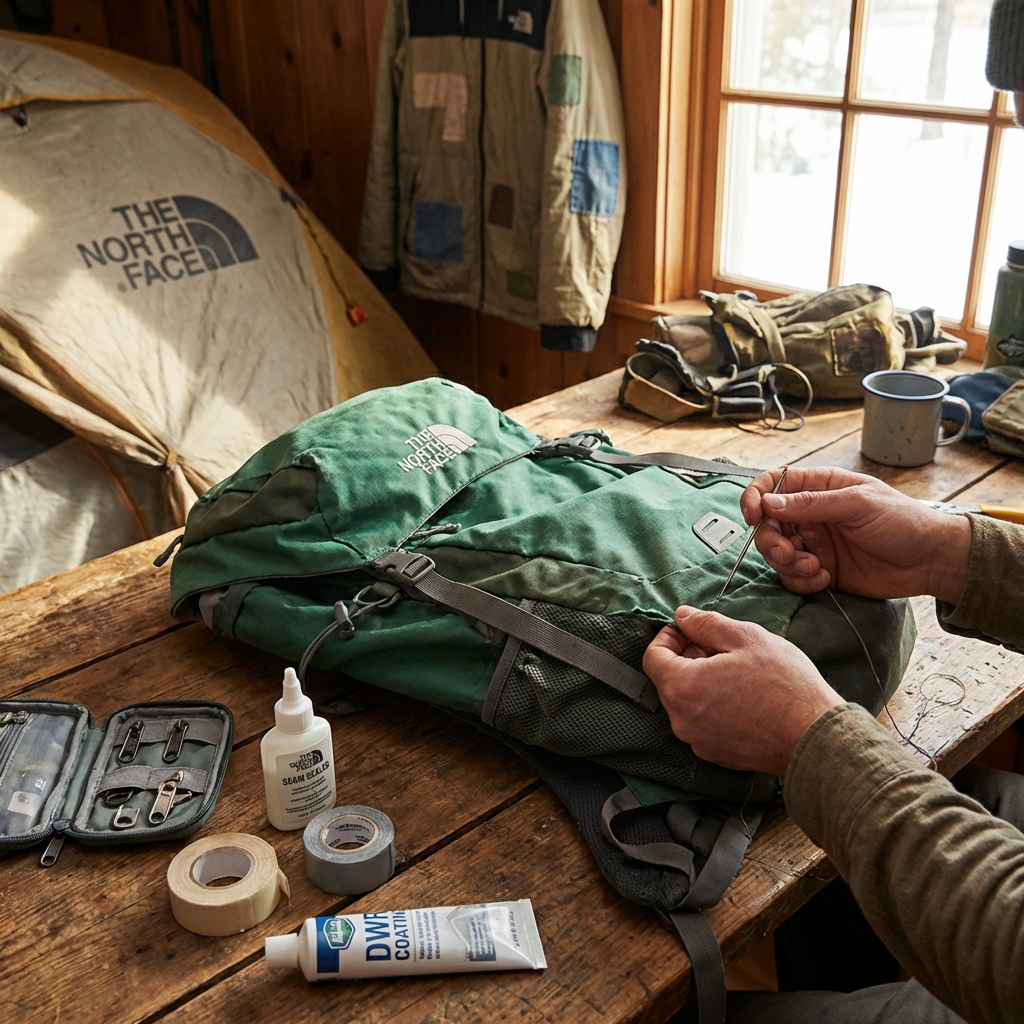
Essential Tools We Recommend for Your Repair Kit
You don’t need a full workshop. A focused kit, kept in a dry bag or small pouch, covers the vast majority of field and home repairs.
Start with needle and thread. Carry both heavy-duty thread for fabric repair and fine thread for detail work. A curved upholstery needle handles thick materials better than a standard sewing needle. Include an assortment of colors: black, navy, gray, and tan cover most gear colors.
Add a zipper repair kit. These come pre-assembled and include replacement sliders, stops, and a special tool to remove and install them. They’re inexpensive and invaluable. You’ll also want a small roll of seam-sealing tape, which we recommend for resealing worn or compromised seams on technical fabrics. It’s heat-activated and works on most of our shell jackets and backpacks.
Include adhesive patches designed for outdoor fabrics. These aren’t the iron-on patches from childhood. Modern repair patches use flexible adhesive and work on nylon, polyester, and Gore-Tex materials. Bring a small tube of flexible fabric glue as a backup. A patch kit specifically for inflatable gear (if you carry sleeping pads or mattresses) is worth the space.
Round out your kit with a small pair of scissors, tweezers for thread management, a measuring tape, and a straightedge for cutting clean patch lines. A magnifying glass or jeweler’s loupe helps when working with small stitches or tight spaces. Keep a piece of wax paper to protect other gear from adhesives.
Store everything in a waterproof pouch. The kit weighs under a pound and takes up minimal pack space.
Fixing Broken Zippers: Our Step-by-Step Method
Zippers fail more often than any other gear component, and fortunately, most failures are fixable without replacing the entire zipper.
A stuck slider happens when the teeth are misaligned or the slider is jammed with debris. Start by cleaning the zip with a brush and a bit of graphite powder or silicone lubricant. Work the slider back and forth gently, never forcing it. Nine times out of ten, this solves the problem.
If the slider itself is broken or stripped, replacement is the answer. Most of our jackets and packs use standard sliders. Using your replacement kit, carefully remove the top and bottom stops with tweezers or a small flathead screwdriver. Slide the damaged slider off. Thread the new slider onto the zipper teeth from the top, making sure the alignment is correct. Reinstall the stops, checking that the slider moves smoothly through its full range before you consider it done.
For zippers that separate partway down (teeth no longer meeting), pinch the slider gently with pliers or a vise. A small amount of pressure realigns the internal mechanism. Test it on a few inches of the zip first. If that doesn’t work, the slider may be beyond recovery, and replacement becomes necessary.
Prevent zipper problems by keeping them clean and dry. A light coat of silicone lubricant every few months protects sliders and keeps teeth moving freely. Store jackets and packs with zippers slightly open to prevent pressure on the mechanism.
Restoring Seams and Sealing Leaks in Technical Fabrics
Seams on technical garments are taped from the inside, a process called tape-sealing that prevents water from wicking through needle holes. Over time and with heavy use, this tape can separate or wear.
Look for leaks by holding the garment up to light or running it under water while watching the inside. Mark any seams that show moisture with a permanent marker. Small separations are candidates for a reseal. Start by carefully peeling back the worn tape from the inside using tweezers. Clean the seam of old tape residue with rubbing alcohol and let it dry completely.
Cut a length of seam-sealing tape slightly longer than the damaged section. Apply it carefully over the seam, pressing firmly as you go. The heat from a household iron (on low setting) activates the adhesive. Use a pressing cloth to protect the fabric from direct iron contact. Work slowly, pressing for 10 seconds per inch, and let the tape cool before flexing or testing.
For small pin-hole leaks or seam separation that won’t fully reseal, flexible fabric sealant works as a secondary barrier. Apply it sparingly to the inside of the seam, smooth it with a wet fingertip, and allow it to cure per manufacturer instructions.
Don’t skip the interior work. Most water infiltration in technical gear happens through stitched seams, not the outer fabric itself. Maintaining them keeps your gear performing as we designed it.
Reviving DWR Coating on Your Outerwear
DWR, or durable water repellent, is a microscopic coating on the outer layer of our shells that makes water bead rather than absorb. Over time, UV exposure, dirt, and wear degrade this finish. Your jacket stops shedding water and starts soaking it up.
Signs of DWR failure are obvious: water darkens the fabric instead of rolling off, or wet patches appear during light rain. The good news is revival is simple and inexpensive.
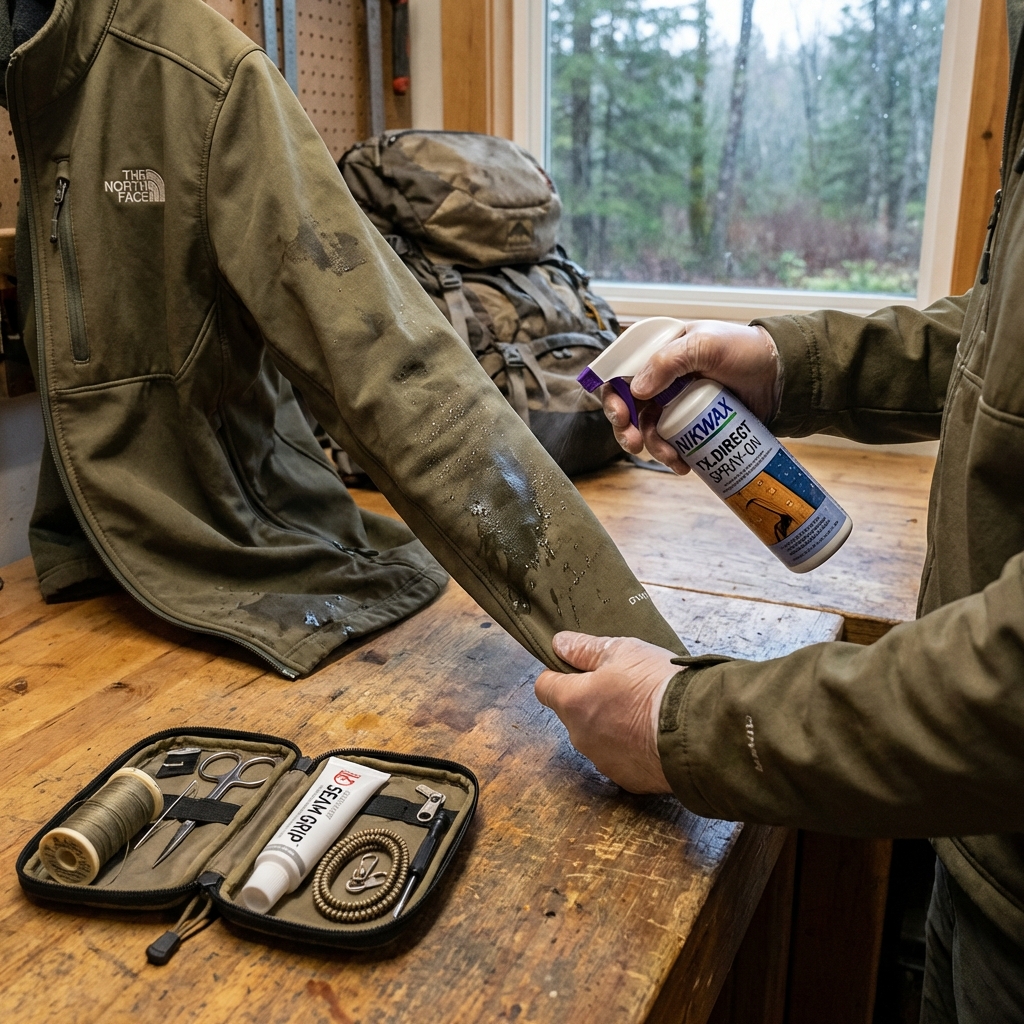
Wash your jacket first. Use warm water, a gentle detergent designed for technical fabrics, and your washing machine on a delicate cycle. Tumble dry on low heat. The heat reactivates some of the remaining DWR. If beading improves significantly, you’re done.
If the jacket still doesn’t shed water, apply a DWR treatment. We recommend spray-on or wash-in formulas designed for technical fabrics. Follow the product instructions carefully. Spray applications require even coverage from 6 inches away in multiple thin coats. Wash-in treatments go in with a load of laundry and coat the entire garment uniformly. Dry on low heat to activate, and the coating will improve water shedding for another year or more of heavy use.
This single maintenance task extends the functional life of a shell jacket by years. It’s also far cheaper than replacing a jacket that simply lost its water repellency rather than structural integrity.
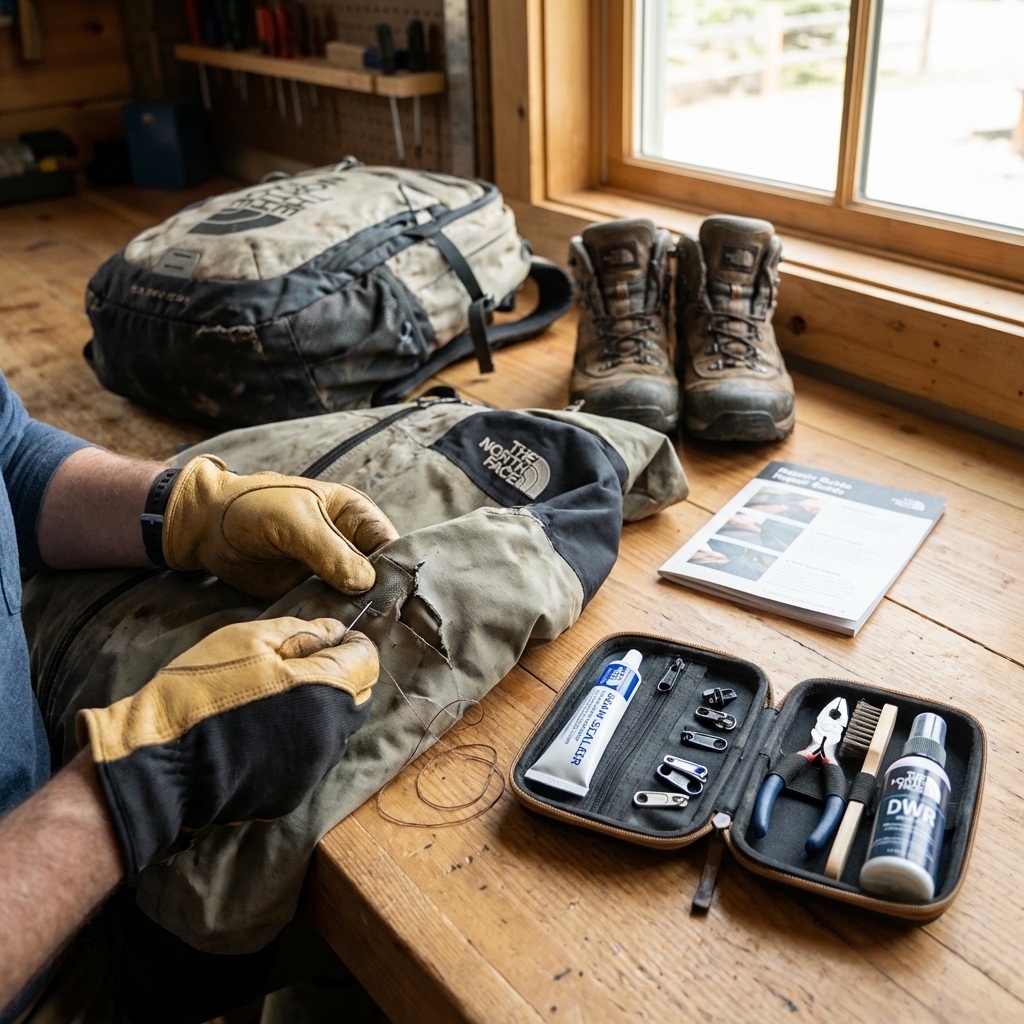
Patching Tears and Holes in Backpacks and Apparel
Tears in nylon or polyester fabric don’t spell doom. Small punctures and rips are entirely repairable and often invisible once patched.
For small holes under half an inch, a patch on the inside is often sufficient. Cut a patch from adhesive-backed repair tape, round the corners to prevent peeling, and press it firmly over the hole. The flexibility of modern patches means they move with the fabric and withstand washing and packing.
Larger tears require a two-sided approach. If possible, clean the area around the tear with rubbing alcohol and let it dry. On the inside, apply a patch that extends at least an inch beyond the tear in all directions. On the outside, apply a matching patch. This sandwiches the tear between reinforcement layers. For the most durable repair, stitch around the perimeter of the patch using a needle and heavy-duty thread after applying the adhesive.
On gear like backpack straps or high-stress areas, stitching adds durability that adhesive alone can’t match. Use a running stitch (in and out every quarter inch) or a cross-stitch for maximum strength. Knot your thread at both ends and apply a small drop of fabric glue to the knots to prevent slipping.
Our technical backpacks* are built with repair in mind. The modular construction means worn straps or bottom panels can often be addressed without affecting the whole pack. A patch to a load-bearing area extends years of service.
Using Our Sustainable Resale Program for Beyond-Repair Gear
Some gear reaches the end of its useful life despite your best repair efforts. Structural failure, permanent water infiltration, or irreparable damage means it’s time to let go. That doesn’t mean it goes to waste.
We operate a resale and trade-in program specifically designed for our customers. Gear that’s beyond your repair can still serve another explorer. You ship us the item, we evaluate it, clean and inspect it, and list it at a discounted price for someone else. You get credit toward a future purchase or a charitable donation in your name.
This program keeps gear in active use and out of landfills. It extends the functional life of our products beyond the original owner and reinforces our commitment to a circular economy. Every item resold is a resource saved.
If your jacket, pack, or boots are worn but still functional, the resale program gives them a second life with a new adventurer. It’s also a sustainable way to upgrade your own gear without guilt. Use what you have until it’s truly done, then pass it forward.
Advanced Repairs: When to Seek Professional Help
Some damage requires skills and tools beyond the scope of DIY repair. Knowing when to attempt a fix and when to defer to professionals is part of responsible gear maintenance.
Leave frame damage on backpacks to the experts. Our AMK 55L Backpack* and similar technical packs use advanced internal structures. Bent or broken stays and suspension systems require specialized knowledge and tools to repair correctly.
Similarly, if a zipper is broken beyond the slider (the teeth are stripped or the zipper itself is damaged), professional replacement ensures proper alignment and function. Gore-Tex laminate separation in shells also demands professional intervention. Attempting to re-laminate at home risks water infiltration and gear failure in the field.
Large tears in high-stress areas, especially those near seams or load-bearing points, benefit from professional stitching. Industrial sewing equipment and heavy-duty thread create repairs that withstand the abuse outdoor gear takes.
We offer repair services through select retail partners and our customer care team. Contact us if you’re unsure whether a repair is something you can tackle or if you’d prefer expert hands on your gear.
Preventive Care Tips to Maximize Gear Durability
The best repair is one you never need to make. Thoughtful care prevents most damage before it starts.
After each trip, dry your gear completely before packing it away. Moisture trapped inside promotes mold and degrades fabrics from within. Hang jackets in a well-ventilated space. Stuff packs with newspaper and let them sit in open air. This step alone eliminates most gear failures we see.
Inspect your gear seasonally. Look for fraying seams, worn DWR, areas where zippers show stress, and any small tears before they become big ones. Addressing these minor issues with preventive patches or spot repairs keeps gear functional year-round.
Wash technical fabrics only when necessary and always with detergent designed for technical gear. Standard laundry soap breaks down DWR and can damage fabric finishes. Use cold water and gentle cycles. Dry on low heat.
Store gear in a cool, dry place. UV exposure degrades fabrics and finishes. Never store anything damp. Ensure zippers are slightly open and straps are relaxed to prevent stress on attachment points.
During use, avoid dragging your pack on rocks or sharp brush. These habits cause minor damage that accumulates. Be mindful of where you set gear during camp setups. A jacket dropped on a cactus or a pack placed on sharp gravel suffers preventable punctures.
Proper care extends the lifespan of your gear from years to decades.
Our Commitment to Repairable, Built-to-Last Products
We design gear with repair in mind. Our stitching patterns, material choices, and construction methods prioritize durability and repairability. We use standardized components wherever possible, meaning replacement parts are accessible and affordable.
This approach reflects our values and your values as someone committed to the outdoors. Gear built to last reduces consumption and waste. It honors the resources and labor that go into making each item. It also means your favorite jacket, pack, or boots can remain part of your adventures for as long as you want them to.
The skills in this guide are straightforward and learnable. Start with a simple repair, build confidence, and expand your capability over time. Every time you successfully fix something yourself, you’re not just saving money or resources. You’re deepening your relationship with gear you trust and building knowledge that serves you on the trail.
Your next step is simple: assess your current gear. Is there a jacket with a stuck zipper, a pack with a small tear, or boots with worn seams? Pick one item and tackle the repair. You’ll be surprised at how quickly these jobs get done and how satisfying the result feels.
We’re here to support you with products, guidance, and services. Shop our repair kits and replacement components. Reach out to our customer care team if you’re unsure about any repair. And when your gear finally reaches the end of the road, remember our resale program exists to keep your adventure going and the planet thriving.
Ready for your next adventure? Gear up with apparel and equipment built for the wild. Explore the collection now.
Frequently Asked Questions (FAQ)
Can I really repair my own North Face gear, or should I take it to a professional?
We absolutely encourage you to try DIY repairs for most common issues like broken zippers, small tears, and DWR coating touch-ups. We’ve designed our gear to be durable and repairable, and our guide walks you through each step so you can confidently handle these fixes at home. However, we recommend seeking professional repair for complex issues like damaged core seams, split fabric panels, or structural damage to backpack frames, since these repairs require specialized equipment and expertise we don’t expect you to have in your garage.
What’s the best way to restore the water-repellent coating on my jacket?
We suggest starting with a gentle wash using a technical fabric cleaner to remove any dirt or sunscreen buildup that might interfere with the coating. After drying completely, you can either apply a liquid DWR treatment (which we carry) following the product instructions, or use a tumble dryer on low heat with a DWR refresh sheet if your jacket is machine-safe. Most of our outerwear responds beautifully to one of these methods and regains its water-shedding performance without needing a full replacement.
What should I do with gear that’s too damaged to repair?
We created our sustainable resale program specifically for this situation, so your gear can find a second life with another explorer rather than ending up in a landfill. If an item is beyond repair, we’ll assess its condition and either refurbish it for resale or ensure it’s recycled responsibly. This way, you’re extending the lifespan of your favorite piece while supporting our commitment to reducing waste in the outdoor industry.
Leave a Reply