Table of Contents
- Why Your Layering System Determines Summit Success
- The Three-Layer Foundation We've Perfected
- Base Layer Technology: Moisture Management in Extreme Cold
- Mid-Layer Insulation: Choosing Between Down and Synthetic Performance
- Shell Layer Protection: Balancing Weight and Weather Resistance
- How Our XPLR Pass Members Optimize Their Kits
- Common Layering Mistakes That Cost Climbers on the Mountain
- Our Recommended Combinations for Different Alpine Conditions
- Sustainability in Technical Layers: Our Resale Program Advantage
- Building Your Complete System with The North Face
- Real Climber Stories: Layering Systems That Worked
- Gear Care Tips to Extend Your Technical Layers
- Frequently Asked Questions (FAQ)
Why Your Layering System Determines Summit Success
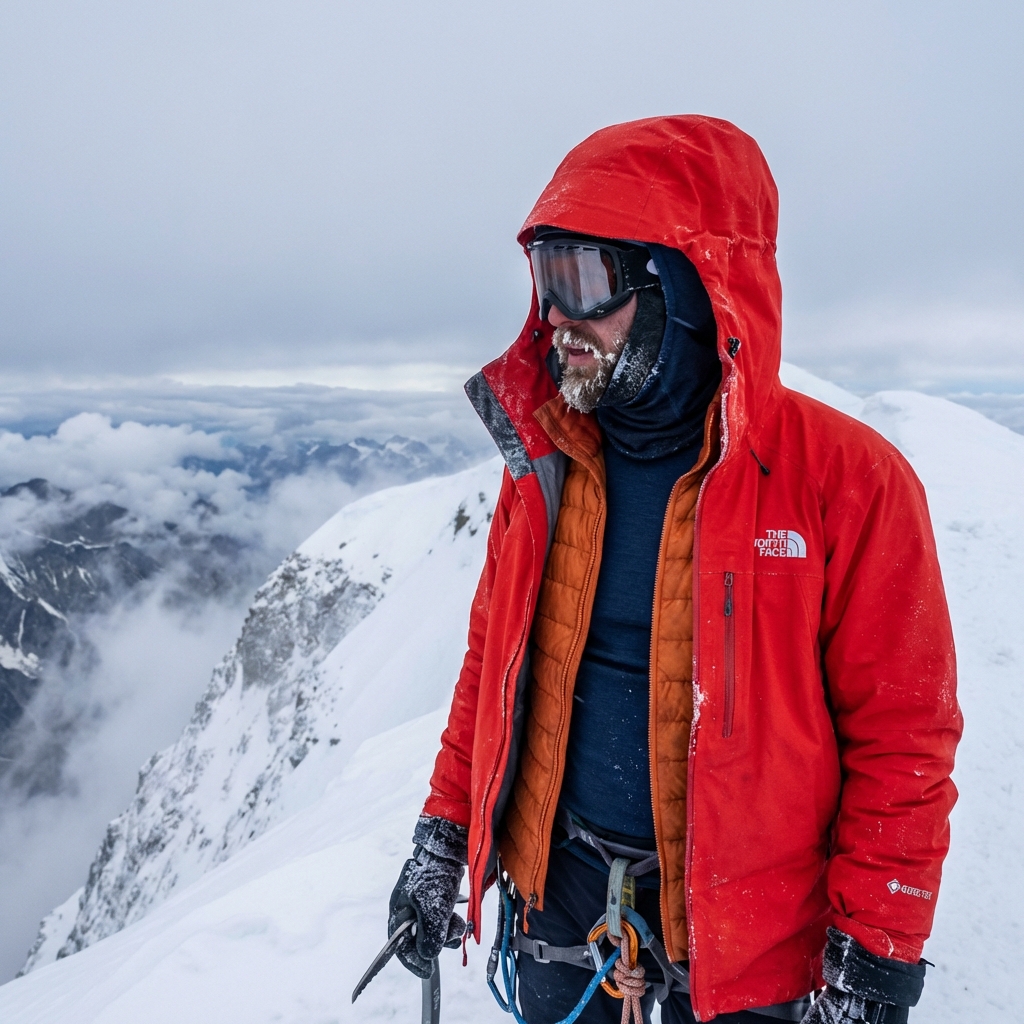
You’re 18,000 feet high, the wind is shredding at 40 mph, and your core is starting to feel the chill. Your layering system is now the only thing between you and a dangerous situation. This is where theory meets reality on the mountain, and we’ve built our technical apparel around one core principle: every layer has a job, and they only work when stacked deliberately.
We’ve watched climbers summit in conditions that felt impossible and watched others turn back in milder weather. The difference rarely comes down to toughness or experience alone. It comes down to understanding how moisture, insulation, and wind resistance interact as a system. A single wrong choice in your base layer can cascade through your entire kit, making you colder, heavier, and less able to adapt.
When you get layering right, your body stays regulated across temperature swings of 40 degrees. You move efficiently. You stay dry from sweat and external weather. You make sound decisions because your energy isn’t burned on fighting discomfort. That’s what we optimize for when we design technical climbing gear.
What to do next: Think about your last alpine push. Did you feel restricted, overheated, or sluggish? That’s often a layering problem, not a fitness problem. Keep that moment in mind as you read through our system.
The Three-Layer Foundation We’ve Perfected
We’ve refined this down to three critical layers, and each one addresses a specific function. Strip any one away, and your performance drops. Add layers without purpose, and you sacrifice mobility or breathing room.
Our system works like this:
- Base layer: Moves moisture away from your skin so you stay dry in active phases and don’t cool rapidly at rest
- Mid-layer: Traps dead air to insulate, with flexibility to compress or remove as output changes
- Shell layer: Blocks wind and precipitation while allowing trapped body heat to escape so you don’t overheat under exertion
The beauty of this three-part approach is flexibility. You can climb in base plus shell on a crisp, dry dawn. Add a mid-layer as you ascend into wind. Strip the shell during a steep snow pitch and pull it back on during the traverse. Each adjustment takes five seconds and keeps you in your performance zone.
We don’t build layers assuming you’ll wear everything at once. We build them assuming you’ll swap, layer, and adjust dozens of times during a single climb. That’s what real alpine work looks like.
Base Layer Technology: Moisture Management in Extreme Cold
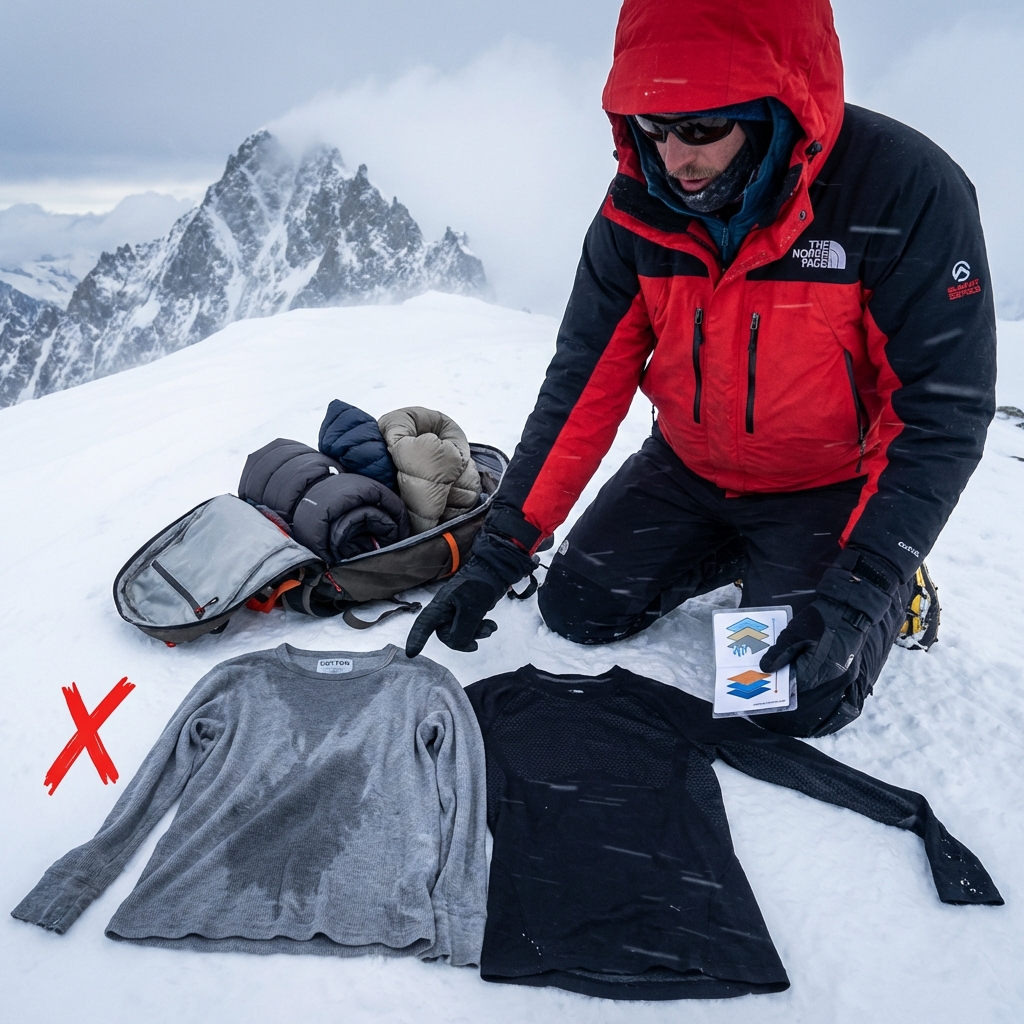
Your base layer is on the clock the moment you start moving. Sweat is inevitable, and cotton holds moisture like a sponge, dropping your core temperature by 25 degrees when the wind hits. We engineer our base layers from synthetic blends and merino wool that wick moisture away from your skin in seconds, not minutes.
Synthetic materials like polyester move sweat laterally across the fabric, pushing it toward the surface where air can evaporate it. Merino wool does something different and equally valuable: it absorbs moisture into its fiber structure without feeling wet, then releases it. Both work. The choice depends on your sensitivity to cold and how aggressively you’re climbing.
On sustained, high-output climbs like steep snow gullies, synthetics tend to outperform. They dry faster if you sweat heavily and cool quickly when soaked. On moderately paced, high-altitude approaches where you’re managing effort carefully, merino’s odor resistance and thermal properties often feel more comfortable.
Fit matters more than you’d think. A loose base layer doesn’t wick efficiently because the fabric sits away from your skin. Our base layers use a technical fit that hugs without restricting, so sweat moves away consistently across your entire torso and legs. Seams run flat to prevent blisters during multi-day pushes, and our crotch gusset design means you can move freely on steep terrain without chafing.
Actionable takeaway: Test your base layer on a moderate day hike before committing it to a summit attempt. Climb hard enough to sweat, then sit still for 15 minutes. If you feel warm and dry, you’ve found your match. If you feel clammy or chilled, switch materials.
Mid-Layer Insulation: Choosing Between Down and Synthetic Performance
This is where we see the most confusion, and it’s the most consequential choice in your kit. Down insulation compresses to almost nothing and delivers exceptional warmth-to-weight. Synthetic insulation stays warm even when damp and dries faster. Both have their place, and we make both because neither dominates in every condition.
Down excels on high, dry mountains where weather is stable and you’ll control moisture carefully. A down mid-layer on Mount Denali or the north face of the Eiger delivers warmth you can’t match elsewhere. It’s light enough that you barely notice it in your pack, and it lasts decades if cared for. The tradeoff: once down gets genuinely wet, it clumps and loses insulation immediately. On wet mountains or during extended alpine traverses where you can’t guarantee drying time, that risk becomes real.
Synthetic insulation like PrimaLoft and Polartec PowerFill perform differently. They lose some warmth compared to down at the same thickness, but they retain 60 to 80 percent of their insulation value even when damp. They also dry faster between uses and don’t require the careful storage that down demands. If you’re climbing in the Pacific Northwest or trying to climb year-round, synthetic mid-layers handle moisture reality better.
We also see mixed strategies work beautifully. A synthetic base plus a down mid-layer under a waterproof shell handles massive temperature swings. Start the day in base and shell. Add the down as you approach ridge lines where temperature drops sharply. Strip it during steep climbing if you’re generating heat. This flexibility is why we make both, and why experienced climbers often carry both on long pushes.
Actionable takeaway: Check your destination’s typical weather patterns. If rain or snow is likely during your climb, synthetic insulation reduces the risk of system failure.
Shell Layer Protection: Balancing Weight and Weather Resistance
Your shell layer is your first defense against wind and precipitation, but here’s what surprises many climbers: the best shell isn’t always the most waterproof. A truly rigid, 100 percent waterproof layer can trap heat and moisture if it doesn’t breathe, making you feel clammy even though you’re technically dry from outside water.
We engineer shells with breathability baked in because managing sweat is as critical as blocking rain. Our FutureLight AMK Jacket uses a textile membrane that allows sweat vapor to escape while still blocking liquid water. The result is a shell that breathes aggressively on long climbs without leaking during storms.
Weight is secondary but real. On a 12-hour alpine push, every ounce affects your pace and fatigue. We cut unnecessary material, use thin fabrics with reinforced seams, and design pockets that don’t add bulk. A quality alpine shell should compress into a space smaller than a water bottle because you might carry it most of the day but need it suddenly.
Fit affects function significantly. A shell that’s too tight over your mid-layers restricts movement and compresses insulation. Too loose, and wind channels through gaps. Our alpine shells fit over a full insulation system without excess material, giving you mobility without exposure.
Actionable takeaway: Before buying a shell, layer it over your planned mid-layer and move through your climbing motions. Can you swing an ice axe freely? Can you reach your pack straps? Does wind seep at the neck or cuffs when you’re in climbing position?
How Our XPLR Pass Members Optimize Their Kits
We’ve built XPLR Pass to recognize that gear optimization is an ongoing process. Members get early access to new technical innovations, exclusive discounts on replacement layers as their needs change, and a community of climbers who share what works in real conditions.
Our most engaged members often build multiple kits rather than one do-everything system. They have a dry-mountain kit optimized for stability and minimal weight, a wet-conditions kit biased toward synthetic insulation and aggressive breathability, and a fast-and-light kit for spring climbing when you’re moving quickly but temperature swings are extreme. XPLR Pass rewards this strategy by giving them accumulated points to refresh layers seasonally.
Many members tell us they discovered mid-layer preferences through the loyalty program’s exchange process. They bought one insulation type, tested it on real mountains, realized they wanted to try something different, and used their points to explore without guilt. That feedback loop directly shapes which combinations we prioritize in production.
Actionable takeaway: Join XPLR Pass if you’re serious about refining your system. The points add up quickly on technical gear, and you’ll earn early access to new releases before wider availability.
Common Layering Mistakes That Cost Climbers on the Mountain
We see predictable patterns in what holds climbers back, and most are fixable with small adjustments.
Wearing cotton anywhere near your skin: Even as a mid-layer sleeve or liner, cotton wicks poorly and holds cold. This is the single most common mistake we see, and it takes just one swap to fix it.
Buying the biggest size to accommodate layering: Oversized layers look forgiving but actually hurt performance. Sweat sits between you and the fabric instead of moving away. Loose shells let wind tunnel through. Size for layering, not for baggy comfort.
Stacking insulation based on how cold it feels outside: Outside temperature doesn’t tell you what your body needs. A sunny, still day at 20 degrees needs less insulation than a windy, cloudy day at 35 degrees. Watch the sun, wind, and your output level. Adjust layers before you feel cold.
Skipping the shell on dry days: Clear skies hide risk. Afternoon wind picks up fast in mountains, and a forgotten shell turns a good day into a rescue situation. Carry it always, even if you don’t wear it.
Choosing insulation based on a single day’s use: Your kit will see dozens of different conditions. Optimize for your most common or most challenging scenario, not the easiest day you can imagine.
Our Recommended Combinations for Different Alpine Conditions
Dry, high-altitude, stable weather (Denali, Aconcagua): Base synthetic, down mid-layer, waterproof-breathable shell. This prioritizes warmth-to-weight and works beautifully when moisture isn’t a factor. Strip layers aggressively during climbing, add during rests.
Wet, maritime mountains (Cascades, Pacific Northwest): Base merino or synthetic, synthetic mid-layer PrimaLoft, aggressive breathable shell. Prioritize moisture resistance and quick drying over minimal weight. You’ll appreciate mid-layer warmth even when damp.
Alpine ice climbing with rapid temperature swings (mixed rock and ice): Base synthetic, two mid-layers (light synthetic plus option to add thin down or fleece), shell. This lets you climb in base plus shell for motion, add insulation for long pitches, and strip aggressively during steep sections to avoid overheating.
Fast climbing with minimal overnight (spring mountaineering): Base merino, light synthetic mid-layer, minimal shell (or hybrid shell with integrated insulation). Speed matters more than redundancy. You’ll change elevation quickly and manage temperature swings through pace.
Winter and extreme cold (above 18,000 feet): Base merino, heavy down mid-layer, premium insulated parka (like our Cloud Down AMK Parka), rigid waterproof shell. Stack everything because output is limited, and sitting still creates massive cold exposure.
Actionable takeaway: Write down your next climb’s elevation gain, expected weather, and climb duration. Match that to one of these templates and build your specific kit from there.
Sustainability in Technical Layers: Our Resale Program Advantage
We’ve watched climbers hold onto technical gear longer than they should because replacing it feels wasteful. Our Resale Program flips that script. Sell us your used layers, and we clean them, verify their condition, and resell them at a lower price. You recover value, someone else gets quality gear at an accessible price, and we keep garments in use instead of landfills.
For layering systems specifically, this means you can experiment with confidence. Buy that mid-layer combination you’re unsure about. Test it for two seasons. If it doesn’t fit your actual climbing pattern, resell it through us and try something different. The economic friction disappears, and you optimize faster.
Many climbers also use Resale to upgrade systematically. Sell last year’s shells, put that credit toward newer breathable fabrics. Your kit stays current, your obsolete layers find new climbers, and the environmental cost of always buying new gear drops significantly.
Building Your Complete System with The North Face
Your complete alpine layering system is specific to your climbing goals, your local weather patterns, and your personal heat regulation. We can’t prescribe it, but we can guide the process.
Start with your base layer. Choose merino if you climb in cold, dry conditions or prefer comfort on moderate days. Choose synthetic if you’re in wet mountains or plan aggressive output where drying speed matters. Fit should feel snug, not baggy.
Pick your mid-layer next based on your most challenging condition. If you’re climbing in the Cascades or similar wet mountains, prioritize synthetic insulation. If you’re working toward 18,000-foot peaks with stable weather, down rewards weight optimization. Most climbers working toward higher elevations eventually own both.
Add your shell third. Prioritize breathability as much as waterproofing. A shell that moves sweat vapor outward will keep you comfortable during movement and protected during rest or storms. Fit it over your planned mid-layers and test mobility.
Build around those three, then add lighter layers for specific uses: a fleece for around camp, a wind layer for weight-conscious days, extra base layers for extended climbs. Each addition should solve a specific problem you’ve experienced, not hypothetical what-ifs.
Actionable takeaway: Don’t buy your whole system at once. Buy your base layer, climb in it, learn how your body regulates. Then add mid-layers. Then shells. Each decision is informed by real experience.
Real Climber Stories: Layering Systems That Worked
We’ve asked climbers who’ve pushed at high elevation and in brutal conditions what actually worked. Patterns emerge fast.
A mountaineer who summited six peaks above 18,000 feet told us she stopped worrying about “the perfect insulation” and started building redundancy instead. She carries a light synthetic and a down layer, choosing what to wear based on real-time conditions. On her final push up Denali, she mixed them, creating total flexibility. She never felt trapped in the wrong system mid-climb.
An ice climbing guide who works in the Canadian Rockies swears by merino base layers and synthetic mid-insulation. He described a March day when he got soaked crossing a stream but kept climbing for six more hours. His synthetic mid-layer dried while he moved, maintaining enough insulation that he never got dangerously cold. Cotton or down would have been a medical incident.
A ski mountaineer who does high-speed traverses emphasized shell breathability more than waterproofing. She told us she’d been chased off mountains by internal condensation, not leaking shells. Switching to an aggressively breathable design changed her ability to climb fast without overheating. That single choice fixed a problem she’d been troubleshooting for years.
These aren’t heroic stories. They’re practical adjustments to technical choices. That’s what real optimization looks like.
Gear Care Tips to Extend Your Technical Layers
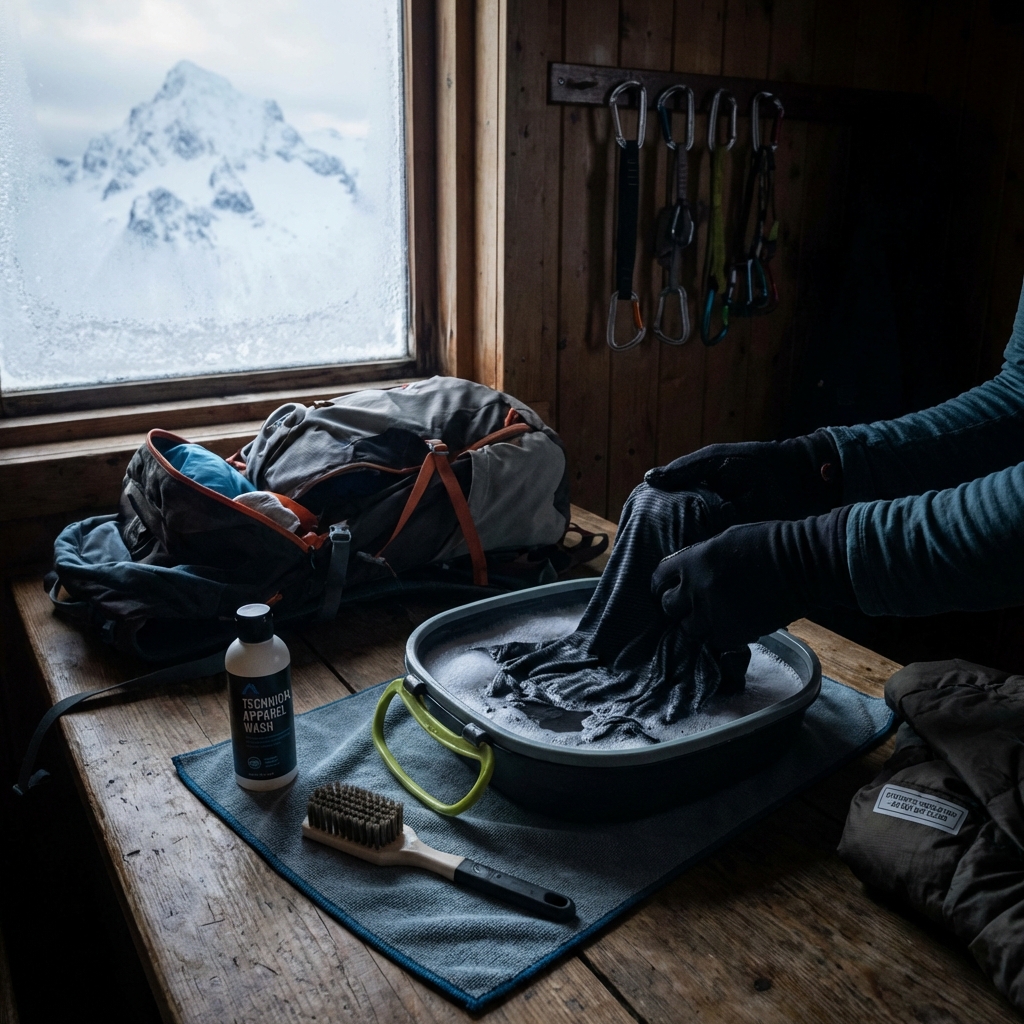
Your technical layers will outlast seasons if you treat them consistently. We’ve designed them to handle abuse, but maintenance matters.
Wash your base layers frequently. Merino and synthetics resist odor, but washing after 5 to 10 wears keeps insulation properties intact and prevents buildup. Use cold water and gentle detergent. Skip fabric softener, which coats fibers and kills breathability.
Dry insulation carefully. Down and synthetic insulation can handle the dryer on low heat, but hang-drying is safer. High heat damages the fibers that create dead-air insulation. After mountains, let wet insulation dry fully before storing, or it can develop odor and mildew.
Treat your shell with care during storage. Seam tape is durable but benefits from dry storage. Folding shells rather than hanging prevents stress on shoulders. If your shell gets a small tear, repair it immediately with a patch kit. Small leaks become big problems.
Compress down insulation in stuff sacks, not in tight compression bags. Tight compression bags permanently strain down clusters. Stuff sacks let it breathe and maintain loft while staying compact.
Inspect seams and zippers before every climb. Zippers fail on multi-day pushes when it matters most. Run them smoothly, ensure alignment, and consider a zipper repair kit for remote climbs.
The reality is simple: technical gear costs real money. Washing your base layer and drying your insulation correctly adds years of life and keeps your system reliable when it counts.
Building your alpine layering system is an ongoing conversation with the mountain. You’ll refine your choices as you climb, discover what your body actually needs versus what you assumed, and gradually build a kit that’s uniquely optimized for your style. We’re here to make that process smoother by building gear that performs across conditions and communities where you learn from experienced climbers. Start with a quality base layer, climb in it, and build from there. The best system is the one that keeps you warm, dry, and efficient on every push.
Ready for your next adventure? Gear up with apparel and equipment built for the wild. Explore the collection now.
Frequently Asked Questions (FAQ)
Why does our three-layer system work better than wearing one heavy jacket?
We’ve found that our three-layer approach gives you flexibility and performance that a single jacket can’t match. Each layer serves a specific purpose: our base layers wick moisture away from your skin, our mid-layers trap warmth, and our shells protect you from wind and precipitation. This system lets you adjust your insulation as conditions and your effort level change during your climb, preventing overheating and the dangerous sweat that leads to hypothermia.
How do we help you choose between down and synthetic insulation for alpine climbing?
We recommend down when you’re climbing in dry, cold conditions because it compresses more efficiently and gives you the best warmth-to-weight ratio for your pack. However, we suggest synthetic insulation when conditions are wet or variable because our synthetic materials perform better when damp and dry faster than down. Most of our experienced climbers carry both options and swap them based on the forecast and their specific route.
What makes our XPLR Pass members better equipped for alpine expeditions?
Our XPLR Pass members get early access to new technical gear releases and exclusive discounts that let them upgrade their systems more affordably. They also gain priority sizing during peak seasons when our most advanced climbing layers sell out quickly, ensuring they have the exact combination we recommend for their conditions.
Leave a Reply