Table of Contents
- Understanding DWR Coatings and Why We Test Them
- The Water Beading Test: Our Go-To Inspection Method
- Pressure-Based Testing: How We Ensure Our Jackets Perform
- Lab-Grade Hydrostatic Testing for Reliable Performance
- Field Testing in Real Conditions: Where Our Gear Proves Itself
- Reproofing Your Jackets: Our Simple Step-by-Step Process
- Maintaining Waterproofing on Your Boots: Extended Durability Solutions
- Frequently Asked Questions (FAQ)
Understanding DWR Coatings and Why We Test Them
Water doesn’t forgive poor preparation. Whether you’re caught in a sudden alpine rainstorm or trudging through a swollen creek crossing, the difference between staying dry and soaked comes down to how well your gear was tested before it ever reached your pack.
We’ve spent decades refining waterproofing standards across our technical outerwear, hiking boots, and backpacks. That experience taught us something critical: testing methods matter as much as the materials themselves. A jacket that passes one test might fail another. A boot that sheds light rain might absorb water during a full submersion. The only way to build gear you can trust is to use rigorous, layered testing protocols that mirror real-world demands.
This guide walks you through the seven methods we use to ensure our gear keeps water out, how they work, and what they tell you about durability. By understanding these tests, you’ll know exactly what to look for when choosing your next piece of equipment and how to maintain it once it’s yours.
Durable Water Repellent (DWR) coatings are the first line of defense against moisture. Think of DWR as a invisible shield that makes water bead up and roll off fabric rather than soak in. It’s not waterproofing itself; it’s the surface treatment that keeps your outer shell from becoming a water sponge.
We apply DWR to nearly every piece of shell outerwear we make. It extends the life of breathable membranes underneath (like Gore-Tex) by preventing water from coating the fabric and blocking air vapor escape. Without DWR, water clings to fibers, and your jacket turns clammy even if the membrane itself is technically waterproof.
Here’s what matters: DWR degrades over time. Friction from pack straps, repeated washing, and UV exposure wear it down. That’s why testing for DWR isn’t a one-time factory checkmark. You need to know:
- How quickly water beads initially
- How long the coating lasts through field use
- When it’s time to reapply
- Which reproofing methods actually work
We test DWR performance across our entire product line because a jacket that loses its water-shedding ability within a season defeats the purpose of owning technical gear. The tests you’ll read about below are all designed to measure, validate, and predict how DWR holds up.
Next step: When you inspect a new jacket or boot, run a quick water test (see below) to establish a baseline. This tells you whether the factory coating is still active.
The Water Beading Test: Our Go-To Inspection Method
The water beading test is simple, fast, and tells you almost everything you need to know about whether DWR is working.
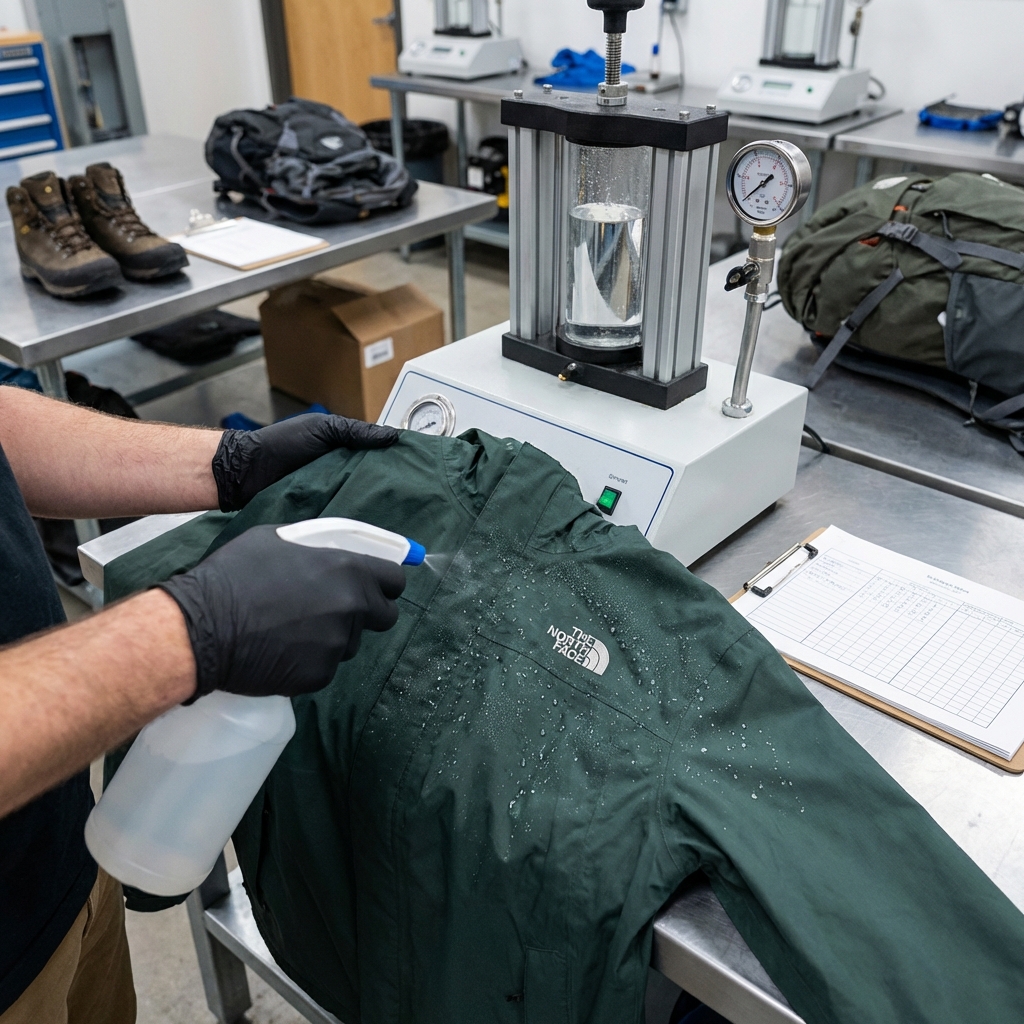
Here’s how we do it: Pour a small amount of water directly onto a clean section of your jacket or pack. If the coating is fresh and functional, water forms tight beads that sit on top of the fabric like mercury drops. The beads stay distinct, roll around, and eventually fall off without soaking in.
When DWR is worn down, water spreads and soaks into the weave instead. It darkens the fabric, clings to it, and doesn’t roll freely. This is the warning sign that reproofing time is near.
We run this test on samples from every production batch. It’s not lab equipment or fancy instruments; it’s the same test you can do at home with a spray bottle. But that simplicity is also why it’s so effective. You’re observing exactly what happens in the field: water hitting your gear, and either being shed or absorbed.
The limitation is important to acknowledge: the water beading test only checks surface behavior. It doesn’t tell you whether the membrane underneath is actually waterproof, or how much pressure water needs to penetrate the weave. That’s where the tests below come in.
Actionable takeaway: Before your next trip, test each jacket and shell you own with water from a spray bottle. Mark the ones where water doesn’t bead cleanly. Those are candidates for reproofing before serious rain or snow exposure.
Pressure-Based Testing: How We Ensure Our Jackets Perform
Pressure-based testing simulates what happens when rain doesn’t just fall on your gear; it hammers it. Imagine heavy downpour while you’re in a tent with gear piled against fabric, or rain driving sideways under pack straps. These scenarios create real pressure that water must overcome to penetrate.
We use a test called the spray rating method in our quality control labs. Equipment simulates rainfall at different intensities and angles while water pressure builds behind the fabric. We measure how much water passes through the weave under specific pressure conditions. The result is expressed as how many millimeters of water column the fabric can withstand before water starts seeping through.
Our technical shell jackets are typically rated for 20,000 mm or higher, meaning they resist water pressure equivalent to a column of water 20 meters tall before leaking begins. That threshold handles most real-world rain scenarios, including extended downpours and water running off higher terrain.
The strength of pressure testing is accuracy and reproducibility. You get a number that’s directly comparable across different products and brands. Two jackets both rated 10,000 mm should perform similarly under equivalent conditions.
But here’s the catch: a lab rating assumes perfect fabric and seams. Once you’re on the trail, imperfect seams and abrasion lower that effective rating. This is why every jacket we make beyond entry-level includes sealed seams. We’re accounting for real-world wear in our manufacturing.
Next step: When shopping for shells, ask for or look for the mm-rated specification. Anything above 10,000 mm handles serious rain; 20,000 mm or higher is what we build into our Summit Series gear. Don’t get seduced by astronomical numbers (50,000 mm+); they’re overkill and often indicate marketing rather than meaningful durability.
Lab-Grade Hydrostatic Testing for Reliable Performance
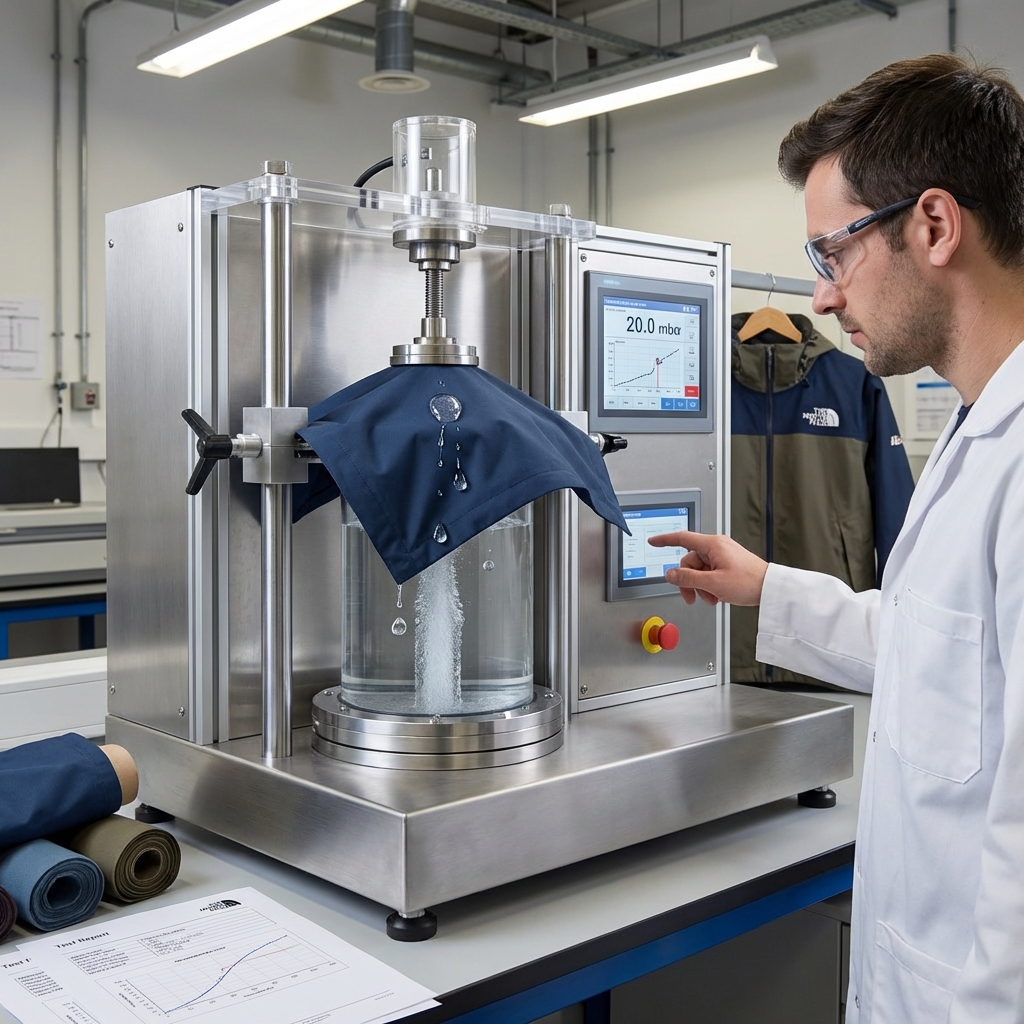
Hydrostatic testing goes deeper than pressure rating. Instead of simulating rain, we actually submerge fabric samples and measure exactly how much water pressure builds before breakthrough occurs.
We place a fabric sample over a tube, apply steadily increasing water pressure from below, and watch for the first appearance of moisture on the other side. That breakthrough point, measured in millimeters of water column, is the hydrostatic rating. It’s the most direct measure of waterproof performance a material can receive.
This test is brutal because it removes all variables except the fabric itself. No seams, no DWR variability, no real-world imperfections. It’s the fabric’s true waterproof potential.
Our Gore-Tex Pro membranes consistently exceed 20,000 mm in hydrostatic testing, which means they handle extreme conditions. We validate this across multiple samples and batches because even high-quality materials can have variation.
Hydrostatic testing also helps us identify which combinations of fabrics work best. A cheap polyester backing paired with a premium membrane might fail unexpectedly. By testing the layered combination, not just individual components, we catch problems before gear reaches you.
The limitation is that this is a lab environment. Real jackets have seams, zippers, and stitching holes that create weak points. A seam in hydrostatic testing would fail at a fraction of the membrane’s rated pressure. This is exactly why seam sealing is non-negotiable on any serious technical jacket.
Actionable takeaway: Inspect the seams on any used or inherited jacket you plan to rely on. Look for peeling or whitened seam tape, or gaps where tape has separated from stitching. Those seams are your weakest point and should be re-sealed before major trips.
Field Testing in Real Conditions: Where Our Gear Proves Itself
Numbers in a lab tell one story. Actual weather tells another.
We send prototypes and finished products to athletes, guides, and explorers who use them in the exact conditions we design for: high-altitude snow, coastal rain, desert flash floods, and everything between. Over the past year alone, our gear has logged hundreds of thousands of test miles across six continents. Our athletes document performance, failure points, and durability degradation in real time.
Field testing catches what labs miss. A seam sealed perfectly in the factory might fail due to abrasion from a pack strap. DWR coatings degrade faster in high-UV alpine environments than in temperate rain. A zipper that works smoothly with dry gloves becomes impossible with frozen fingers.
We document everything: how long DWR lasts before water stops beading, how breathability holds up after repeated sweat cycles, where seams start to separate, and which abrasion points matter most. This data feeds directly back into design and material selection for the next generation.
One consistent finding: gear used in the harshest conditions shows exactly where engineers made good decisions and where they didn’t. A jacket rated for extreme alpinism will immediately reveal any seam-sealing shortcut. A waterproof boot rated for scrambling will expose inadequate membrane coverage around the ankle if there’s a weak point.
The trade-off is time and cost. Field testing takes months or years before we have reliable data. This is why we don’t cut corners on prototyping. Better to spend six months testing than ship gear that fails on your first big climb.
Actionable takeaway: Check product reviews and athlete feedback from people using gear in conditions similar to yours. Real users will surface durability issues faster than marketing copy ever could. Pay attention to complaints about specific weak points; they’re usually legitimate.
Reproofing Your Jackets: Our Simple Step-by-Step Process
DWR doesn’t last forever. After heavy use, roughly 12 to 24 months depending on conditions, you’ll notice water no longer beads on your jacket. The membrane underneath still works, but the surface is wearing down.
Fortunately, reproofing is straightforward. Here’s our proven process:
- Clean your jacket thoroughly. Dirt, sunscreen, and body oils block DWR application. Use a gentle soap, warm water, and a soft brush. Rinse completely and let it dry fully (at least several hours, ideally overnight).
- Choose a reproofing product. We recommend wash-in treatments for regular maintenance. They’re applied during the rinse cycle and distribute evenly across your fabric. Spray treatments work for touch-ups on specific areas but are less consistent across larger surfaces.
- Follow product instructions precisely. Most wash-in DWR treatments go into the rinse cycle with a warm water wash. Don’t use detergent; DWR works best on clean but not chemically treated fabric.
- Dry thoroughly. Most reproofing requires heat activation. Use a low-temperature dryer or air dry near a warm place. High heat can damage some shells, so check your jacket’s care label first.
- Test before your next trip. Once your jacket has dried completely, run the water beading test again. You should see beading return within one hour of application.
The entire process takes a few hours, costs under twenty dollars, and extends your jacket’s functional life by another season or two. We recommend reproofing before it reaches the point where water spreads immediately. Preventative reproofing is cheaper and easier than waiting until you’re soaked on the trail.
One note: avoid dry-cleaning services for technical gear. Dry-cleaning solvents can degrade membranes and finishes. Home reproofing gives you complete control.
Next step: Pick up a wash-in DWR treatment this month and reapply to any shell that’s more than a year old. Make it an annual maintenance routine, like checking your hiking boots.
Maintaining Waterproofing on Your Boots: Extended Durability Solutions
Boots face different waterproofing challenges than jackets. They’re in constant contact with wet ground, mud, and abrasive gravel. The membrane has to survive constant flexing where the toe box meets the upper, and where your ankle moves inside the shaft.
Our approach combines three layers of protection:
Membrane selection and sealing: We use Gore-Tex or comparable breathable, waterproof membranes in our technical boots like the Summit Series Verto FA Boots. Every seam where membrane overlaps is sealed with tape or liquid sealant applied from the inside, preventing water from finding entry points during flexing.
DWR on uppers: The outer leather or fabric gets DWR treatment, just like shell jackets. This prevents water from soaking into the upper leather before it ever reaches the membrane. Wet leather also becomes heavy and loses insulating properties in cold conditions.
Drain and dry protocols: Design-level solutions matter most. We include drain holes in protective toe caps and use materials that shed water rather than trap it. Once you’re back in camp, proper drying is critical. Remove the insoles, loosen the laces fully, and stuff with newspaper to absorb moisture. Dry at room temperature, never near direct heat.
Maintenance every 3 to 6 months keeps waterproofing intact:
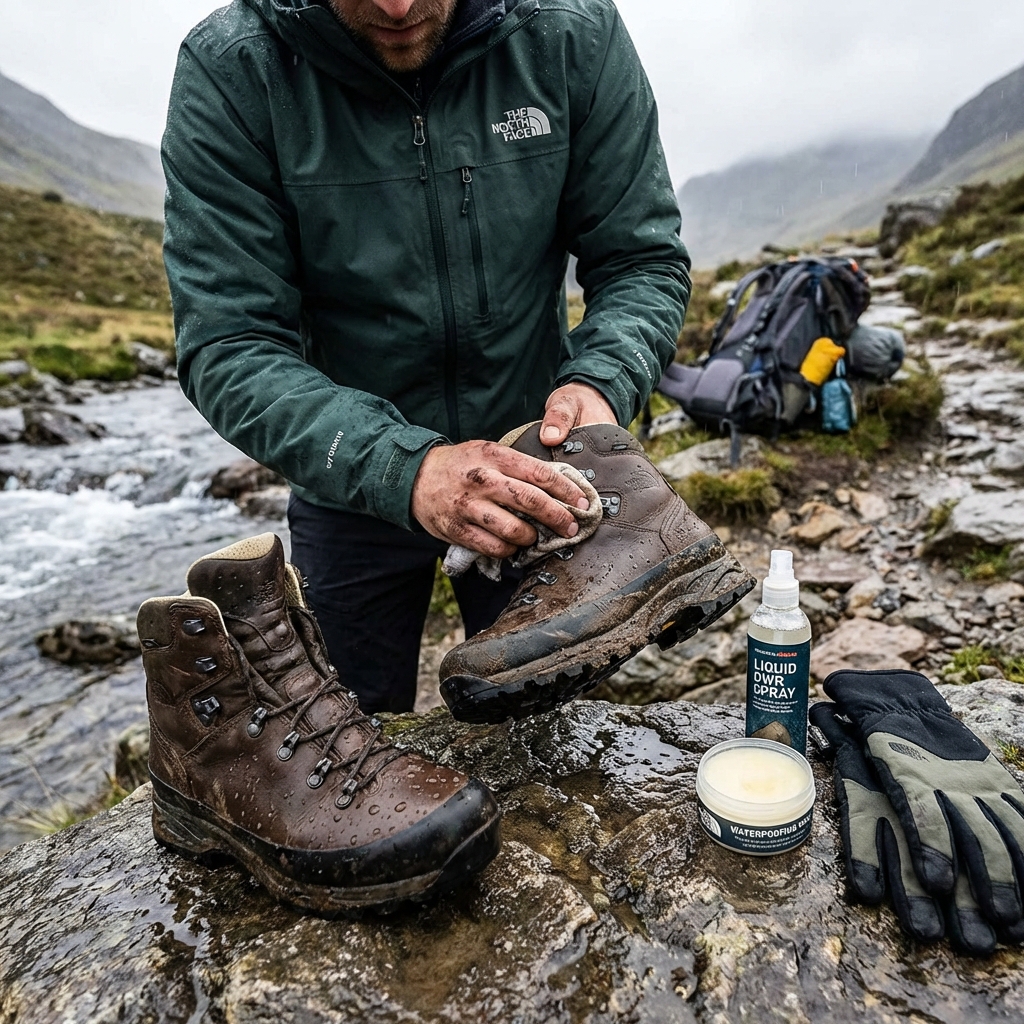
- Clean boots with warm water and a brush to remove dirt and salt residue
- Apply a leather-appropriate waterproofing product (wax or cream for leather, spray for synthetic uppers)
- Check seams for whitening or separation and have them re-sealed professionally if needed
- Test fit with a fresh insole every season; compression reduces cushioning and changes how water sheds
Most boot failures we see aren’t membrane failures; they’re seam or DWR failures. Preventative maintenance costs almost nothing compared to replacing boots.
Your move: After your next muddy hike, take 15 minutes to clean your boots and apply a waterproofing treatment. That single habit extends boot life from three seasons to five or more.
—
Waterproofing isn’t magic. It’s the result of careful material selection, rigorous testing, and preventative maintenance. Every test method we’ve outlined here serves one purpose: ensuring that when you need your gear, it performs.
We invest in hydrostatic testing, field validation, and pressure rating because we know where our products go. Alpine summits don’t forgive shortcuts. Neither do we.
Start with the water beading test on your current gear. Reproof anything that no longer sheds water. Inspect seams before major trips. Make waterproofing maintenance an annual habit, not an afterthought.
Your next adventure depends on gear that actually works when conditions turn serious. That’s exactly what we build.
Ready for your next adventure? Gear up with apparel and equipment built for the wild. Explore the collection now.
Frequently Asked Questions (FAQ)
How often should I reproof my jacket to maintain waterproofing?
We recommend reproofing your jacket every 1-2 seasons of regular use, or whenever you notice water no longer beads on the surface. The DWR coating naturally wears away with washing and abrasion, so this maintenance is essential for keeping your gear performing at its peak. We’ve designed our reproofing process to be straightforward enough that you can do it at home without special equipment.
What’s the best way to tell if my boots need waterproofing maintenance?
We suggest doing a simple water test by pouring a small amount of water onto your boot’s surface. If the water soaks in instead of beading up, that’s your signal to reapply treatment. Boots take on moisture differently than jackets, so we recommend checking yours before each season of heavy use, especially if you’re hiking in wet conditions regularly.
Can I use the same waterproofing methods on all my gear?
Not quite – different materials and gear types require tailored approaches. Our waterproof jackets respond well to spray-on or wash-in reproofing treatments, while your boots and backpacks may need specialized products designed for their specific construction. We always recommend checking the care label on each item, as we engineer different materials with particular maintenance needs in mind.
Leave a Reply