Table of Contents
- Fixing Stuck and Broken Zippers on Your Gear
- Patching Tears in Fabric and Nylon Effectively
- Resealing Seams to Restore Waterproofing
- Repairing Puffer Jacket Down Leaks
- Reinforcing High-Stress Seams and Stress Points
- Fixing Ripped Backpack Straps and Attachments
- Quick Fixes for Boot and Footwear Damage
- Frequently Asked Questions (FAQ)
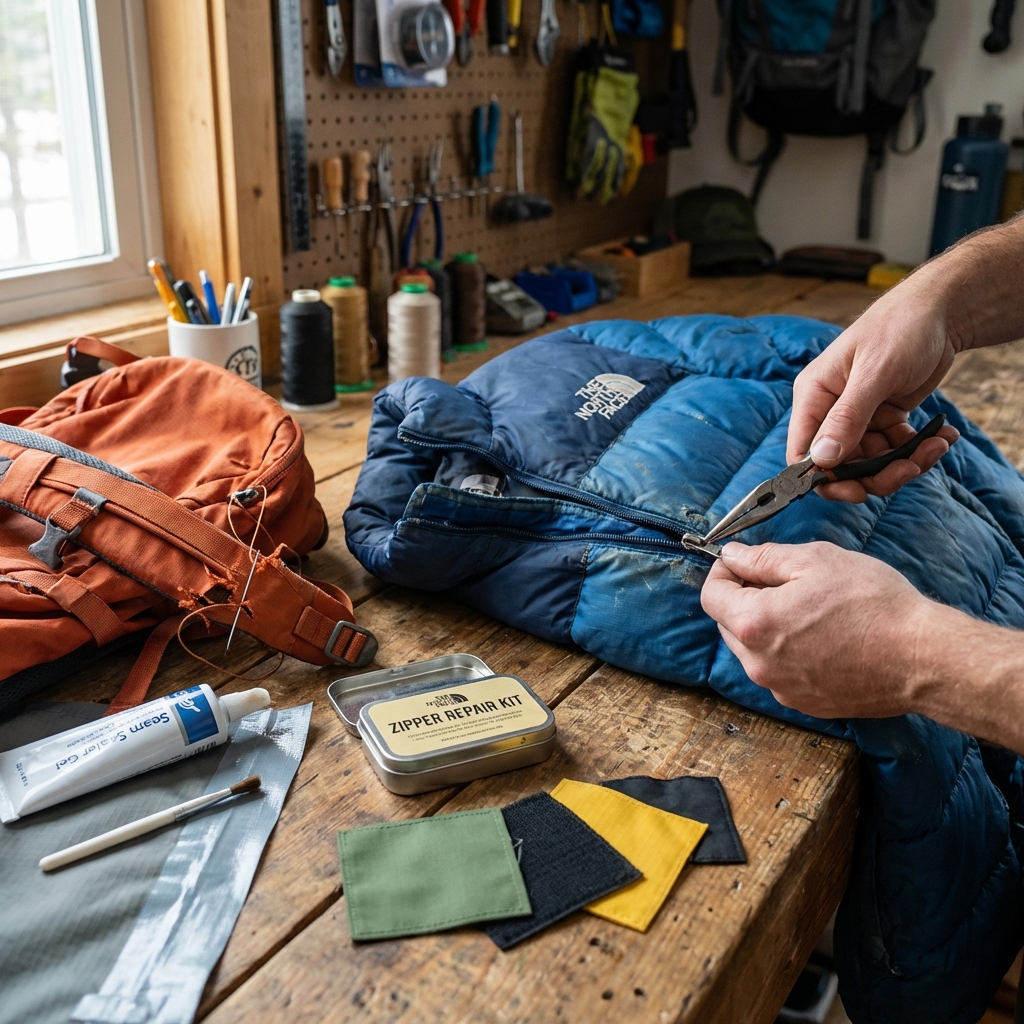
Fixing Stuck and Broken Zippers on Your Gear
Your favorite jacket rips on a sharp branch. A backpack zipper jams mid-trail. Water seeps through a seam you thought was sealed. These moments don’t have to mean the end of your gear’s life. Over decades of designing and refining technical apparel and equipment, we’ve learned that smart field repairs can extend the life of your favorite pieces by months or years. The truth is: most gear damage is fixable with basic tools and the right technique.
We’ve put together the practical repair strategies our field testers and athletes rely on to keep their gear mission-ready. Whether you’re deep in the backcountry without a replacement or simply want to avoid sending a beloved jacket to the landfill, these seven methods will give you the confidence to repair common damage yourself.
Zippers fail in two ways: they either jam or the slider breaks. Both are fixable, and neither requires replacing the whole zipper.
A stuck zipper usually means the teeth have snagged fabric or the slider has accumulated dirt and salt. Start by cleaning. Use a dry brush or old toothbrush to scrub along both sides of the zipper track, working side to side rather than up and down. Then apply a light lubricant. Graphite pencil works surprisingly well: rub the pencil tip along the teeth on both sides, then work the slider up and down gently. If you don’t have graphite, a small amount of silicone-based lubricant or even a bar of dry soap will do. Avoid oil-based products, which trap dirt and make things worse.
For a broken slider (the part you pull), the repair is even simpler. You can replace just the slider without touching the teeth. Buy a replacement slider that matches your zipper’s size, slide the old one off, and thread the new one on. Most outdoor retailers stock universal replacement sliders for around 5 to 10 dollars. This beats buying a new jacket by a factor of a hundred.
What to do next: Keep a small graphite pencil and a universal replacement slider in your repair kit. Test the zipper monthly on gear you use regularly, and address sticking before it becomes a break.
Patching Tears in Fabric and Nylon Effectively
Tears in outer shell fabric or pack material don’t have to spread. The key is catching them early and choosing the right patch method for your material.
For small tears (under two inches) in ripstop nylon, adhesive fabric patches work best. Clean and dry the area completely, then apply an adhesive patch slightly larger than the tear, pressing firmly for 30 seconds. These patches form a seal that holds in light rain and prevents the damage from growing. Seam Sealer or similar products can reinforce the edges if you want extra security.
Larger tears or tears in soft shell fabric call for a sewing approach. Use a patch cut from matching or similar ripstop material, and sew it over the tear with a running stitch using thread suited to your fabric type (nylon thread for nylon, etc.). A few simple rows of stitching create surprisingly strong repairs. If you’re worried about waterproofing after stitching, seal the stitched edges with waterproof fabric glue or seam sealer.
For our technical outerwear, we recommend our customers use patches designed for their specific material, whether that’s Gore-Tex or standard ripstop. A well-placed patch can restore functionality for years.
What to do next: Buy a small patch kit with both adhesive and sewn-patch options before your next trip. Test patches on old gear first so you know how they feel and hold up.
Resealing Seams to Restore Waterproofing
Seams are the weak point in any waterproof garment. They’re stitched with thousands of tiny holes, and over time, the tape or glue that seals them degrades.
If water is dripping through a seam rather than the fabric itself, resealing is your solution. Start by identifying which seam is leaking. A simple test: wear the jacket in light rain and note where water enters. Once you’ve found the culprit, let the jacket dry completely.
Next, peel back any old seam tape if it’s loose or visibly degraded. Clean the seam area with rubbing alcohol on a cloth to remove any old adhesive residue, dirt, or oils. Let it dry for at least 30 minutes. Then apply fresh seam sealer tape (available at any outdoor retailer) along the entire leaking seam, pressing firmly as you go. Pay extra attention to corners and where seams branch.
For a permanent fix, follow the seam tape with a liquid seam sealer applied with a small brush. This creates a waterproof seal that won’t peel away with repeated movement. Let it cure for 24 hours before wearing or washing the jacket.
This is one repair that truly extends gear life. A resealed jacket often performs like new for another season or two.
What to do next: Inspect your jackets’ seams after heavy rain. If you spot drips in the same location twice, reseal immediately rather than waiting for major failure.
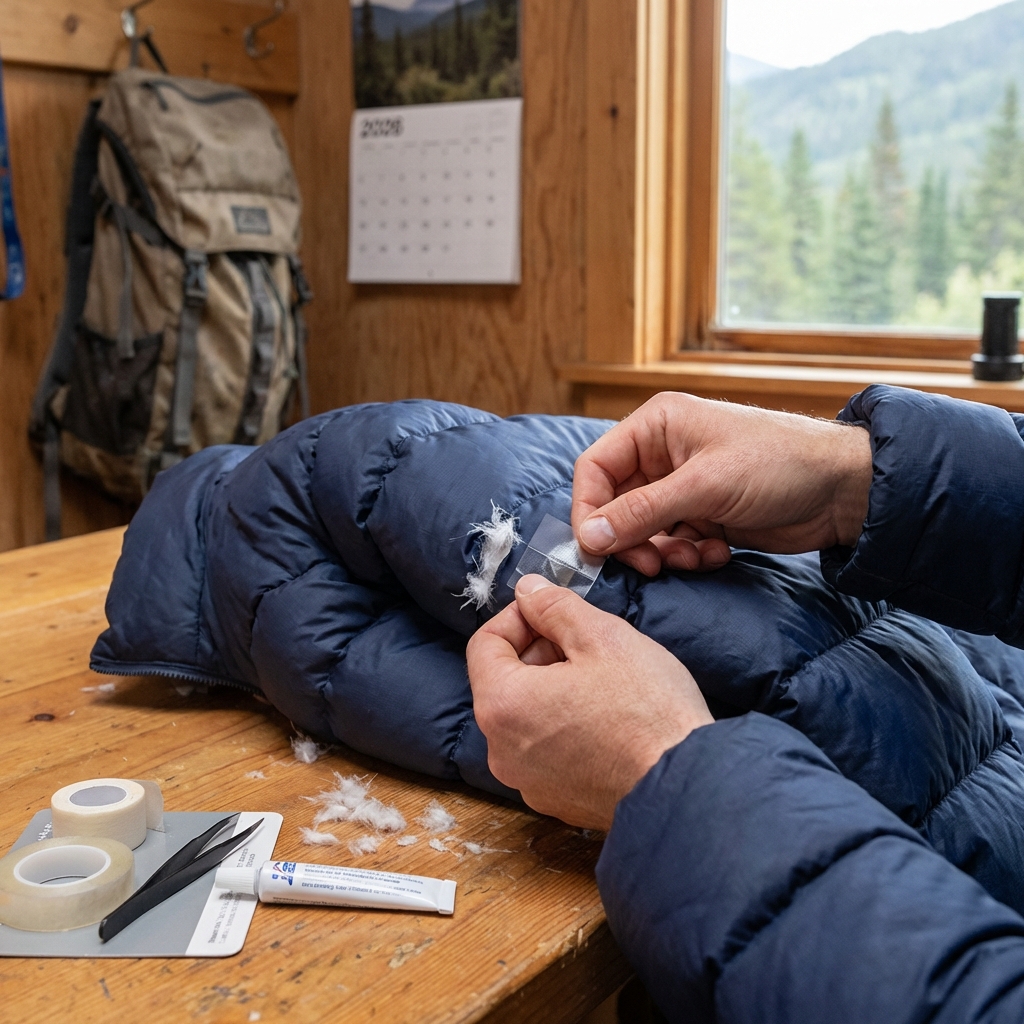
Repairing Puffer Jacket Down Leaks
Down and synthetic insulation can leak, leaving you with clumps of cold and a trail of white feathers. The good news is that small leaks are containable with a simple patch.
First, identify the leak. Put on the jacket indoors and gently puff or compress the insulation where you suspect the hole. Down escaping means you’ve found it. Mark the spot with a safety pin or marker.
Now comes the repair. Use a small adhesive patch or a sewn patch over the exterior of the leak. This stops future down loss immediately. But here’s the detail many people miss: inside the jacket, you need to contain the existing insulation. Cut a piece of nylon mesh or fine ripstop slightly larger than your external patch, and glue it to the interior facing, directly opposite the exterior patch. This cage prevents down from migrating out through the hole even if the exterior patch eventually fails.
For seam leaks (where insulation escapes along stitching), sewing a reinforcement patch over the seam on the interior of the jacket works well. You don’t need to pull the insulation out; just seal the opening.
What to do next: After washing or heavy compression, inspect your puffer for new leaks while it’s dry. Catching a pinhole leak before it becomes a half-dollar hole saves hours of repair work later.
Reinforcing High-Stress Seams and Stress Points
Certain seams break before others: armpit seams, where straps attach to packs, and the inside thigh seam of climbing pants. These areas bend, stretch, and stress thousands of times per use.
You can prevent failure by reinforcing these seams before they tear. The method is simple: add a second row of stitching parallel to the existing seam, just half an inch away. Use strong thread (upholstery thread or nylon thread works) and a running stitch with short intervals (every quarter inch). This distributes stress across two lines instead of one, nearly doubling durability.
For pack attachment points (where straps connect to the main bag body), use a small rectangular patch of webbing or ripstop glued and sewn over the stress point. Our best-selling backpacks incorporate reinforcement at these exact points because that’s where failure happens most. You can add the same engineering to your existing gear.
Pay attention to diagonal stress patterns. When a strap or seam runs at an angle through high-movement zones, reinforce it with a patch that runs perpendicular, creating a cross-brace effect.
What to do next: Before your next big trip, examine any gear you’ve used heavily. Look for seams that show wear marks or fabric discoloration (a sign of repeated stress). Reinforce those seams now, not after they fail.
Fixing Ripped Backpack Straps and Attachments
Backpack straps take a beating. They compress, rub against rock and branches, and hold substantial weight. When the outer nylon tears, the webbing underneath is exposed and degrades quickly.
A torn strap deserves immediate attention. Clean the area, let it dry completely, and apply a patch of matching ripstop or nylon webbing over the tear, sewing it down with multiple rows of strong stitching. If the strap is critical for weight distribution (a shoulder strap or hip belt), don’t rely on adhesive alone; sew the patch with at least two parallel rows of stitching, spaced about a quarter inch apart.
For attachment points where a strap connects to the pack body, this is where reinforcement truly pays off. If the stitching is intact but the material around it is fraying or torn, sew a small rectangular patch (roughly 2 by 3 inches) over the damaged area, stitching all four sides with short, tight intervals.
If the strap has started to separate from the pack body, re-glue it with flexible fabric adhesive before sewing. Press firmly for 30 seconds, let the glue set per the manufacturer’s instructions, then reinforce with stitching.
When checking our best selling backpacks, you’ll notice extra fabric and webbing at stress points. That’s intentional design to prevent these failures. You can apply the same principle to reinforce your existing pack.
What to do next: Test your backpack straps by pulling sideways and down with moderate force. If you feel any flex or hear creaking, that’s a sign the attachment is weakening. Reinforce it before your next loaded trip.
Quick Fixes for Boot and Footwear Damage
Boots take direct impact and abrasion, making them prone to scuffs, heel tears, and sole separation. Smart field repairs keep your feet protected and comfortable.
For scuffs and surface damage to the outer material, adhesive patches designed for footwear work well. Clean the area, dry it thoroughly, and apply a tough adhesive patch rated for shoes. These patches flex with your boot movement and bond reliably.
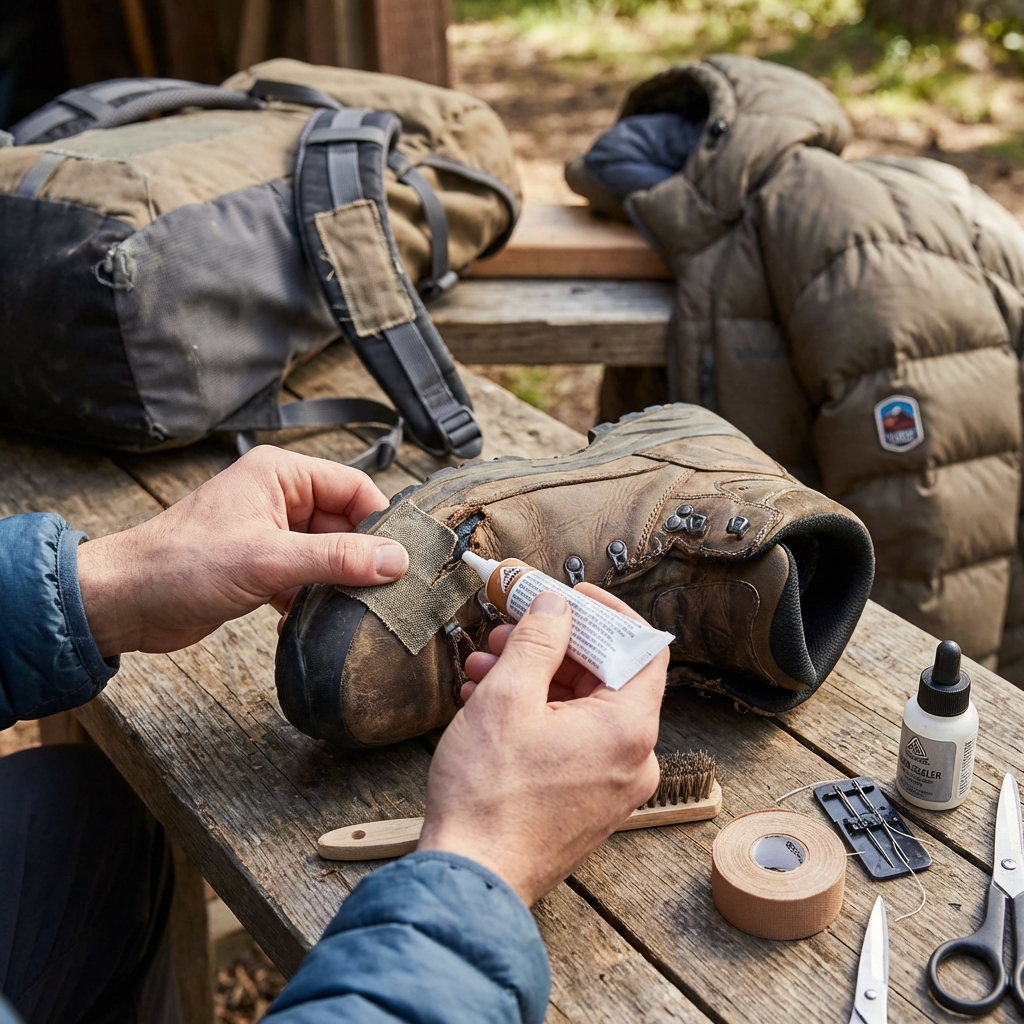
When the sole starts separating from the upper (a common failure point after many miles), you have two options. For a temporary fix in the field, waterproof tape wrapped tightly around the boot can hold the sole in place until you reach home. Once home, use a flexible footwear adhesive to reglue the sole, pressing hard and clamping the area (or weighing it down) for 24 hours.
For heel damage, where the heel counter material tears or wears, a patch applied to the interior and exterior of the heel area prevents further breakdown. This is especially important because heel integrity affects your entire gait and foot support.
Seams on boots need the same attention as seams on jackets. If you notice water seeping at a seam, reseal it with flexible seam sealer designed for footwear. Some sealers are designed to move with boot flexing, so they won’t crack like rigid products.
Our Verto FA Boots and other performance boots are engineered with reinforced heels, doubled stitching at stress points, and premium adhesives that resist breakdown. That foundation means repairs, when they’re needed, are straightforward and hold longer.
What to do next: After every muddy or wet hike, inspect your boots’ seams and attachment points while they’re still slightly damp. It’s easier to spot leaks and separation when water or moisture is visible.
—
Mastering these seven repairs means you’re investing in both sustainability and self-reliance. We design gear to last, and with these skills, you can keep your favorite jacket, pack, and boots working for years longer than they would without care. Start with one repair technique, practice it on older gear, and build your confidence. Your gear will thank you, and you’ll be ready for whatever the trail sends your way.
Ready for your next adventure? Gear up with apparel and equipment built for the wild. Explore the collection now.
Frequently Asked Questions (FAQ)
Can I repair my North Face gear myself, or should I send it to you?
We love that you want to extend the life of your gear! Many repairs are totally doable at home with basic supplies like seam sealer, patches, and a needle and thread. For complex issues like major down leaks or structural damage to your pack, we recommend our repair services to ensure your equipment gets back to peak performance.
What’s the best way to seal seams on our jackets to keep them waterproof?
We recommend using a quality seam sealer after patching any damage, applying it carefully along the seam lines on the inside of your jacket. Let it cure fully according to the product instructions before testing in wet conditions. This simple technique restores the waterproofing that keeps you protected on the trail.
How do I prevent future damage to my gear after making repairs?
We suggest inspecting your equipment regularly before trips, checking for small issues before they become big problems. Proper storage in a cool, dry place and using your gear within its intended conditions will help you get the most life out of your investment.
Leave a Reply